OAuth2 enables you to configure an external authentication method, such as LinkedIn or Facebook. In this section you find how to configure them.
The signer will see an additional external authentication option. A pop-up appears, where the signer has to enter his credentials to authenticate. eSignAnyWhere will receive a temporary token to receive some authentication information, which will be stored in the audit log of the envelope. You can integrate any external OAuth 2.0 service. For example the open source project OAuthServer (https://oauthserver.codeplex.com/) would enable you to connect your AD/LDAP via OAuth 2.0 and eSignAnyWhere, or you can implement your own OAuth 2.0 service.
The following two OAuth2 configuration examples (LinkedIn & Facebook) show you how to configure it. Because these two guides are external services the procedure may change by time. They should show you the basic concept tow to configure OAuth2
Note: To force a specific user the response must be JSON!
OAuth 2.0 (eID)
ID Austria
Please also see the following documentation about ID Austria (German documentation only): https://eid.egiz.gv.at/anbindung/direkte-anbindung/anbindung-oidc/
Step 1: Configure eSignAnyWhere
Open Settings > Identity Providers and add a new OAuth2 provider. Enter the ID Austria credentials as below.
| Client ID: | your Client ID |
| Client Secret: | your Client Secret |
| Scope: | openid profile |
| Authorization URI: | https://eid.egiz.gv.at/idp/profile/oidc/authorize |
| Token URI: | https://eid.egiz.gv.at/idp/profile/oidc/token |
| Logout URI: |
Please also see the next figures for the OAuth2 configuration and the JWT configuration:
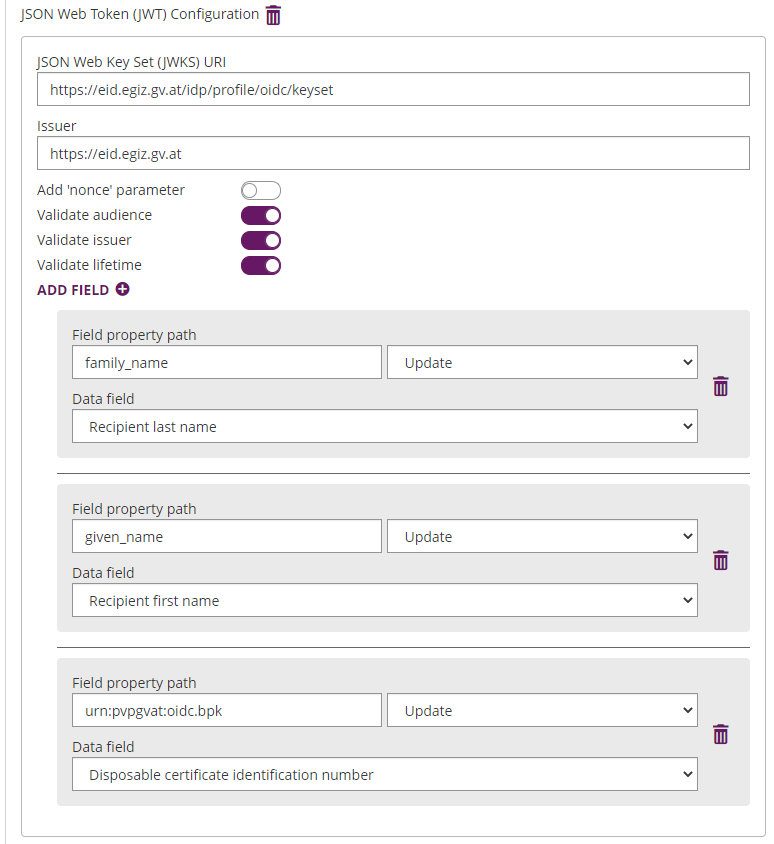
Please note that the disposable certificate identification number will be updated with this configuration. If you want to override the identification number as it is shown in the configuration please also make sure to add a disposable certificate for the signer.
OAuth 2.0 (LinkedIn)
Step 1: Create a new LinkedIn App
Go to your LinkedIn Account and create a new LinkedIn App. You have to enter a name (e.g. “my-eSAW-Authenticator”, a description, URL and some additional information). Once you have created your LinkedIn App you have to finish the configuration.
Step 2: Configure LinkedIn App
In your LinkedIn App you will find your (secret) client-id and client-secret, and the available scopes (e.g. r_basicprofile r_emailaddress). It is important to separate the scopes with space ” “.
You have to add a OAuth 2.0 forwarding URL. The URL for eSignAnyWhere is https://www.significant.com/esawviewer/HttpHandlers/AuthHandler.ashx.
Step 3: Configure eSignAnyWhere
Open the Settings > Organization page and add a new OAuth 2.0 provider. Enter the LinkedIn credentials as below (see LinkedIn documentation for current configuration!). The Identifier is your unique identifier for using with API. The ressources URIs are called for data, which will be stored in the audit-log.
| Client ID: | your Linked Client ID |
| Client Secret: | your LinkedIn Client Secret |
| Scope: | r_basicprofile r_emailaddress |
| Authorization URI: | https://www.linkedin.com/oauth/v2/authorization |
| Token URI: | https://www.linkedin.com/oauth/v2/accessToken |
| Logout URI: | https://www.linkedin.com |
| Ressource Parameter: | oauth2_access_token |
| Ressource URI: | https://api.linkedin.com/v1/people/~:(id,firstName,lastName,headline,email-address)?format=json |
 Ressources
LinkedIn and OAuth2: https://developer.linkedin.com/docs/oauth2
OAuth 2.0 (Facebook)
Step 1: Create a new Facebook App
Go to Facebook Developer, login and create a new Facebook App. You have to enter your App Name (e.g. “my-eSAW-Authenticator”), a contact email-address and a category.
Step 2: Configure your Facebook App
In your Facebook App dashboard and subpages you will find the API ID (similar to Client Token) and the App Secret (similar to Client Secret). You have to add a Facebook Login product to your app (OAuth2). In the settings page of your Facebook Login you can configure the OAuth Redirect URI (https://www.significant.com/esawviewer/HttpHandlers/AuthHandler.ashx).
For the scope you will need to add permissions, which can be found here. For this example we are using the following permissions: public_profile email user_about_me. It is important to separate the scopes with space ” “.
Step 3: Configure eSignAnyWhere
Open the Settings > Organization page and add a new OAuth 2.0 provider. Enter the Facebook credentials as below (see Facebook documentation for current configuration!). The Identifier is your unique identifier for using with API. The ressources URIs are called for data, which will be stored in the audit-log (see Facebook documentation).
| Client ID: | your Facebook App ID |
| Client Secret: | your Facebook App Secret |
| Scope: | public_profile email user_about_me |
| Authorization URI: | https://www.facebook.com/v2.8/dialog/oauth |
| Token URI: | https://graph.facebook.com/v2.8/oauth/access_token |
| Logout URI: | http://facebook.com |
| Ressource Parameter: | oauth_token |
| Ressource URI: | https://graph.facebook.com/v2.5/me?fields=id,name,first_name,middle_name,last_name,email,birthday |
The configured Ressource URI returns a JSON object with the specified parameter. These parameters can be defined in the fields to force a specific LinkedIn user to authenticate (e.g. email address). HINT: to see what data is returned in the Ressource URI send yourself an envelope and have a look in the audit trail. It contains the returned object with its parameter. Note: Parameter in Ressource URI of LinkedIn is not the same in the result (email vs. emailAddress).

The Ressource URI will return data of the profile. With the “Graph API Explorer” you can build and test your own profile requests. With the optional configuration of “Fields” you can define fields, which are checked for authentication. So you can force a specific user (e.g. identified via email, id or birthdate) to authenticate. Other users are not accepted.
{
  "id": "5761459xxxxxx",
  "name": "Firstname Lastname",
  "first_name": "Firstname",
  "last_name": "Lastname",
  "email": "some@email.com",
  "birthday": "01/01/2000"
}
Ressources
Facebook Developer: https://developers.facebook.com
Permissions: https://developers.facebook.com/docs/facebook-login/permissions/
Facebook API: https://developers.facebook.com/docs/graph-api/using-graph-api/
OAuth 2.0 (eSAW)
On-Premise only can configure the app (step 1 mentioned below). Otherwise please contact us.
Step 1: Create a new App
Create a new app in eSAW. You can find the OAuth settings in the section OAUTH APPS. You can configure the app with the following settings:
- Logo
- Name
- Description
- Redirect Urls
- In the settings you can also find the Client id and the Client Secret which are both necessary in the next steps.
Step 2: Configure eSignAnyWhere
Open the Settings > Organization page and add a new OAuth 2.0 provider. Enter the eSAW app credentials as below. Please see the following figure for more information about the configuration in eSAW:
We recommend to configure Resource Uris. If you configure a resource Uri it returns a JSON object with the specified parameter. These parameters can be defined in the fields to force a specific eSAW user to authenticate (e.g. email address). HINT: to see what data is returned in the Resource URI send yourself an envelope and have a look in the audit trail. It contains the returned object with its parameter. You can find a sample configuration in the next figure:
In the figure shown above the resource URI will return data of the profile with the following URI: https://demo.esignanywhere.net/api/v5/user/me. With the optional configuration of “Fields” you can define fields, which are checked for authentication. So you can force a specific user (e.g. identified via email, id or birth date) to authenticate. Other users are not accepted. In the figure above we configured one filed with the email address of the user and added the field in the URI. As response for this URI we get the following data shown in the audit trail:
{
"id": "39cbe455xxxxxx",
"email": "some@email.com",
"first_name": "Firstname",
"last_name": "Lastname",
}
If the user is not allowed to authenticate the following error will appear:
If authentication was successful you can find the app in Settings->Api Tokens and Apps in the section Apps and Connectors. Please see the next figure:
For more information about the signing process in eSAW please also see the next video:
Force a specific user to authentication
You can force a specific user to authentication via checks in the authenticator (based e.g. on userid or email). Via API you configure the authentication with a “check”.
<authentications>
  <authentication>
    <!-- CustomAuthenticationProvider will be mapped to GenericOAuthProvider -->
    <method>CustomAuthenticationProvider</method>
    <parameter>nameofprovider</parameter>
    <checks>
      <check compareOperation="equals" fieldId="userprofile" value="a232656-6656-5665"></check>
    </checks>
  </authentication>
  <authentication>
    <method>CustomOAuthProvider</method>
    <parameter>nameofprovider</parameter>
      <checks>
      <check compareOperation="equals" fieldId="useremail" value="jordan@xyzmo.com"></check>
          <check compareOperation="equals" fieldId="userprofile" value="a232336-6656-5665"></check>
    </checks>
  </authentication>
</authentications>