OAuth2 enables you to configure an external authentication method, such as LinkedIn or Facebook. In this section you find how to configure them.
The signer will see an additional external authentication option. A pop-up appears, where the signer has to enter his credentials to authenticate. eSignAnyWhere will receive a temporary token to receive some authentication information, which will be stored in the audit log of the envelope. You can integrate any external OAuth 2.0 service. For example the open source project OAuthServer (https://oauthserver.codeplex.com/) would enable you to connect your AD/LDAP via OAuth 2.0 and eSignAnyWhere, or you can implement your own OAuth 2.0 service.
The following chapters show, based on examples, how to configure OAuth2 authentication. Because some of these examples are based on external services, the procedure may change by time. They should show you the basic concept tow to configure OAuth2. Note: To force a specific user and configure validation rules, the OAuth2 provider must return a JWT token or offer a resource uri that provides user data in JSON format (e.g. an OIDC /userinfo endpoint)!
Samples of OAuth 2.0 Signer Authentication
Authenticate with LinkedIn
Step 1: Create a new LinkedIn App
Go to https://developer.linkedin.com/ and create a new LinkedIn App. You have to enter a name (e.g. “my-eSAW-Authenticator”, a description, URL and some additional information). Once you have created your LinkedIn App you have to finish the configuration.
Step 2: Configure LinkedIn App
In your LinkedIn App you will find your (secret) client-id and client-secret, and the available scopes (e.g. r_basicprofile r_emailaddress). It is important to separate the scopes with space ” “.
You have to add a OAuth 2.0 forwarding URL. The URL for eSignAnyWhere is https://www.significant.com/esawviewer/HttpHandlers/AuthHandler.ashx.
Step 3: Configure eSignAnyWhere
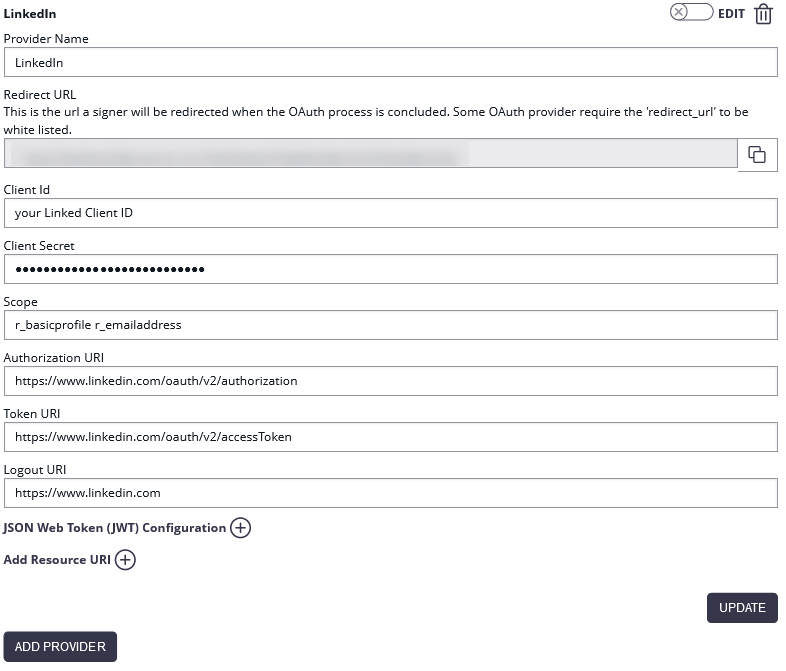
Open the Settings > Organization page and add a new OAuth 2.0 provider. Enter the LinkedIn credentials as below (see LinkedIn documentation for current configuration!). The Identifier is your unique identifier for using with API. The ressources URIs are called for data, which will be stored in the audit-log.
| Client ID: | your Linked Client ID |
| Client Secret: | your LinkedIn Client Secret |
| Scope: | r_basicprofile r_emailaddress |
| Authorization URI: | https://www.linkedin.com/oauth/v2/authorization |
| Token URI: | https://www.linkedin.com/oauth/v2/accessToken |
| Logout URI: | https://www.linkedin.com |
| Ressource Parameter: | oauth2_access_token |
| Ressource URI: | https://api.linkedin.com/v1/people/~:(id,firstName,lastName,headline,email-address)?format=json |
Authenticate with Facebook
Step 1: Create a new Facebook App
Go to Facebook Developer, login and create a new Facebook App. You have to enter your App Name (e.g. “my-eSAW-Authenticator”), a contact email-address and a category.
Step 2: Configure your Facebook App
In your Facebook App dashboard and subpages you will find the API ID (similar to Client Token) and the App Secret (similar to Client Secret). You have to add a Facebook Login product to your app (OAuth2). In the settings page of your Facebook Login you can configure the OAuth Redirect URI (https://www.significant.com/esawviewer/HttpHandlers/AuthHandler.ashx).
For the scope you will need to add permissions, which can be found here. For this example we are using the following permissions: public_profile email user_about_me. It is important to separate the scopes with space ” “.
Step 3: Configure eSignAnyWhere
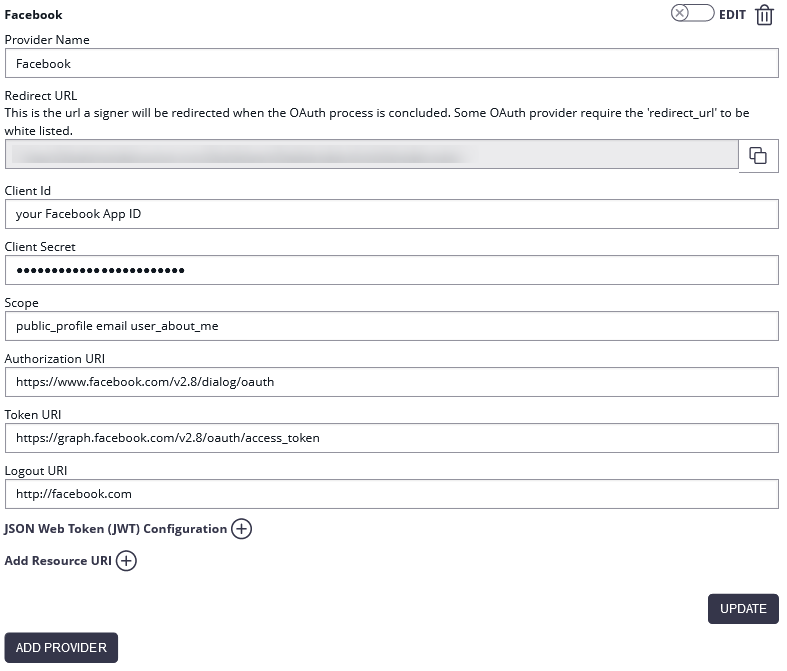
Open the Settings > Organization page and add a new OAuth 2.0 provider. Enter the Facebook credentials as below (see Facebook documentation for current configuration!). The Identifier is your unique identifier for using with API. The ressources URIs are called for data, which will be stored in the audit-log (see Facebook documentation).
| Client ID: | your Facebook App ID |
| Client Secret: | your Facebook App Secret |
| Scope: | public_profile email user_about_me |
| Authorization URI: | https://www.facebook.com/v2.8/dialog/oauth |
| Token URI: | https://graph.facebook.com/v2.8/oauth/access_token |
| Logout URI: | http://facebook.com |
| Ressource Parameter: | oauth_token |
| Ressource URI: | https://graph.facebook.com/v2.5/me?fields=id,name,first_name,middle_name,last_name,email,birthday |
The configured Ressource URI returns a JSON object with the specified parameter. These parameters can be defined in the fields to force a specific LinkedIn user to authenticate (e.g. email address). HINT: to see what data is returned in the Ressource URI send yourself an envelope and have a look in the audit trail. It contains the returned object with its parameter. Note: Parameter in Ressource URI of LinkedIn is not the same in the result (email vs. emailAddress).
The Ressource URI will return data of the profile. With the “Graph API Explorer” you can build and test your own profile requests. With the optional configuration of “Fields” you can define fields, which are checked for authentication. So you can force a specific user (e.g. identified via email, id or birthdate) to authenticate. Other users are not accepted.
{
  "id": "5761459xxxxxx",
  "name": "Firstname Lastname",
  "first_name": "Firstname",
  "last_name": "Lastname",
  "email": "some@email.com",
  "birthday": "01/01/2000"
}
Ressources
Facebook Developer: https://developers.facebook.com
Permissions: https://developers.facebook.com/docs/facebook-login/permissions/
Facebook API: https://developers.facebook.com/docs/graph-api/using-graph-api/
Authenticate with eSignAnyWhere
This configuration allows to authenticate with an eSignAnyWhere account. The authentication information will be added to the Audit Trail, as evidence that the signer was the intended one. Recommended for use cases where internal signers are invited to sign, and signature methods such as ClickToSign should be used.
Step 1: Create a new OAuth App in eSAW AdminWeb
Only customers running their own On-Premise instance configure the OAuth Application (i.e. the authentication method on the identity provider side) themselves. On Private-SaaS and Shared-SaaS instances, ask Namirial staff to create this app on the OAuth identity provider side for your instance.
Create a new app in eSAW. You can find the OAuth settings in the section OAUTH APPS. You can configure the app with the following settings:
- Logo (optional)
- Name
- Description
- Redirect Urls
- The allow-list of redirect URIs depends on which external environments want to authenticate using eSignAnyWhere Login as authentication method.
- When configuring Signer Authentication for eSignAnyWhere using the eSignAnyWhere OAuth Identity Provider, the URI is shown in the WebUI where you are configuring the authentication method (see Step 2, value "Redirect Url").
When configuring WebUI User Authentication for eSignAnyWhere using the eSignAnyWhere OAuth Identity Provider (e.g. to log in using eSAW credentials from another instance), the URI is shown in the WebUI where you are configuring the authentication method (similar to step2, but in the section "User Authentication").
- In the settings you can also find the Client id and the Client Secret which are both necessary in the next steps.
Step 2: Configure Signer Authentication using eSignAnyWhere
This configuration allows the sender of an envelope to define that the signer has to authenticate with an eSAW WebUI login before getting access to the document.
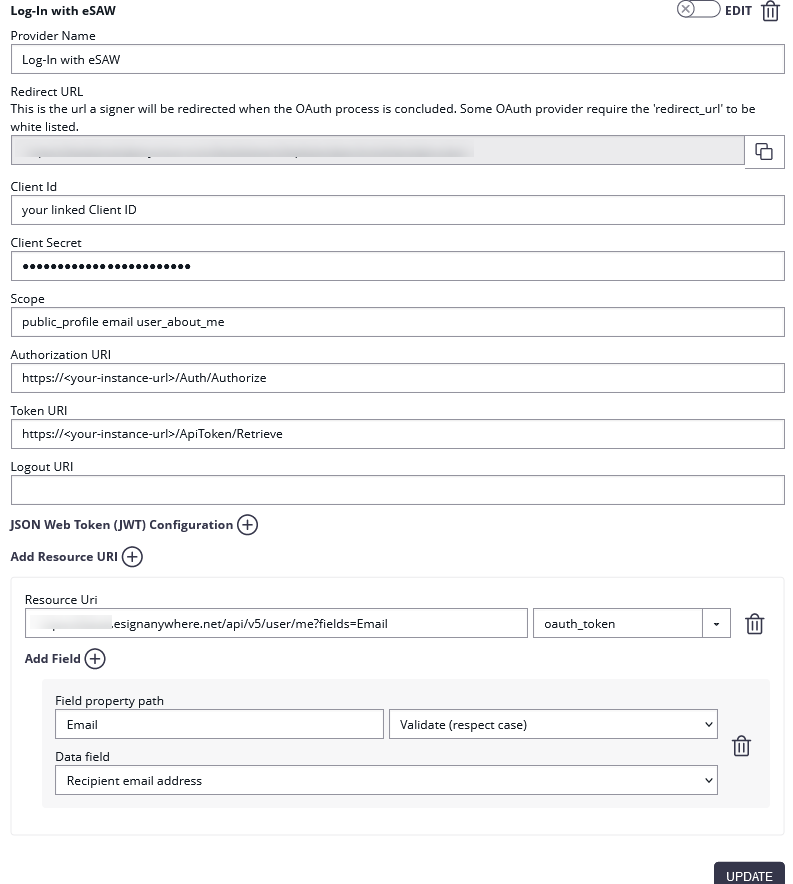
Open the Settings > Identity Providers page and add a new OAuth 2.0 provider. Enter the eSAW app credentials as below.
| Client ID: | your linked Client ID |
| Client Secret: | your linked Client Secret |
| Scope: | |
| Authorization URI: | https://<your-instance-url>/Auth/Authorize |
| Token URI: | https://<your-instance-url>/ApiToken/Retrieve |
| Logout URI: | |
| Ressource Parameter: | oauth_token |
| Ressource URI: | https://<your-instance-url>/api/v5/user/me?fields=Email |
The Ressource URI allows to define a validation rule, to ensure that the recipient himself performs the login (and not just any account on that instance).
Therefore, configure a validation rule of the value "Email" (returned from the resource uri) against the recipient's email address. The resource Uri returns a JSON object with the specified parameter. These parameters can be defined in the fields to force a specific eSAW user to authenticate (e.g. email address).
Example response of the user/me endpoint, containing the data which can be used for data validation rules:
{
"Id": "39cbe455xxxxxx",
"Email": "j.doe@example.com",
"FirstName": "John",
"LastName": "Doe",
}
Please see the following figure for more information about the configuration in eSAW:
(Hint: in some older product versions, this settings had been located in Settings-Organization, section "OAuth Settings").
HINT: to see what data is returned in the Resource URI send yourself an envelope and have a look in the audit trail. It contains the returned object with its parameter.
The response of the resource URI will also be logged in the audit trail (which might be important in scenarios where you just enforce that someone performs the login, in case you do not validate for a specific user email).
If the user is not allowed to authenticate an error will appear.
If authentication was successful, the signer will be logged in and SAW Viewer will grant access to the document.
After a successful login, the granted access for the OAuth Application is shown in Settings->Api Tokens and Apps in the section Apps and Connectors: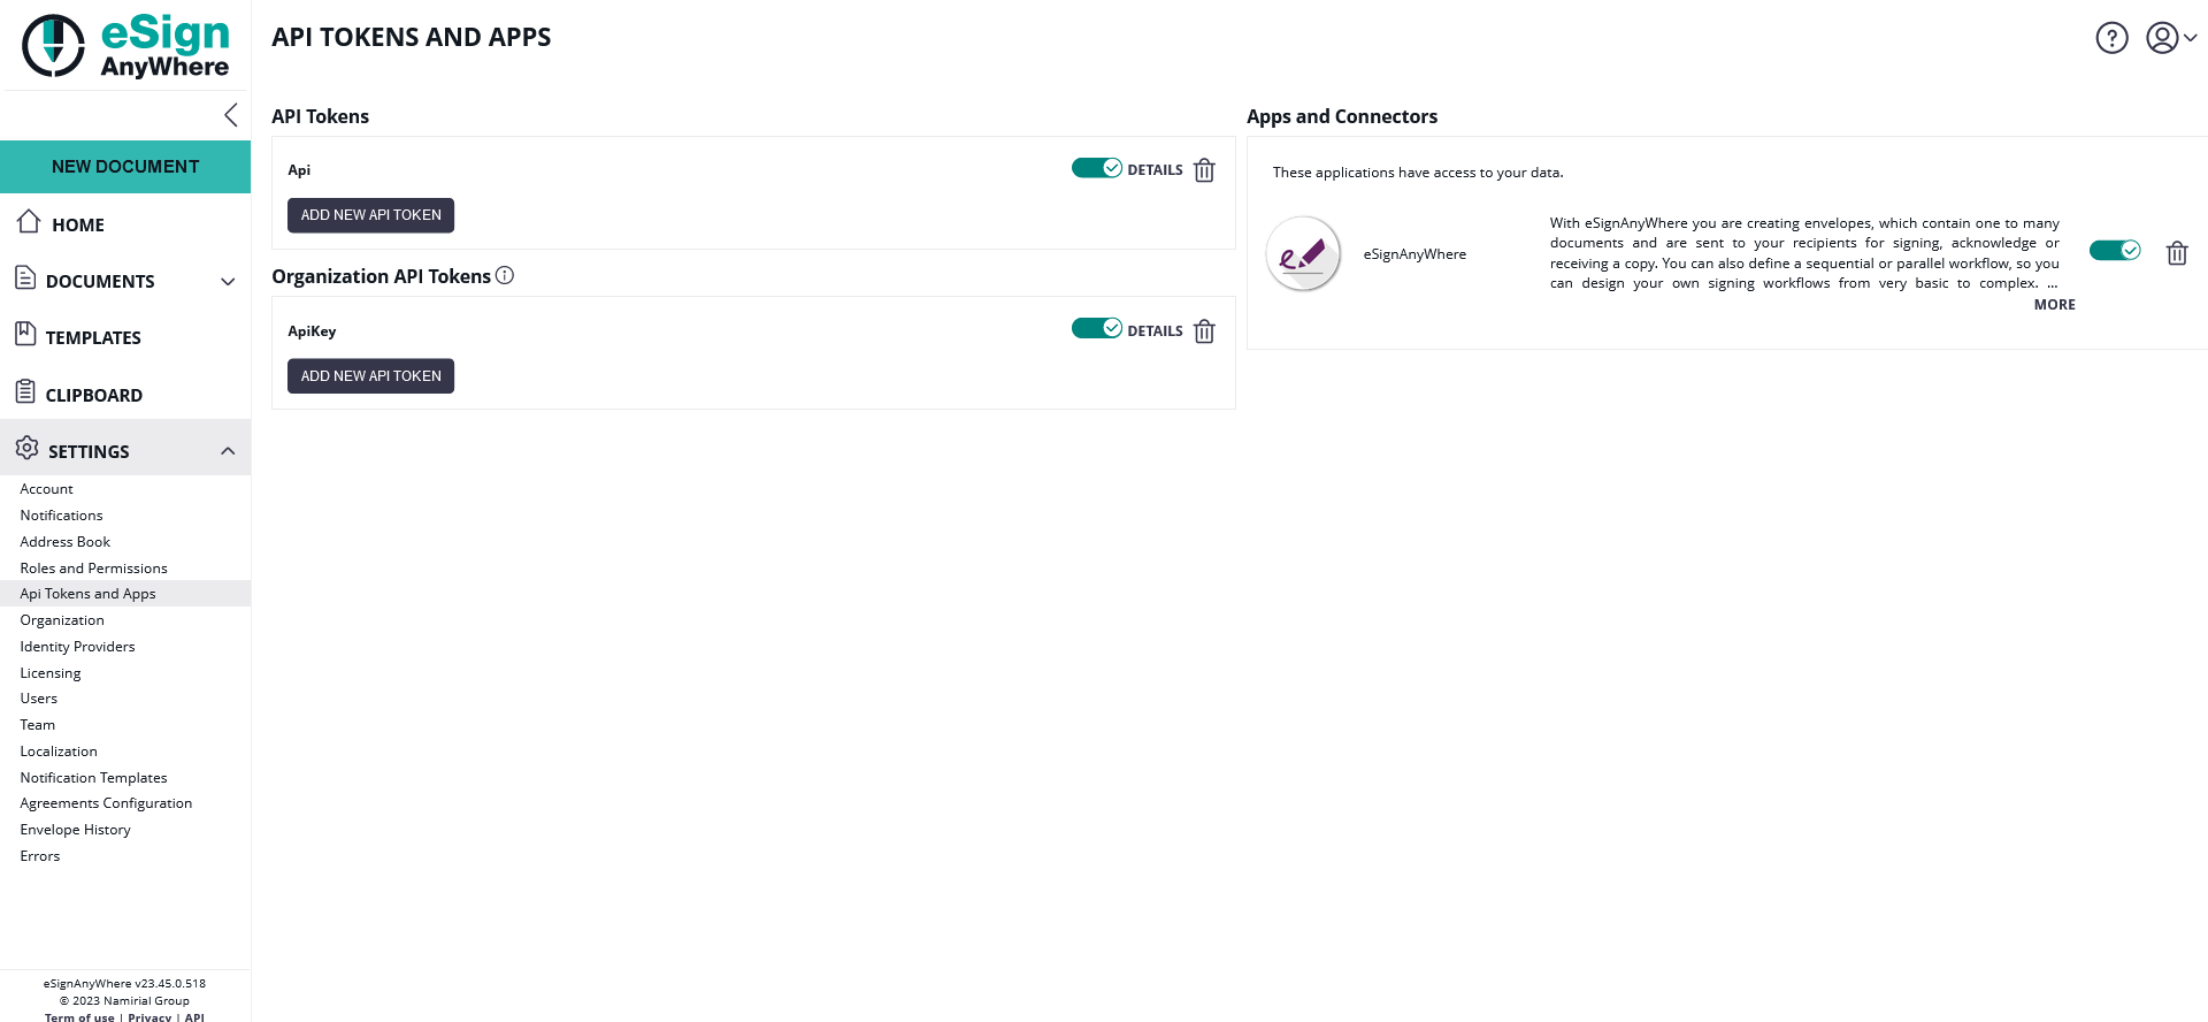
For more information about the signing process in eSAW please also see the next video:
Force a specific user to authentication via API
You can force a specific user to authentication via checks in the authenticator (based e.g. on userid or email). Via API you configure the authentication with a “check”.
<authentications>
  <authentication>
    <!-- CustomAuthenticationProvider will be mapped to GenericOAuthProvider -->
    <method>CustomAuthenticationProvider</method>
    <parameter>nameofprovider</parameter>
    <checks>
      <check compareOperation="equals" fieldId="userprofile" value="a232656-6656-5665"></check>
    </checks>
  </authentication>
  <authentication>
    <method>CustomOAuthProvider</method>
    <parameter>nameofprovider</parameter>
      <checks>
      <check compareOperation="equals" fieldId="useremail" value="jordan@xyzmo.com"></check>
          <check compareOperation="equals" fieldId="userprofile" value="a232336-6656-5665"></check>
    </checks>
  </authentication>
</authentications>
Samples of OAuth 2.0 Signer Identification
In this section, we are describing OAuth 2.0 based solutions for strong identification of signers, with technical possibilities to retrieve data (e.g. for issuance of a QEC). Please note that legal aspects and the allowance of its use in specific scenarios need to be checked in the Trust Service Provider's Operative Manual or contractual agreements.
Video Identification - Namirial LiveID+
The Namirial LiveID+ video identification can be inserted into identification processes using an OAuth 2.0 Authentication / Identification configuration. As LiveID+ is not offering an OAuth 2.0 endpoint itself, this is implemented in "LIP OAuth Wrapper".
Step 1: Request to create an organization in LiveID+ configuration, and configure the required identification process
The underlying LiveID+ configuration needs to be done by Namirial staff.
As a result, you will get
- an organization identifier in LiveId+
- a process identifier
Step 2: Request registration of a new Application in LIP OAuth Wrapper
This needs to be done by Namirial staff. Please provide following information:
- Request to create an OAuth application for the LIP OAuth Wrapper for a code grant flow with eSignAnyWhere. You need to receive, as result of the request, a client_id and client_secret.
Note that the LIP OAuth Wrapper is an optional add-on to eSignAnyWhere and must therefore be installed on the eSAW instance as a precondition. - eSignAnyWhere redirect URI which needs to be whitelisted in the MyNamirial configuration
- Provide your eSignAnyWhere organization's customization ID, and which LiveID+ organization and LiveID+ process should be linked with it
Step 3: Configure eSignAnyWhere
- Login to eSignAnyWhere with a user that has administrative permissions on your Organization.
- Open the Settings > Identity Providers page and add new OAuth Settings for Signer Authentication.
| Provider Name | This name will be displayed in the Authentication dialog in SignAnyWhere Viewer, so make sure it identifies your organization. e.g.: Video Ident with LiveId+ |
| Redirect Url | This is already set and has to be white listed on LIP OAuthWrapper. We already provided this URL in the request in Step 2. |
Client Id | your "Application (client) ID" from Step 2 |
| Client Secret: | your secret's value from Step 2 |
| Scope: | |
| Authorization URI: | https://<your-esaw-instance>/OAuthWrapperLiveIdPlus/api/authorize |
| Token URI: | https://<your-esaw-instance>/OAuthWrapperLiveIdPlus/api/getToken |
| Logout URI: | can be blank |
| JWKS URI: | https://<your-esaw-instance>/OAuthWrapperLiveIdPlus/Jwk/getJwks |
| Issuer: | https://<your-esaw-instance>/OAuthWrapperLiveIdPlus |
| On-Off Sliders: |
|

And then configure the following field mappings:
| Field property path | Validate/Update | Data Field |
|---|---|---|
| firstname | Update | Recipient First Name |
| lastname | Update | Recipient Last Name |
| identificationType | Update | Disposable Certificate identification type |
| recognitionType | Update | Disposable Certificate document type |
| identificationNumber | Update | Disposable Certificate identification number |
| phone | Update | Disposable Certificate phone number |
| Validate | Recipient Email | |
| documentIssuingCountry | Update | Disposable Certificate document issuing country |
| documentIssuingOrganisation | Update | Disposable Certificate document issued by |
| documentNumber | Update | Disposable Certificate document number |
| documentIdentificationCountry | Update | Disposable Certificate identification country |
| documentIssueDate | Update | Disposable Certificate document issued on |
| documentExpireDate | Update | Disposable Certificate document expiry date |
(if you want to disallow proceeding with data corrected by the video identification agent, change additional mappings from "Update" to "Validate". But note that e.g. small deviations in the name might then disallow to proceed)
and then,
- Click on Update to save the configuration
- Click on the slider to enable the OAuth provider
Step 4: Send envelopes using the LiveID+ identification
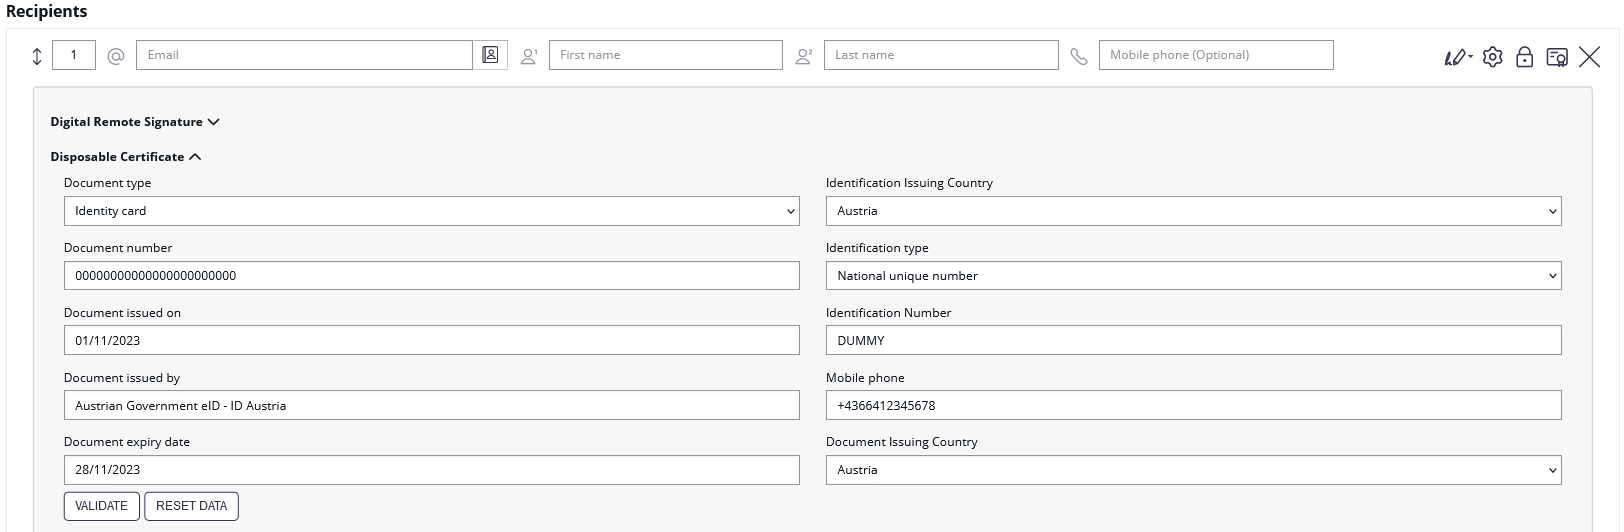
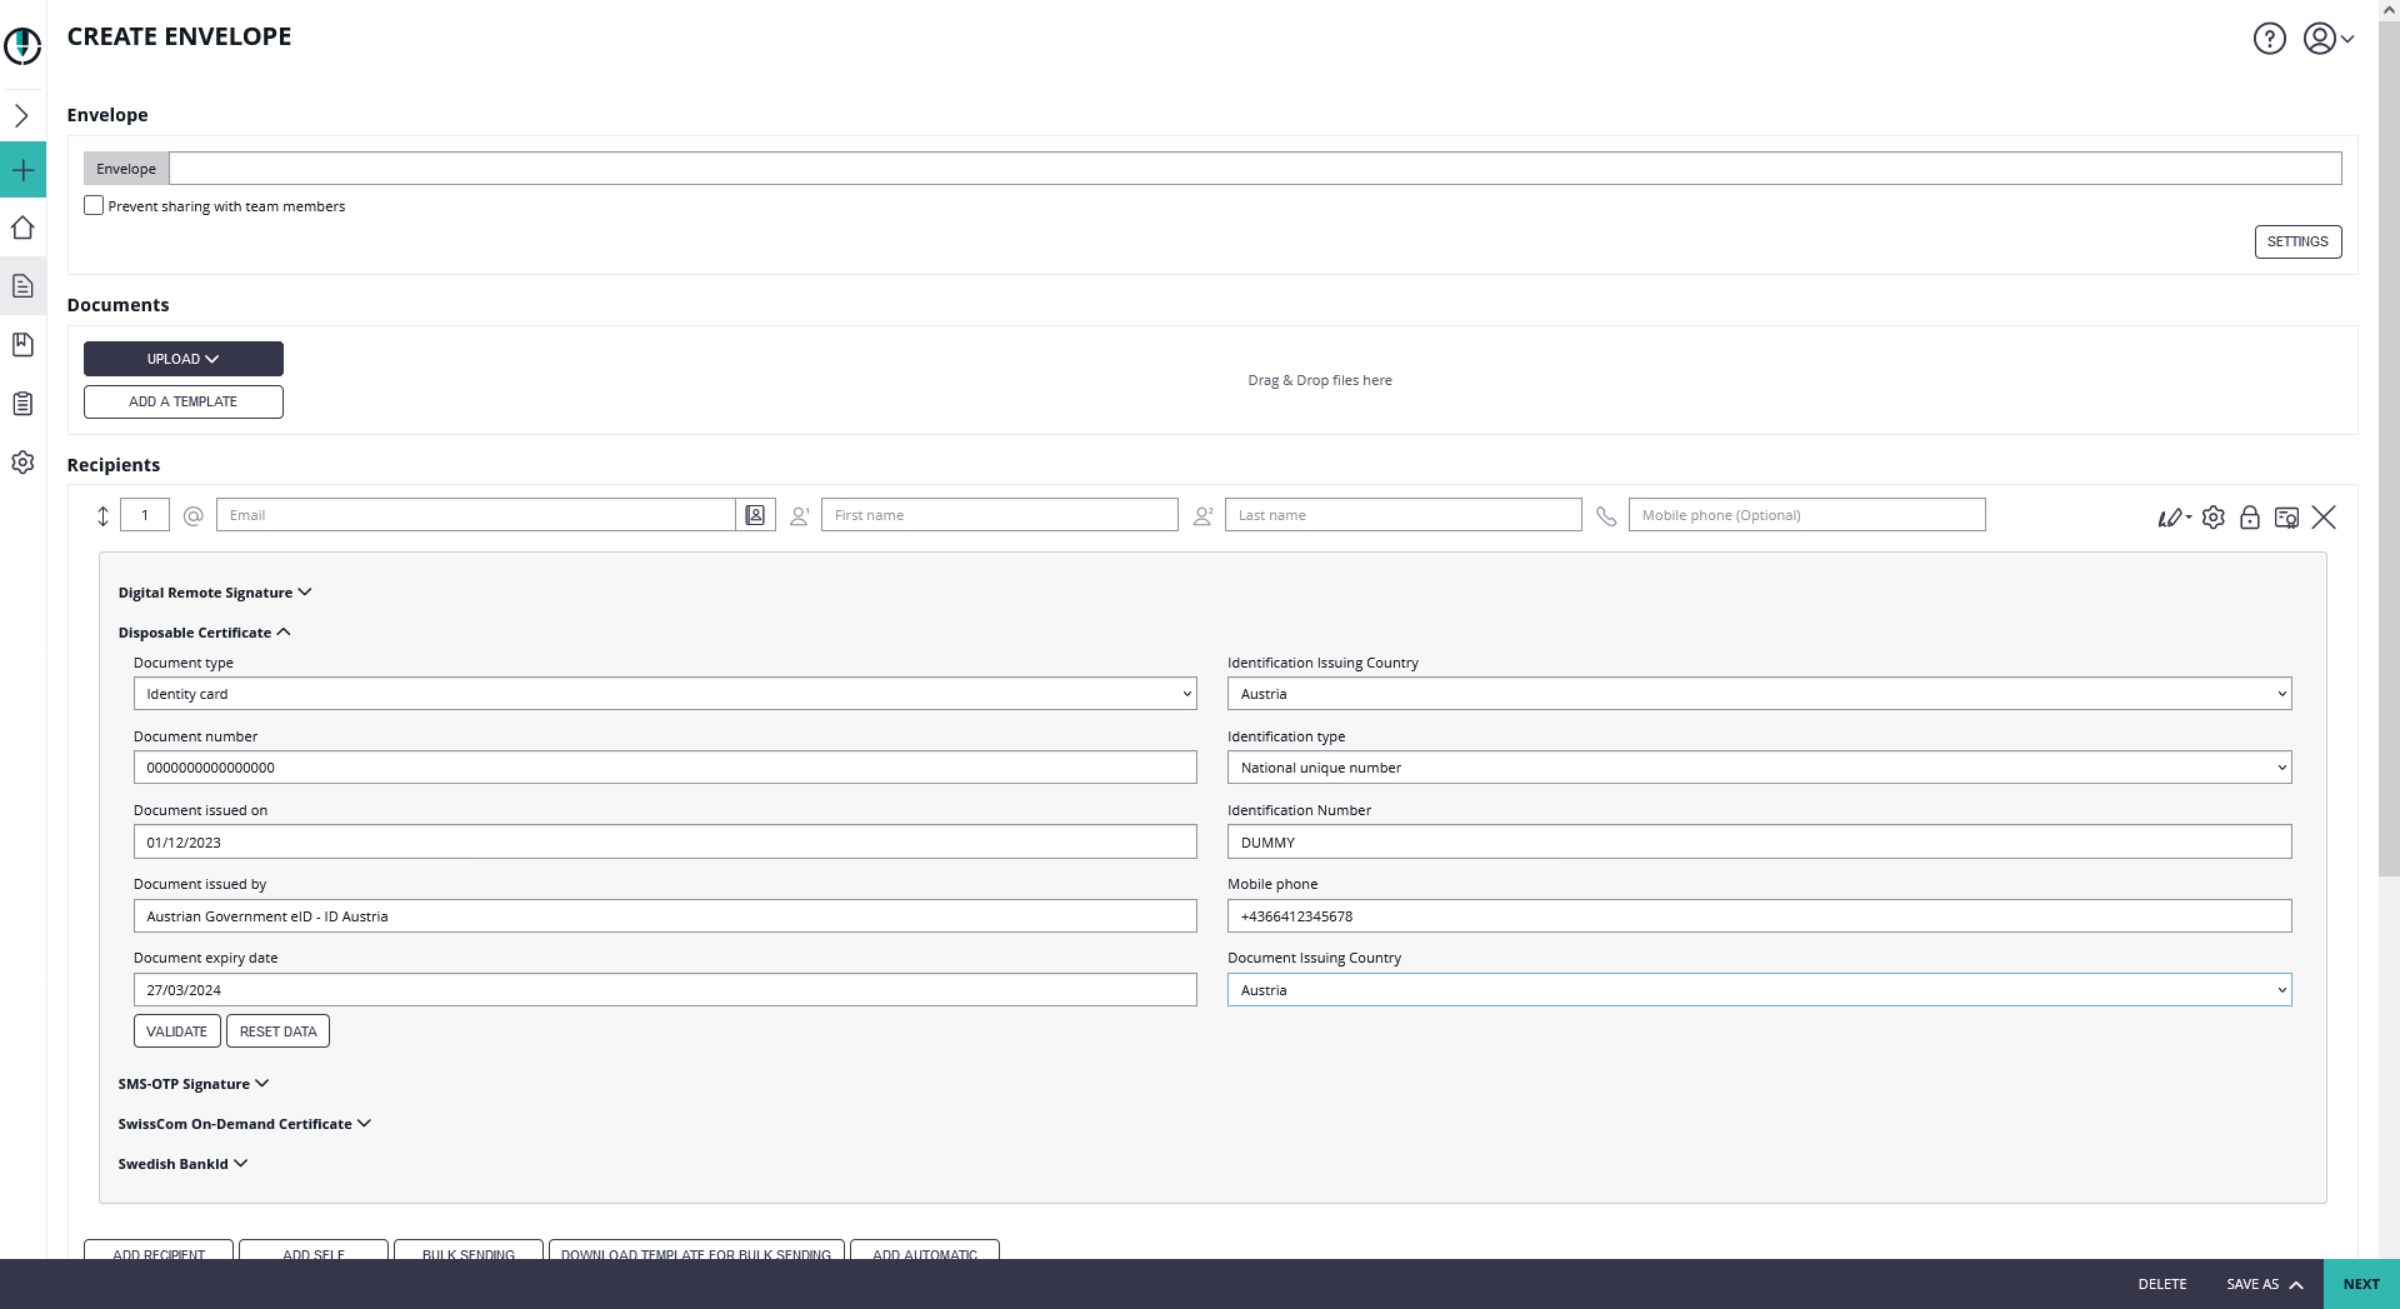
When sending an envelope using eSignAnyWhere Web UI, select the identification provider in the Envelope Create wizard's Recipients Page. The identification provider is listed in the expandable area of the recipient's activity, accessible through the "lock" symbol (Identification methods are listed in a separate section directly below the Authentication methods)
Identify using SignD SmartIdent
An alternative is to perform identification using the SmartIdent solution offered by SignD. It can be inserted into identification processes using an OAuth 2.0 Authentication / Identification configuration.
Step 1: Obtain SmartIdent credentials
It will therefore necessary to mention the "OAuth Redirect URI" to SignD, to perform the necessary whitelisting. The URI can be seen in your eSAW Instance, Settings - Identity Providers, when creating a new Signer Authentication.
As a result, you will receive client_id and client_secret.
Step 2: Configure eSignAnyWhere
- Login to eSignAnyWhere with a user that has administrative permissions on your Organization.
- Open the Settings > Identity Providers page and add new OAuth Settings for Signer Authentication.
| Provider Name | This name will be displayed in the Authentication dialog in SignAnyWhere Viewer, so make sure it identifies your organization. e.g.: SmartIdent |
| Redirect Url | This is already set and has to be white listed on SignD side. We already provided this URL in the request in Step 1. |
Client Id | your "Application (client) ID" from Step 1 |
| Client Secret: | your secret's value from Step 1 |
| Scope: | openid flat |
| Authorization URI: | https://openid.signd.id/v1/oauth/authorize |
| Token URI: | |
| Logout URI: | can be blank |
| JWKS URI: | |
| Issuer: | |
| On-Off Sliders: |
|

And then configure the following field mappings:
| Field property path | Validate/Update | Data Field |
|---|---|---|
| identification_individual_first_name | Update | Recipient First Name |
| identification_individual_last_name | Update | Recipient Last Name |
| identification_id_recognition_type | Update | Disposable Certificate document type |
| identification_id_type | Update | Disposable Certificate identification type |
| identification_id_number | Update | Disposable Certificate document number |
| identification_individual_mobile_number | Update | Disposable Certificate phone number |
| sub | Update | Disposable Certificate identification number |
| identification_id_issuing_country | Update | Disposable Certificate document issuing country |
| identification_id_expeditor | Update | Disposable Certificate document issued by |
| identification_id_issuing_country | Update | Disposable Certificate identification country |
| identification_id_issuing_date | Update | Disposable Certificate document issued on |
| identification_id_expiration_date | Update | Disposable Certificate document expiry date |
(if you want to disallow proceeding with data corrected by the video identification agent, change additional mappings from "Update" to "Validate". But note that e.g. small deviations in the name might then disallow to proceed)
and then,
- Click on Update to save the configuration
- Click on the slider to enable the OAuth provider
Step 3: Send envelopes using SmartIdent identification
When sending an envelope using eSignAnyWhere Web UI, select the identification provider in the Envelope Create wizard's Recipients Page. The identification provider is listed in the expandable area of the recipient's activity, accessible through the "lock" symbol (Identification methods are listed in a separate section directly below the Authentication methods)
Identification using national eID implementations
Many eID implementations across EU are offering OAuth 2.0 based integration options.
ID Austria (Austria)
When talking about ID Austria, we have to distinguish 3 different environments which the Austrian government offers:
"E-ID Serviceprovider (Q)" environment, which is a test environment and therefore does not require complex accreditation process.
"E-ID Serviceprovider" environment, which is the production environment.
Early Adopters environment which was used as testing environment before E-ID Serviceprovider (Q) went online
Test Environment - USP Service "E-ID Serviceprovider (Q)"
Please also see the following documentation about ID Austria (German documentation only): https://eid.egiz.gv.at/anbindung/direkte-anbindung/anbindung-oidc/
Mind, that the test environment ("E-ID Serviceprovider (Q)") works just with test identities, not with your individual "Handysignatur" or "ID Austria". Read https://eid.egiz.gv.at/anbindung/testidentitaeten/ for more details.
Step 1: Create "Service Provider" in USP.GV.AT
- Assign necessary "Verfahrensrechte"
as described in https://eid.egiz.gv.at/anbindung/registrierung/registrierung-von-privaten-service-providern/ - Create your Service provider
as described in https://eid.egiz.gv.at/anbindung/registrierung/registrierung-von-privaten-service-providern/ Undergo the necessary accreditation steps (on test environment (Q) the accreditation will be completed within one hour automatically without "real" accredidation)
On every status change, you will get an automatic email so that you know when you can proceed:From: sp-registrierung@brz.gv.at <sp-registrierung@brz.gv.at>
To: <your USP registered email address>
Subject: Status Ihres ServiceProvider "eSignAnyWhere Demo" wurde aktualisiert. Umgebung Q
Sehr geehrte Damen und Herren,
Der Status eines Ihrer Serviceprovider "<Service Provider name)" wurde geändert. Für mehr Informationen gehen Sie bitte auf <Link to USP administrative interface for the service provider>.
Mit freundlichen Grüßen- Don't forget to activate your service provider version.
As a result, you know the (self-defined) client-ID (must be an URL) and your client-secret.
Step 2: Configure eSignAnyWhere
Open Settings > Identity Providers and add a new OAuth2 provider. Enter the ID Austria credentials and configuration values as below.
| Client ID: | your Client ID |
| Client Secret: | your Client Secret |
| Scope: | openid profile |
| Authorization URI: | https://eid2.oesterreich.gv.at/auth/idp/profile/oidc/authorize |
| Token URI: | https://eid2.oesterreich.gv.at/auth/idp/profile/oidc/token |
| Logout URI: | |
| JWKS URI: | |
| Issuer: | https://eid2.oesterreich.gv.at |
| On-Off Sliders: |
|

The URIs are documented in https://eid.egiz.gv.at/anbindung/direkte-anbindung/anbindung-oidc/ - if above's URIs don't work, check if there was an update on this page.
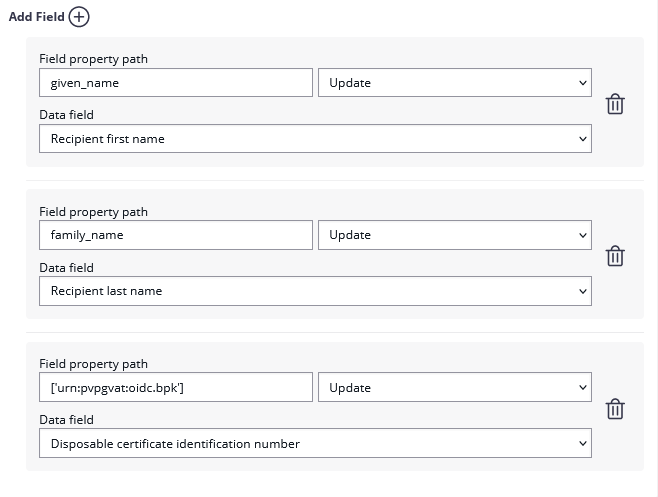
Add the following field mapping configurations:
| Field property path | Validate/Update | Data Field |
|---|---|---|
| given_name | Update | Recipient First Name |
| family_name | Update | Recipient Last Name |
| ['urn:pvpgvat:oidc.bpk'] | Update | Disposable Certificate identification number |
After setting these values, the JWT and field mapping configuraiton should look similar to the following screenshot.
Please note that the disposable certificate identification number will be updated with this configuration. If you want to override the identification number as it is shown in the configuration please also make sure to add a disposable certificate for the signer.
Production Environment - USP Service "E-ID Serviceprovider"
Registration steps are similar to the one explained above for the test environment. Note that it requires for production use an acceditation and approval process triggered via USP, which may take some time.
Configuration is similar to the settings described above for "E-ID Serviceprovider (Q)" but with following changes (in short: "eid" instead of "eid2" in all URIs):
| Authorization URI: | https://eid.oesterreich.gv.at/auth/idp/profile/oidc/authorize |
| Token URI: | https://eid.oesterreich.gv.at/auth/idp/profile/oidc/token |
| JWKS URI: | |
| Issuer: | https://eid.oesterreich.gv.at |
Early Adopter Environment
Please also see the following documentation about ID Austria (German documentation only): https://eid.egiz.gv.at/anbindung/direkte-anbindung/anbindung-oidc/
Step 1: Request early adopter access
Current process is published on ID Austria related technical documentation. In the past, it was a process that required to obtain client_secret via an email request.
We understood that registration for the "early adopter" environment is not available any more and interrested service providers should register for the "E-ID Serviceprovider (Q)" test environment via USP.GV.AT (see above).
Step 2: Configure eSignAnyWhere
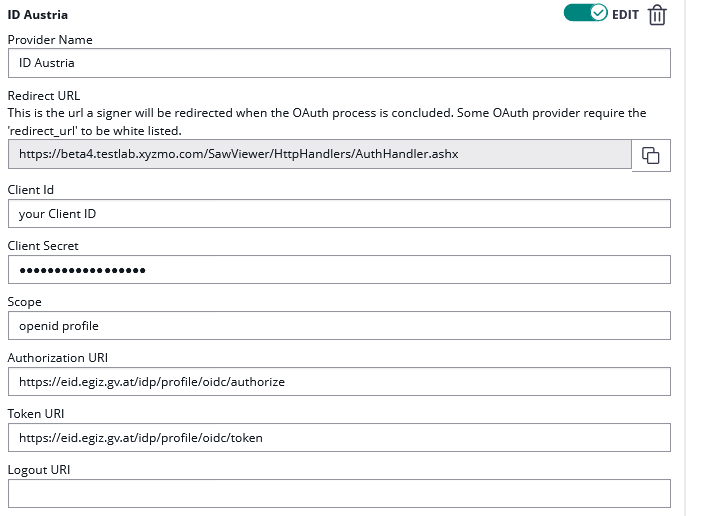
Open Settings > Identity Providers and add a new OAuth2 provider. Enter the ID Austria credentials as below.
| Client ID: | your Client ID |
| Client Secret: | your Client Secret |
| Scope: | openid profile |
| Authorization URI: | https://eid.egiz.gv.at/idp/profile/oidc/authorize |
| Token URI: | https://eid.egiz.gv.at/idp/profile/oidc/token |
| Logout URI: |
Please also see the next figures for the OAuth2 configuration and the JWT configuration:
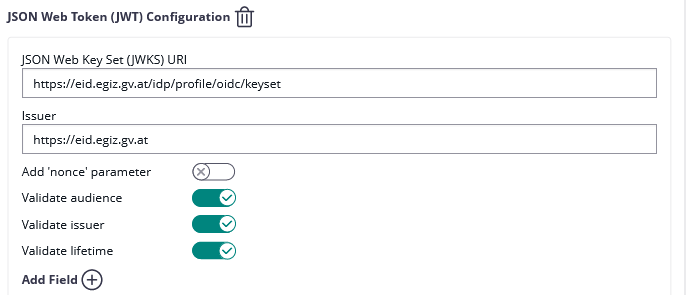
Add the following field mapping configurations:
| Field property path | Validate/Update | Data Field |
|---|---|---|
| given_name | Update | Recipient First Name |
| family_name | Update | Recipient Last Name |
| ['urn:pvpgvat:oidc.bpk'] | Update | Disposable Certificate identification number |
Please note that the disposable certificate identification number will be updated with this configuration. If you want to override the identification number as it is shown in the configuration please also make sure to add a disposable certificate for the signer.
Czech BankID (Czech Republic)
As the Czech BankID is offering an OAuth 2.0 / OIDC endpoint, it can be integrated very similar to e.g. ID Austria.
Technical documentation is available at https://developer.bankid.cz/ - or as we did already do a proof of concept (PoC), we will be able to provide further details on request.
It's Me (Belgium)
According to the available documentation of the provider, we expect it can be used easily. In case of open questions, feel free to get in contact with us.
Verimi (Germany)
According to the available documentation of the provider, we expect it can be used. An OAuth to OAuth MTLS Proxy might be technically necessary. In case of open questions, feel free to get in contact with us.
Yes (Germany)
as we did already do a proof of concept (PoC), we will be able to provide further details on request. An OAuth to OAuth MTLS Proxy is technically necessary.
MitID (Denmark)
According to the available documentation of the provider, we expect it can be used easily. In case of open questions, feel free to get in contact with us.
FranceConnect (France)
According to the available documentation of the provider, we expect it can be used easily. In case of open questions, feel free to get in contact with us.
BankID (Norway)
According to the available documentation of the provider, we expect it can be used easily. In case of open questions, feel free to get in contact with us.
Buypass (Norway)
According to the available documentation of the provider, we expect it can be used easily. In case of open questions, feel free to get in contact with us.
FranceConnect (France)
According to the available documentation of the provider, we expect it can be used easily. In case of open questions, feel free to get in contact with us.
Freja eID (Sweden)
According to the available documentation of the provider, we expect it can be used easily. In case of open questions, feel free to get in contact with us.
Phenix (Sweden)
Phenix is acting as a proxy to various ID services. As the proxy itself is not issuing/confirming the identities, an extra compliancy check might be necessary. According to the available documentation of the provider, we expect it can be used easily from a technical point of view. In case of open questions, feel free to get in contact with us.
ID Uruquay (Uruquay)
According to the available documentation of the provider, we expect it can be used easily. In case of open questions, feel free to get in contact with us.
Samples of OAuth 2.0 User Authentication
In this section, we are describing common OAuth 2.0 configurations which allow users to use an external OAuth identity provider login when authenticating to eSignAnyWhere Web UI. This authentications could of course also be used to set up a signer authentication, but as the configuration steps are just minor (the configuration is just done in the upper section of the identity providers configuration page) we are not going into differences in detail.
Microsoft Azure AD via OAuth 2.0
Step 1: Register a new Application in your Azure AD
Link to Microsoft documentation: https://docs.microsoft.com/en-us/azure/active-directory/develop/quickstart-register-app
Sign in to the Azure portal.
If you have access to multiple tenants, use the Directories + subscriptions filter
 in the top menu to switch to the tenant in which you want to register the application.
Search for and select Azure Active Directory.
Under Manage, select App registrations > New registration.
Enter a display Name for your application (e.g. "my-eSAW-Authenticator").
Users of your application might see the display name when they use the app, for example during sign-in.
You can change the display name at any time and multiple app registrations can share the same name.- Specify who can use the application (e.g.: "Accounts in this organizational directory only")
Don't enter anything for Redirect URI (optional). You'll configure a redirect URI in the next section.
Select Register to complete the initial app registration.
When registration finishes, the Azure portal displays the app registration's Overview pane.
You need two details from that page that you should now copy for later usage:
- Application (client) ID
- Directory (tenant) ID
Step 2: Configure platform settings
In the Azure portal, in App registrations, select your application.
Under Manage, select Authentication.
Under Platform configurations, select Add a platform.
Under Configure platforms, select the tile "Web" to configure a web app.
- Enter the following Redirect URI (either one or both):
- for User Authentication in eSignAnywhere:
https://<eSignAnyWhere URL>/Account/ValidateOAuth(e.g.: https://demo.esignanywhere.net/Account/ValidateOAuth) - for Signer Authentication in eSignAnyWhere:
https://<eSignAnyWhere URL>/SawViewer/HttpHandlers/AuthHandler.ashx(e.g.: https://demo.esignanywhere.net/SawViewer/HttpHandlers/AuthHandler.ashx)
- for User Authentication in eSignAnywhere:
Select Configure to complete the platform configuration.
- Under Implicit grant and hybrid flows (still on the Authentication page) make sure "ID tokens (used for implicit and hyprid flows)" is enabled
- Leave Allow public client flows disabled, this is not needed.
- Click Save to complete the configuration
Step 3: Add a client secret
- In the Azure portal, in App registrations, select your application.
- Select Certificates & secrets > Client secrets > New client secret.
- Add a description for your client secret.
- Select an expiration for the secret or specify a custom lifetime.
- Client secret lifetime is limited to two years (24 months) or less. You can't specify a custom lifetime longer than 24 months.
- Microsoft recommends that you set an expiration value of less than 12 months.
- Select Add.
- Record the secret's value for use in eSignAnyWhere later on. This secret value is never displayed again after you leave this page.
(Optional) Step 4: OpenID Connect discovery document
Link to Microsoft documentation: https://docs.microsoft.com/en-us/azure/active-directory/develop/userinfo
This step is optional as Microsoft doesn't change it's OAuth configuration very often, but it's good to know where to find your OpenID Connect discovery document.
You need the Directory (tenant) ID from Step 1, then call the following URL (no authentication needed):
https://login.microsoftonline.com/<Directory (tenant) ID>/v2.0/.well-known/openid-configuration
For the eSignAnywhere configuration you need the following properties:
token_endpoint
authorization_endpoint
userinfo_endpoint
Step 5: Configure eSignAnyWhere
- Login to eSignAnyWhere with a user that has administrative permissions on your Organization.
- Open the Settings > Identity Providers page and add new OAuth Settings for User Authentication.
| Provider Name | If "Share on login page" is enabled, this name will be displayed on the login page, so make sure it identifies your organization. e.g.: Azure AD for <Organization name> |
| Direct access url | If "Share on login page" is disabled, this link is needed to login to eSignAnyWhere with OAuth 2.0. Make sure you bookmark this link. |
| Redirect Url | This is already set and has to be white listed on Azure AD. We already entered this URL in Step 2, make sure it is the correct URL. |
Client Id | your "Application (client) ID" from Step 1 |
| Client Secret: | your secret's value from Step 3 |
| Scope: | openid email |
| Authorization URI: | your authorization_endpoint from Step 4 or simplyhttps://login.microsoftonline.com/<Directory (tenant) ID>/oauth2/v2.0/authorize |
| Token URI: | your token_endpoint from Step 4 or simplyhttps://login.microsoftonline.com/<Directory (tenant) ID>/oauth2/v2.0/token |
| Logout URI: | can be blank |
| Share on login page | Depending on the server settings this property might not be visible to you. If enabled your provider name will show up on the login page. |
| Ressource Parameter: | oauth2_access_token |
| Ressource URI: | your
Click on "Add field" and enter "email" and map it to "User Email Address" |
- Click on Update to save the configuration
- Click on the slider to enable the OAuth provider
Step 6: Add OAuth provider to existing users
- Login to eSignAnyWhere with a user that has administrative permissions on your Organization.
- Open the Settings > Users page and edit the user you want to add the OAuth provider to
- Under OAuth assignments click on the + icon and choose your previously created OAuth provider
- The user will now get a validation email to finish the setup.
- (optional) ensure that the permission configuration of the user's roles denies password based login for this user, if OAuth2 should be the only allowed login method.
Step 7: Login to eSignAnyWhere using OAuth 2.0
The OAuth provider might not be visible on the login page, depending on the setting "Share on login page" in Step 5.
Use the "Direct access url" instead.
OAuth 2.0 (ADFS 2016)
Step 1: Create an Application Group in AD FS 2016 and later
In AD FS Management: Choose Add Application Group from under Application Groups.
Give a name and choose Server application accessing a web API from the Template. It is under the category Client-Server applications.
Copy the Client Identifier and keep it somewhere. This is needed later.
Add the Redirect URI by pasting it and clicking add.
Click next and then enable the checkbox Generate a shared secret. Copy this secret and then click next.
Add the Client Identifier from step 3 under Identifier and click next.
Choose access control policy as required. Default is Permit everyone. Click Next.
Accept the default selection of openid under permitted scopes and click next. Other ones like email and allatclaims can also be selected if needed.
Check summary and close.
Step 2: Pass necessary values
- Choose the Application Group that was created earlier and click on Properties.
- Edit the Web API Application
- Choose the Issuance Transform Rules tab.
- Create a rule which passes the necessary values like Email, Display Name etc.
Step 3: Web Application Proxy
If you are using Shared SaaS or Private SaaS, please make sure that your ADFS endpoint is available publicly since the server needs to access the URIs. Also, the endpoint should have a public certificate.
Windows Application Proxy server can be setup as per the instructions at https://docs.microsoft.com/en-us/previous-versions/windows/it-pro/windows-server-2012-r2-and-2012/dn383662(v=ws.11)
Step 4: Configure eSignAnyWhere
- Login to eSignAnyWhere with a user that has administrative permissions on your Organization.
- Open the Settings > Identity Providers page and add new OAuth Settings for User Authentication.
- Note in case of ADFS that there are no forward slashes at the end. A mistake with the URL will result in the setup not working.
| Provider Name | If "Share on login page" is enabled, this name will be displayed on the login page, so make sure it identifies your organization. e.g.: ADFS Oauth for <Organization name> |
| Direct access url | If "Share on login page" is disabled, this link is needed to login to eSignAnyWhere with OAuth 2.0. Make sure you bookmark this link. |
| Redirect Url | This is already set and has to be added in the Application Group. We already entered this URL in Step 1. Make sure it is the correct URL. |
Client Id | your Client Identifier from Step 1 |
| Client Secret: | The shared secret that you saved earlier. |
| Scope: | openid email |
| Authorization URI: | https://FQDN/adfs/oauth2/authorize |
| Token URI: | https://FQDN/adfs/oauth2/token |
| Logout URI: | can be blank |
| Share on login page | Depending on the server settings this property might not be visible to you. If enabled your provider name will show up on the login page. |
| JWKS URI: | https://FQDN/adfs/discovery/keys |
| Issuer: | Click on "Add field" and enter "email" and map it to "User Email Address" |
- Click on Update to save the configuration
- Click on the slider to enable the OAuth provider
Step 5: Add OAuth provider to existing users
- Login to eSignAnyWhere with a user that has administrative permissions on your Organization.
- Open the Settings > Users page and edit the user you want to add the OAuth provider to
- Under OAuth assignments click on the + icon and choose your previously created OAuth provider
- The user will now get a validation email to finish the setup.
Step 6: Login to eSignAnyWhere using OAuth 2.0
The OAuth provider might not be visible on the login page, depending on the setting "Share on login page" in Step 4.
Use the "Direct access url" instead.
MyNamirial Account
Step 1: Request registration of a new Application in MyNamirial
This needs to be done by Namirial staff. Please provide following information:
- Request to create a MyNamirial OAuth application for a code grant flow with eSignAnyWhere. You need a client_id and client_secret.
- staging level (is it for test/demo, or is it for a production instance?)
- eSignAnyWhere redirect URI which needs to be whitelisted in the MyNamirial configuration
(Optional) Step 2: OpenID Connect discovery document
This step is optional as we won't change the OAuth configuration of MyNamirial very often, but it's good to know where to find your OpenID Connect discovery document.
You need the mynamirial base url, then call the following URL (no authentication needed):
For production instance of MyNamirial: https://auth.namirial.app/realms/namirial/.well-known/openid-configuration
For the eSignAnywhere configuration you need the following properties:
authorization_endpoint
token_endpoint
userinfo_endpoint
jwks_uri
issuer
Step 3: Configure eSignAnyWhere
- Login to eSignAnyWhere with a user that has administrative permissions on your Organization.
- Open the Settings > Identity Providers page and add new OAuth Settings for User Authentication.
| Provider Name | If "Share on login page" is enabled, this name will be displayed on the login page, so make sure it identifies your organization. e.g.: MyNamirial for <Organization name> |
| Direct access url | If "Share on login page" is disabled, this link is needed to login to eSignAnyWhere with OAuth 2.0. Make sure you bookmark this link. |
| Redirect Url | This is already set and has to be white listed on MyNamirial. We already provided this URL in the request in Step 1. |
Client Id | your "Application (client) ID" from Step 1 |
| Client Secret: | your secret's value from Step 1 |
| Scope: | openid email |
| Authorization URI: | your authorization_endpoint from Step 2 or simply (for production instance of MyNamirial)https://auth.namirial.app/realms/namirial/protocol/openid-connect/auth |
| Token URI: | your token_endpoint from Step 2 or simply (for production instance of MyNamirial)https://auth.namirial.app/realms/namirial/protocol/openid-connect/token |
| Logout URI: | (Optional - can be blank) your end_session from Step 2 or simply (for production instance of MyNamirial)https://auth.namirial.app/realms/namirial/protocol/openid-connect/logout |
| Share on login page | Depending on the server settings this property might not be visible to you. If enabled your provider name will show up on the login page. |
| JWKS URI: | your jwks_uri from Step 2 or simply (for production instance of MyNamirial) |
| Issuer: | your https://auth.namirial.app/realms/namirial |
| On-Off Sliders: |
|
| Field Mappings: | Click on "Add field" and enter "email". Select rule "Validate" and map it to "User Email Address" |

- Click on Update to save the configuration
- Click on the slider to enable the OAuth provider
Step 4: Add OAuth provider to existing users
- Login to eSignAnyWhere with a user that has administrative permissions on your Organization.
- Open the Settings > Users page and edit the user you want to add the OAuth provider to
- Under OAuth assignments click on the + icon and choose your previously created OAuth provider
- The user will now get a validation email to finish the setup.
- (optional) ensure that the permission configuration of the user's roles denies password based login for this user, if OAuth2 should be the only allowed login method.
Step 5: Login to eSignAnyWhere using OAuth 2.0
The OAuth provider might not be visible on the login page, depending on the setting "Share on login page" in Step 5.
Use the "Direct access url" instead.
The MyNamirial account can be registered by the user during login; it will require binding of the MyNamirial account to the user's email address during registration for a MyNamirial account.
Trademarks Remark
The terms LinkedIn, Facebook, Microsoft, Azure, SignD, SmartIdent, ID Austria, Czech BankID, It's Me, Verimi, Yes, MitID, FranceConnect, Freja eID, BankID, Buypass, Phenix, ID Uruquay and other eIDs listed are trademarks or registered trademarks of their respective owners. By mentioning them on this page, Namirial is not claiming any rights on the name and is using them just to describe properties and configuration options of the product. Namirial does not claim any "certified" or "approved" compability, in case vendors are offering compatibility programms.