This is the first part of the eSignAnyWhere user guide. In addition an advanced guide and an electronic signature guide are available for further information (also linked at relevant chapters).
Basic Concepts
eSignAnyWhere is a platform for electronic signing of digital documents. You can send out documents (in form of envelopes) to recipients for signing, acknowledge or receiving a copy.
Organisation, User, Roles and Teams
An eSignAnyWhere Organisation (initial account) can exists of:
- Organisation: The user, who creates the initial account, will also create the organisation. The organisation exists of one to many users (e.g. similar to a company).
- User: A user is always part of an organisation. You can add users to your organisation (depending on your license and select plan).
- User-Role: The user-role defines the rights of the user in the organisation. The role “user manager” is an administrator of the organisation, the “power user” is a user, who can send envelopes for signing. The “registered signer” can use eSignAnyWhere as a signing platform to sign his/her documents and can use it as an document inbox. For more information please have a look at the roles and permissions guide.
- Teams (optional): Teams are a subset of users of your organisation. Within the team you can define some special rights (e.g. manage sent envelopes of your team members) and define a team leader, who always accesses the envelopes of her/his team.
Workflows
Basic Idea: send a document via eSignAnyWhere to a signer (recipient) and receive a signed document back.
With eSignAnyWhere you are creating envelopes, which contain one to many documents and are sent to your recipients for signing, acknowledge or receiving a copy. You can also define a sequential or parallel workflow, so you can design your own signing workflows from very basic to complex. In addition you can also use bulk sending (sending the same envelope to a bulk of recipients), use automatic remote signers or hide certain documents from being seen by specific recipients.
The simplest possible signing workflow would be sending one document to one recipient, who has to sign the document.
You can use eSignAnyWhere for simple signing tasks and for complex tasks e.g. signing a project order, which has to be signed by some managers. A lot of features allow you to design many different signing ceremonies and use cases. In addition you can use our SIGNificant product suite to extend your use case possibilities (e.g. use native iOS/Android apps and SDKs, Signature Pads or even biometric signature verification options).
Workflow Capabilities:
- Sequential recipients: one after another
- Parallel recipients: all recipients without specific order must sign
- Bulk recipients*: each recipient will get a unique copy of the envelope (e.g. if you want to send out a new company policy, first signed by the responsible manager and then each employee gets a separate copy of the envelope for signing)
- Document Hidding*: hide certain documents from specific recipients
- Meta Information: allow to store meta information per envelope (e.g. for hybrid integration; sending envelopes via UI and automated post processing [auto-archive] via finish callback)
Recipient Types:
- Signer “needs-to-sign”: the recipient must sign the document (or can reject it)
- CC “receives a copy”: the recipient receives a copy of the document
- Needs to acknowledge: the recipient must open the document
- Automatic Remote Signers: via Namirial TSP an automatic signature/seal is applied to the document*
- PKCS#7 Signer: a specific feature to sign with a PKCS#7 signature*
* optional feature
Simple Example: You want to send a new insurance contract to your client. (1) First you prepare the new insurance contract for your client and upload the document to eSignAnyWhere to create a new workflow. (2) You design the workflow, where your line-manager first has to approve the contract details and then the approved document is sent to your client for signing the document. The document itself contains some form fields, where the client can change e.g. his address information, if it has been changed. (3) After the line manager has approved the document and the client has signed the new insurance contract, you receive a notification about the finished document. (4) You can download the signed document and audit trail (process evidence) and copy it to your archive for storage.
Simple Workflow (1 Signer):
Workflow (1st Signer, Reviewer, 2nd Signer)
Bulk Workflow (1st Signer, Bulk Signers)
Simple Automatic Workflow (1st Automatic Signer)
Automatic Workflow (1st Signer, 2nd Automatic Signer)
Registration and Login
The login page requires your email address and your password to login. If you have too many false login attempts an additional captcha (“i am human”) will appear due security reasons. If you have forgotten your password, you can reset it via the “Forgot your password?” link.
Moreover, you have the link for the registration page to create a new account/organization. On-Premise and private SaaS customers will see the LDAP/SAML option for login if it is configured.

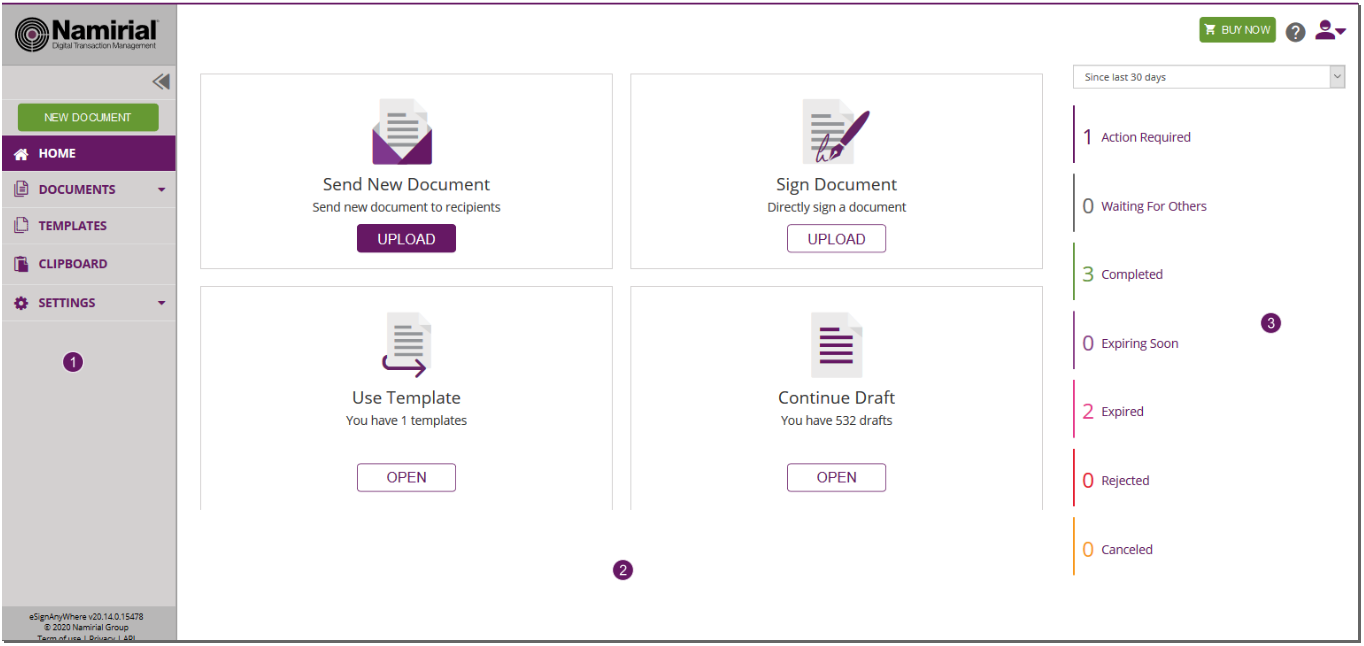
User Interface
The eSignAnywhere default user interface:
- Menu: on the left you find the menu
- new Document: create a new document
- Documents: your (or our teams) sent documents and documents you have to sign
- Templates: your available templates
- Clipboard: if you install the MS Office Plugin (available in the menu top right), you are able to directly upload documents to MS Word to your clipboard in eSignAnyWhere.
- Settings: change your account or organisation settings
- Quickstart: in the middle you find the quickstart buttons
- Send New Document: create new document
- Sign Document: upload and directly sign a document
- Use Template: use a template
- Continue Draft: finish a draft
- Dashboard: provides you information about your envelopes
- Help: at the top right you find a question mark to enable the help
- Account-Action: also at the top right you find the account menu for account settings, issue reporting, Microsoft Office Plugin and log out
| Figure | Description |
|---|---|
 |
|
Compact View
If you want to have more space for designing documents, you can enable a compact view by collapsing the menu. Just click on the arrow symbol in the menu bar at the top.
| Figure | Description |
|---|---|
With this basic introduction and the following Guide you should be able to create and send your first envelope. Create and Send EnvelopesIn addition an advanced guide and an electronic signature guide are available for further information (also linked at relevant chapters). Create and Send EnvelopeTo create a new envelope (or documents you want to have signed), just click on “New Document” or directly click “Upload” on the Dashboard. In addition, if you upload a document via Microsoft Office Plugin (available in the user menu top-right), you can select it from the Clipboard. To send an envelope you have to go through three steps:
You also can save the envelope as Draft or Template. (1) Create EnvelopeWhen you create a new envelope, you can set at least the following parameters:
To create an envelope following steps are necessary: Name the envelope, upload a document, select one to many recipients, (additional) design a personal message. The next figures will show you exactly how to create an envelope. |
|
