INTRODUCTION
After install and configure you virtual appliance SWS, now you can use their method to sign or apply timestamp. SWS have two interfaces SOAP or REST. SOAP is used for files under 50MB and REST interface is used for files over 50MB.
SWS can manage some signature device like:
- automatic signature (her name start with AHI or AHIP followed by numbers)
- eSeal (her name start with SHI or SHIP followed by numbers)
- remote signature (her name start RHI or RHIP followed by numbers)
- disposable signature (her name start with RHI or RHID followed by numbers)
- long lived signature (her name start with RHIL or RHILD followed by numbers)
Only during the integration, you can see:
- eSeal like a automatic signature
- disposable, longlived like a remote signature
And the remote signature like an extension of automatic signature, because beyond username and password require the OTP code.
Can support three different types of signature:
- Pades: valid only for PDF files
- Xades: valid only for XML files
- Cades: valid for every type of files
Apply timestamp on files (according to standard RFC3161)
For every type of signature and timestamp, there is a dedicated web method, which will be described in the the next sections.
In this user guide the examples will be shown using "SoapUI". This is a free tool which can be installed on every OS. With this tool, is possible to create SOAP request which invoke the differents web methods.
During the integration, the application client of SWS should recreate the same XML soap request created on SoapUI with his program language.
SOAP INTERFACE
For test SOAP interface, you can request with SoapUI, following this steps:
Download and install SoapUI from this link:
https://www.soapui.org/tools/soapui/
Once complete the installation:
open SoapUI → File → New Soap Project
And add appliance SWS method to SoapUI, like in this image:

In text box “Initial WSDL” use this URL:
http://<IP-APPLIANCE>:8080/SignEngineWeb/sign-services?wsdl
And you will obtain the list of method like this:

FOR AUTOMATIC AND REMOTE SIGNATURE
The principal method used to sign (valid for remote and automatic signature), they are:
signPAdESList → Used for sign only PDF files
signCAdESList → Used for sign every type of files
signXAdESList → Used for sign XML files
getSignatures → permit to obtain the number of signature made since certicate creation
getAvailableSignatures → permit to obtain the numbers of signatures (valid only for device NOT pay per use, else it will generate an exception)
Every method require the Credentials object, in the next section will see how populate this field.
ONLY FOR REMOTE SIGNATURE
If you are signing with remote signature, you can use this method:
getOTPList → permit to obtain the list of OTP associate to your remote signature (exactly the OTP is associated to the holder of certificate. For example if you have two or more remote signature associate to same holder, you can use this OTP for every remote signature).
sendOtpBySMS → it will send the SMS containig the OTP code.
openSession → permit to obtain the token (like a string) for sign instead to insert new OTP code on every signature). The token is valid for three minutes from generation.
getRemainingTimeForSession → it return the time until the session is valid
closeSession → if you want destroy the token before three minutes
TIMESTAMP
If you want apply only timestamp, you can use this method:
timestamp → it permits to obtain the file with timestamp is possible to choose between two types TSR or TSD. The option TSR mean the timestamp is another files, while the TSD mean the timestamp signature is in the same file.
After this introduction, below will be described every method with input required.
CREDENTIALS object
All the methods used for sign (signPAdES..., signCAdES..., signXAdES) they use the Credentials object, like you can see in this image:

How popolate this fields?
FOR AUTOMATIC AND REMOTE SIGNATURE
For every type of signature (automatic signature and remote signature) you must fill this two fields:
username: contain the device name it start with RHI..., AHI... or SHI...
password: contain the PIN associated to device
ONLY FOR REMOTE SIGNATURE
While only if you you are using the remote signature (username starts with RHI...) you should fill this fields:
idOtp: (optional) it specify the idOtp which you want use for sign. If you don't want set the idOtp, SWS will use automatically the default OTP. You can use the method getOTPList for obtain the idOtp.
Otp: it contains the OTP code recived by SMS or read on app Namirial
sessionKey: it contain the token (like a string) received from method openSession
securityCode: this parameter must not be set. It is used only in certain situation
How works method getOTPList?
With this method you can obtain the OTP list which can be use with specified username, and you will can populate the variable Credentials.idOtp.
This method it require only the username.
For example with username: RHIP20102336019765, in this request:
REQUEST-getOTPList
<soapenv:Envelope xmlns:soapenv="http://schemas.xmlsoap.org/soap/envelope/" xmlns:ser="http://service.ws.nam/">
   <soapenv:Header/>
   <soapenv:Body>
      <ser:getOTPList>
         <credentials>
            <username>RHIP20102336019765</username>
         </credentials>
      </ser:getOTPList>
   </soapenv:Body>
</soapenv:Envelope>
You will obtain response like this:
RESPONSE-getOTPList
<soap:Envelope xmlns:soap="http://schemas.xmlsoap.org/soap/envelope/">
   <soap:Body>
      <ns2:getOTPListResponse xmlns:ns2="http://service.ws.nam/">
         <return>
            <idOtp>501719</idOtp>
            <serialNumber>20210113-091031RJ2L1</serialNumber>
            <type>SMS</type>
         </return>
         <return>
            <idOtp>537430</idOtp>
            <serialNumber>20210305-163726L0PYF</serialNumber>
            <type>OTP GENERATOR</type>
         </return>
         <return>
            <idOtp>537433</idOtp>
            <serialNumber>20210305-163726F0I75</serialNumber>
            <type>OTP PUSH</type>
         </return>
      </ns2:getOTPListResponse>
   </soap:Body>
</soap:Envelope>
During the sign process is possible to choose between this two idOtps: 501719 (associated to OTP SMS) and the idOTP: 537430 (associated to OTP GENERATOR).
Isn't possible to use OTP PUSH, they are used for other purpose, not for sign.
Now during the sign we can choose two types of idOTP: 501719 or 537430.
Sign with OTP SMS
If you decide to sign with OTP SMS, you should use the method: sendOTPBySMS
This method require in input only the username (in this example the username is: RHIP20102336019765).
The soap request will be like this:
REQUEST-sendOTPBySMS
<soapenv:Envelope xmlns:soapenv="http://schemas.xmlsoap.org/soap/envelope/" xmlns:ser="http://service.ws.nam/">
   <soapenv:Header/>
   <soapenv:Body>
      <ser:sendOtpBySMS>
         <credentials>
            <username>RHIP20102336019765</username>
         </credentials>
      </ser:sendOtpBySMS>
   </soapenv:Body>
</soapenv:Envelope>
And if everything is ok, in output will receive the response like this:
RESPONSE-sendOTPBySMS
<soap:Envelope xmlns:soap="http://schemas.xmlsoap.org/soap/envelope/">
   <soap:Body>
      <ns2:sendOtpBySMSResponse xmlns:ns2="http://service.ws.nam/"/>
   </soap:Body>
</soap:Envelope>
And on mobile phone will receive the SMS containing the OTP code (composed from 6 number) for sign, for example now we have received the code: “214196”.
The OTP code just received will be the variable Crediantls.otp during the process of sign.
Sign with OTP GENERATOR
If you decide to sign with OTP GENERATOR, you should open the Namirial OTP App and insert the OTP code showed during the sign process.
→Show the guide "How to configure Namirial OTP App"
How Sign File
Finally we have all requisites to populate Credentials object during the sign. Like mentioned before, the methods to sign are:
- signPAdESList
- signCAdESList
- signXAdESList
With this three methods is possible to sign with every type of signature (automatic and remote).
Everyone of this three methods use the Credentials object filled in the same time.
The automatic signature, require only the variables username and password in the object Credentials.
For example in automatic signature with username: AHI7609757152622 and password 13572468
the object Credentials will be populate like in the image:
AUTOMATIC-Credentials
<credentials>
	<username>RHIP20102336019765</username>
	<password>1357268</password>
</credentials>
While if you are using remote signature you should fill the other fields:
- idOtp (only if you have more idOTP received from method getOTPList)
- OTP or sessionKey (will see in the next section how populate this variable)
Suppose we want sign using with the OTP code received previously from method sendOtpBySMS.
The credentials object will be filled in this way:
REQUEST-Credentials-Remote-OTP-SMS
<credentials>
	<idOtp>501719</idOtp>
	<otp>150259</otp>
	<password>13572468</password>
	<username>RHIP20102336019765</username>
</credentials>
idOtp was obtained from method getOTPList method and otp is the code received from method sendOTPBySMS.
Sign using session
With otp is possible to make only one signature, but if you have need to sign more files, with the “sessionKey” is possible. In the next section will be described how works the session.
This function is available on remote signature, it permits to sign at most 3 minutes using the same session. You can see the sessione like a token provided from method “openSession”.
How obtain the sessionKey?
The method “openSession” it permits to obtain the sessionKey.
In input it require:
- username
- password
- otp
- idOtp
Like in this example:
REQUEST-sessionKey
<soapenv:Envelope xmlns:soapenv="http://schemas.xmlsoap.org/soap/envelope/"
	xmlns:ser="http://service.ws.nam/">
   <soapenv:Header/>
   <soapenv:Body>
      <ser:openSession>
         <credentials>
            <idOtp>501719</idOtp>
            <otp>150259</otp>
            <password>13572468</password>
            <username>RHIP20102336019765</username>
         </credentials>
      </ser:openSession>
   </soapenv:Body>
</soapenv:Envelope>
In output will obtain the value of sessionKey which will be used for sign:
RESPONSE-REMOTE-openSession
<soap:Envelope xmlns:soap="http://schemas.xmlsoap.org/soap/envelope/">
   <soap:Body>
      <ns2:openSessionResponse xmlns:ns2="http://service.ws.nam/">
		<return>
			f4lf7bq/cCxW6mTgL3iGjFEST5cEAZjgLnXvV3hUFzFHcTvjlH3FOkJy+kv/0Zsv1
			uNK0S7L6jMqHYSspBz+CZl7h3r5IEP2FqrK7WJQTVyrNfyr/trZmDgxYOLuACyoZVUFIlnck5Lkjihui
			sv+gZeB68Spwm+cNDdQQdUS3ngzJavHXxo9ADCX6VDIKKMe/AY0v+R51XWE90JF5LfKEThlv1OCpQC5nhnW8WKOFOm
			P4vM90d79JhFYGVVSZWtnTQ9Dg8pOMvg9wwxNm3uGkKKaS7oTp1ewd+eCG/uSC9k3H2w9GB6vQLHQEbn6d
			VVMcsIqJ0RMmZ2IgraD+scb4Q==
		</return>
      </ns2:openSessionResponse>
   </soap:Body>
</soap:Envelope>
The sessionKey just obtained is valid for three minutes, after will expire and will needed to generate another sessionKey using the method openSession and new OTP code (isn't possible to use the same OTP already used).
Is possible to know when the session will expire with method: “getRemainingTimeForSession”. Like in this image:
RESPONSE-remote-getRemainingTimeForSession
<soap:Envelope xmlns:soap="http://schemas.xmlsoap.org/soap/envelope/">
   <soap:Body>
      <ns2:getRemainingTimeForSessionResponse xmlns:ns2="http://service.ws.nam/">
         <return>167</return>
      </ns2:getRemainingTimeForSessionResponse>
   </soap:Body>
</soap:Envelope>
Where 167 are the seconds until the session is active. After 180s from creation will be destroyed automatically, but is good pratice close the session before will expire.
You can destroy the session manually before will expire with method: "closeSession"
Destroy manually the session
The method "closeSession" require in input:
- sessionKey
- username
REQUEST-remote-closeSession
<soapenv:Envelope xmlns:soapenv="http://schemas.xmlsoap.org/soap/envelope/"
	xmlns:ser="http://service.ws.nam/">
   <soapenv:Header/>
   <soapenv:Body>
      <ser:closeSession>
         <credentials>
            <sessionKey>
				f4lf7bq/cCxW6mTgL3iGjFEST5cEAZjgLnXvV3hUFzFHcTvjlH3FOkJy+kv/0Zsv1
				uNK0S7L6jMqHYSspBz+CZl7h3r5IEP2FqrK7WJQTVyrNfyr/trZmDgxYOLuACyoZVUFIlnck5Lkjihui
				sv+gZeB68Spwm+cNDdQQdUS3ngzJavHXxo9ADCX6VDIKKMe/AY0v+R51XWE90JF5LfKEThlv1OCpQC5nhnW8WKOFOm
				P4vM90d79JhFYGVVSZWtnTQ9Dg8pOMvg9wwxNm3uGkKKaS7oTp1ewd+eCG/uSC9k3H2w9GB6vQLHQEbn6d
				VVMcsIqJ0RMmZ2IgraD+scb4Q==
			</sessionKey>
            <username>RHIP20102336019765</username>
         </credentials>
      </ser:closeSession>
   </soapenv:Body>
</soapenv:Envelope>
For security reason, this method doesn't generate an exception if you insert wrong sessionKey and/or username.
In this seguence diagram, we can sumarize the methods to call for sign using sessionKey and OTP SMS:
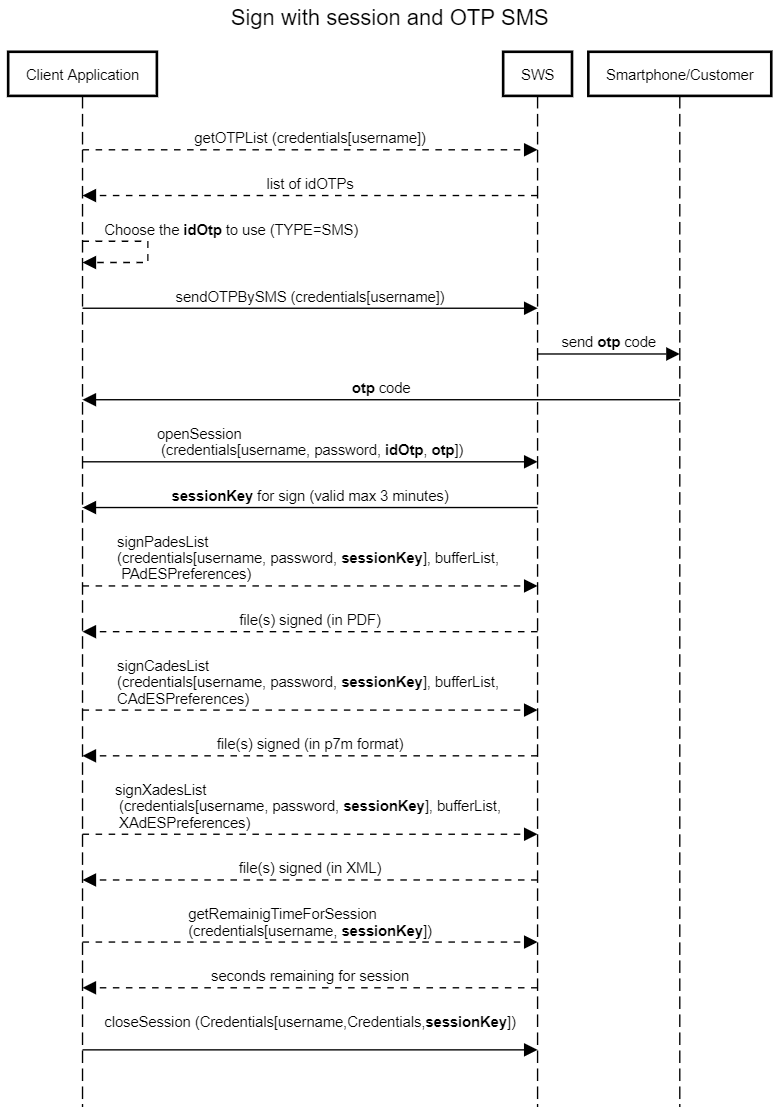
If you are using OTP on App you can skip the method "sendOTPBySMS".
DA VALUTARE: se mettere o meno il diagramma delle sequenze con Namirial App OTP
Summarize:
For automatic signature the credentials object is composed by:
- username
- password
While for remote signature the credentials object is composed by:
- username
- password
- otp
- idOtp (only if you have more OTP else you can set this to "-1")
- sessionKey (optional)
If you need to sign multiple files with remote signature you should use the sessionKey how already described.
Now, is complete how populate the Credentials object for methods: signPadesList, signCadesList and signXadesList, we can populate the object bufferList.
How populate the bufferList
The bufferList contain the list of files (in byte array) which you want sign.
For example in SoapUI the bufferList is composed by the list of base64 files which you want sign, like in this example:
You can dowload the full exampe at this link: signPadesListxml
In output will obtain the base64 associated to file just signed like this: RESPONSE-base64-signPadesList.b64 and decoded will be this PDF: RESPONSE-signPadesList.pdf.
The difference between signPadesList, signCadesList and signXadesList are based on the preferences:
signPadesList → use PadESPreferences
signCadesList → use CadESPreferences
signXadesList → use XadESPreferences
How populate this preferences will be describe in the next sections.
How populate PadESPreferences
This type of preference is used in method signPadesList. Their principal options are:
| PAdESPreferences | |||||
| Name | Type | Mandatory | Default value | Description | Included from SWS version |
|---|---|---|---|---|---|
| hashAlgorithm | String | yes | SHA256 | Algorithm which you want use for sign. Possibile value are: SHA1, SHA256, SHA384, SHA512 | |
| level | Level | B | See the description of Level type | ||
| signType | int | ||||
| encryptInAnyCase | boolean | false | |||
| filenameInTSD | String | Not used | |||
| outputAsTSD | boolean | Not used | |||
| withTimestamp | boolean | false | Specify if you want add or not the timestamp to file signed | ||
| outputBase64Encoded | boolean | false | Set to true if you want file signed in Base64 encode | ||
| timestampHashAlgo | String | SHA-256 | Algorithm which you want to use during the process of apply timestamp. | ||
| timestampUrl | String | URL of timestamp provider with standard RFC3161. Namirial URL: PROD: https://timestamp.namirialtsp.com / http://timestamp.namirialtsp.com TEST: https://timestamp.test.namirialtsp.com / http://timestamp.test.namirialtsp.com | |||
| timestampUsername | String | Username of timestamp credentials | |||
| timestampPassword | String | Password of timestamp credentials | |||
| lockFields | List<String> | ||||
| needAppearanceDisabled | boolean | false | Deprecated | ||
| page | 1 | Indicate the page number where you want apply the signature appereance | |||
| withTimestamp | boolean | false | Set to true if you want apply the timestamp after the signature | ||
| encryptionPassword | String | Specify the password PDF if present | |||
| lockFields | List<String> | ||||
| signerImage | SignerImage | See the description of SignerImage | |||
| signerImageReference | String | Used for specify the template to be used. (used in old version) | |||
| withSignatureField | boolean | false | Set to true if you want apply the signature on signature field in the PDF | ||
You can see how set the correct Level signature:
| Level | |||
| Value | Description | Apply on signature | Included from SWS version |
| B | in the file signed will be added the electronic signature and the signing certificate | Pades, Cades, Xades | |
| T | Like B-Level, but adds a time-stamp, respectively a time-mark that proves that the signature existed at a certain date and time | Pades, Cades, Xades | |
| LT | Like T-Level, but adds VRI (Verification Related Information) data to the DSS (Long Term) | Pades, Cades, Xades | |
| LTA | Like LT-level, but adds a document time stamp and VRI data for the TSA (Time Stamping Authority). An LTA may help to validate the signature beyond any event that may limit its validity (Long Term with Arichive Time-Stamps) | Pades, Cades, Xades | |
| LTV | (Long Term Validation) contain the OCSP/CRL response after the sign. It is used for validation after the signing certificate has been expired | Pades | |
The object SignerImage is composed by the following details:
| SignerImage | |||||
| Name | Type | Mandatory | Default value | Description | Included from SWS version |
|---|---|---|---|---|---|
| image | byte[] | Contains the image which you want apply on the appereance | |||
| signerName | String | Contains the text which you want type on the appereance | |||
| reason | String | Specify the reason about the signature | |||
| textPosition | String | Position of the "signerName" on appereance. Is possible to choose between:
| |||
| x | int | Coordinate X of the appereance (0 is right of the page) | |||
| y | int | Coordinate Y of the appereance (0 is on bottom of the page) | |||
| width | int | Specify the width of the appereance | |||
| height | int | Specify the height of the appereance | |||
| fieldName | Specify the fieldname where apply signature. This fieldName must already exist on PDF file before apply the signature | ||||
| fontName | String | Times-Roman | Specify the font of the text on appereance to be used. The possible values are:
| ||
| imageURL | String | URL to obtain the logo for appereance | |||
| imageVisible | boolean | false | permits to show or not the logo on appereance | ||
| fontSize | int | 10 | permits to set the fontsize | ||
| imageFilename | String | path of the logo on appereance | |||
| scaled | boolean | false | Set to true if you want resize the log on appereance | ||
| location | place of signature | ||||
INSERT EXAMPLE WITH APPEREANCE
How populate Cades Preferences
With cades signature is possible to sign every type of file, the method signCadesList require:
- Credentials associated to device signature
- bufferList, list of files which you want sign
- CAdESPreferences, the preferences about CAdES signature
In the following table you can see how set correctly the CAdESPreferences
| CAdESPreferences | |||||
| Name | Type | Mandatory | Default value | Description | Included from SWS version |
|---|---|---|---|---|---|
| filenameInTSD | |||||
| outputAsTSD | |||||
| outputBase64Encoded | boolean | false | Encoded the file just signed in base64 | ||
| timestampHashAlgo | String | SHA-256 | Algorithm which you want to use during the process of apply timestamp. | ||
| timestampPassword | |||||
| timestampUrl | String | URL of timestamp provider with standard RFC3161. Namirial URL: PROD: https://timestamp.namirialtsp.com / http://timestamp.namirialtsp.com TEST: https://timestamp.test.namirialtsp.com / http://timestamp.test.namirialtsp.com | |||
| timestampUsername | String | Username of timestamp credentials | |||
| hashAlgorithm | String | yes | SHA256 | Algorithm which you want use for sign. Possibile value are: SHA1, SHA256, SHA384, SHA512 | |
| level | Level | B | See the description of Level type | ||
| withTimestamp | boolean | false | Set to true if you want apply the timestamp after the signature | ||
| counterSignature | |||||
| counterSignatureIndex | |||||
| detached | boolean | false | Set to true if you want signature and files in two different files. The output will be the signature. | ||
How populate Xades Preferences
| XAdESPreferences | |||||
| Name | Type | Mandatory | Default value | Description | Included from SWS version |
|---|---|---|---|---|---|
| filenameInTSD | |||||
| outputAsTSD | |||||
| outputBase64Encoded | boolean | false | Encoded the file just signed in base64 | ||
| timestampHashAlgo | String | SHA-256 | Algorithm which you want to use during the process of apply timestamp. | ||
| timestampPassword | |||||
| timestampUrl | String | URL of timestamp provider with standard RFC3161. Namirial URL: PROD: https://timestamp.namirialtsp.com / http://timestamp.namirialtsp.com TEST: https://timestamp.test.namirialtsp.com / http://timestamp.test.namirialtsp.com | |||
| timestampUsername | String | Username of timestamp credentials | |||
| hashAlgorithm | String | yes | SHA256 | Algorithm which you want use for sign. Possibile value are: SHA1, SHA256, SHA384, SHA512 | |
| level | Level | B | See the description of Level type | ||
| withTimestamp | boolean | false | Set to true if you want apply the timestamp after the signature | ||
| detached | boolean | false | Set to true if you want signature and files in two different files. The output will be the signature. | ||
| detachedReferenceURI | String | ||||
| signElement | String | ||||
| signatureId | String | ||||
| withoutSignatureExclusion | boolean | false | Permits to sign the file with/without previous signature | ||
| XPathQuery | String | Permetis to sign a specified path of XML | |||
ADVANCED USE
VERIFY TIMESTAMP
While for verify only timestamp, you can use this methods:
timestampTSDVerify → It permits to validate TSD files (file and timestamp in the same file)
timestampTSRVerify → It permits to validate TSR files (file and timestamp in two different files)