The "envelope create" wizard can be opened using the green button "NEW DOCUMENT" in the menu bar on the left side, or by using one of the tiles on the dashboard which create a new draft.
Beside the options which create a new draft from scratch, following actions open the Envelope Create Wizard:
- When continuing a draft (by using the "Continue" action on an item in one of the envelope filter views), the Envelope Create Wizard will be opened again to configure the draft (and finally send the envelope)
- When using a template, a new draft based on the template will be created and the Envelope Create Wizard will be opened
- In an integration scenario (See Integration Guide), the itegrator can use the Envelope Create Wizard to allow interactive editing of a draft before sending.
The Envelope Create Wizard consists of minimum 3 pages, and can be extended by additional customer-specific pages:
- Recipients Page
- Designer Page
- Summary Page
- optional: additional pages provided by the integration layer (Custom page before sending)
Recipients Page
The Recipients Page is used to define the general data of the envelope, and the signature workflow.
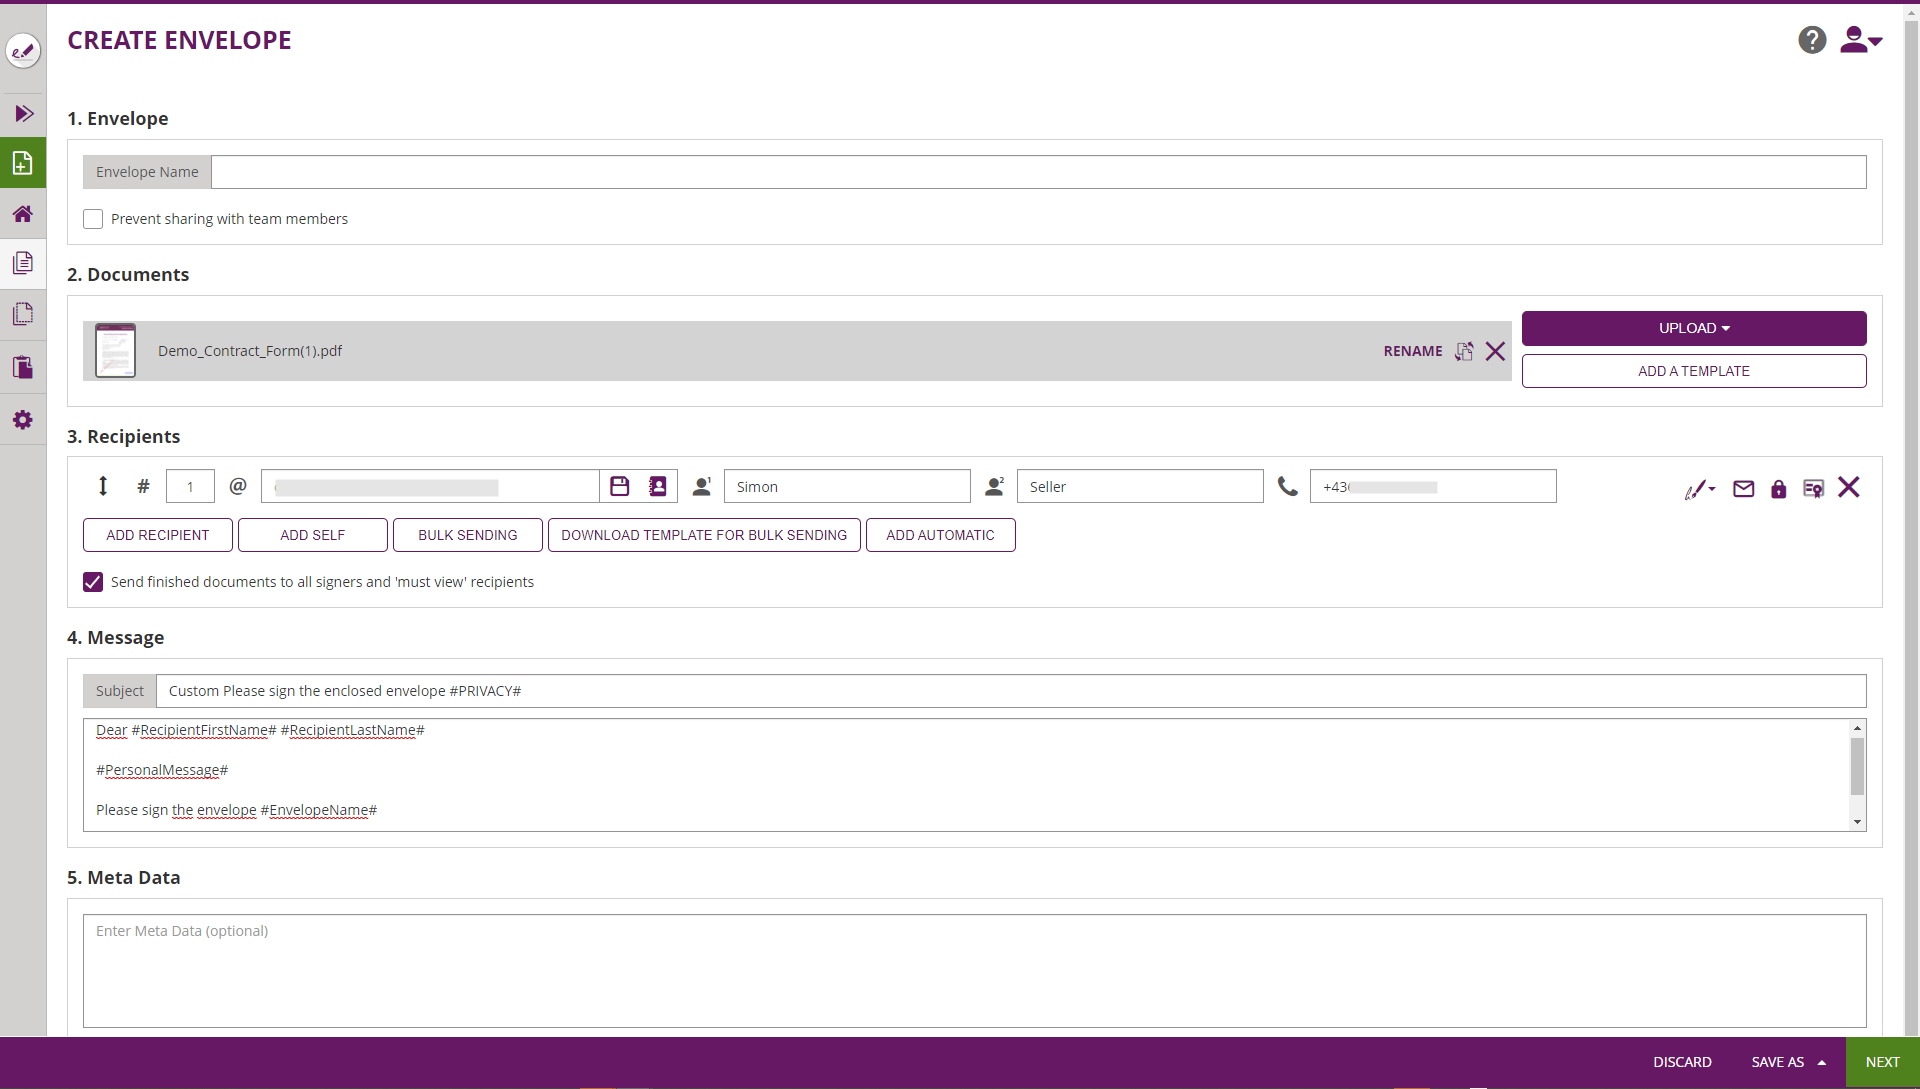
The recipients page is separated into following sections, where the next chapters explain configuration and prerequisites in detail:
- Envelope (General Envelope Data)
- Documents
- Recipients (Activities)
- Document Visibility
- Messages
- Meta Data
Envelope Section
The envelope section contains basic data valid for the entire envelpe, such as the envelope name (visible in the eSignAnyWhere WebUI), or the team sharing configuration. Read more about team sharing in the chapter about Team Configuration.
Documents Section
The documents section allows to add, remove, re-order and change documents sent with an envelope. An envelope contains minumum one document, but can contain multiple documents.
The document order can be re-arranged using Drag&Drop.
Recipients Section
Recipient Primary Data Fields
Order Index
A number allowing to set the activity sort order. Activities with same order index are considered as "parallel", i.e. both recipients get the invitation to sign in parallel. The one who opens the activity first, is automatically locking the activity until he completed all his form filling and signing tasks and he completed (or rejected) the activity. Instead of changing the order index manually, entire rows can be re-arranged by a Drag&Drop interaction.
The value must be a valid mail address, containing at least one character in front of the @, and at least one character after the @, followed by one dot and at least one additional character. Mail addresses with multiple dots after the @ are of course supported.
The mass usage of non-existing mail addresses on environments operated by Namirial is considered as violation of the terms of use, as this can be an issue regarding mail classification rankings. If no mail should be sent, please set a mail with @placeholder.com - which we filter out programmatically.
The e-mail field shows up suggestions as autocompletion popup while typing. To get a full list of the values considered in auto-completion, use the “address book” icon next to the email input field. This will show up a dialog.
The dialog contains:
* entries from personal address book
* entries from organization-wide address book
* recently used entries
Entries are considered as “recently used” when they have been used by the sender as a recipient within the last 30 days, if and only if the envelope has not been deleted. To delete an envelope from the recently-used list, it is required to delete the envelope.
The team configuration has no impact on the list of “recently used” addresses. Only the sender’s own recipients are shown.
First Name
The first name (given name) of the recipient. When signature fields of a recipient are configured to use disposable certificate signatures, the certificate holder given name is also taken from the recipient's first name.
Last Name
The last name (surname) of the recipient. When signature fields of a recipient are configured to use disposable certificate signatures, the certificate holder lastname is also taken from the recipient's last name.
Mobile Phone
The phone number, entered in international format with +xx country code prefix.
Recipient Type
The recipient type is chosen using a dropdown control with an Icon indicating the current selection:
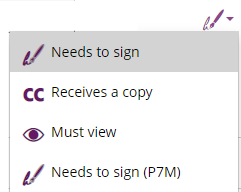
Standard Recipient Types:
Signer | A signer may have tasks on the document assigned to him (Form field filling, signing, etc). It is not required that a signer really has a signature task assigned or signs a signature field (except such tasks or an assigned signature field is mandatory). A document can be assigned to a signer without having any tasks. The signer has to finish his activity by pressing the finish button; before an envelope gets routed to the next signer or before the envelope gets completed. |
Must-View | A recipient type where the activity is considered as completed once the recipient clicked the link in an e-mail to open the activity. It is not required to perform any activity in the document viewer. |
Cc | Sends an E-Mail notification to this recipient, with the (signed) PDF attached. When the filesize of the PDF(s) exceeds the threshold configured per instance, a link to download the PDF(s) is sent instead. |
PKCS#7 | A PKCS7 recipient, instead of signing directly in the PDF, is confirming his signature by pressing the SIGN button which replaces the FINISH action of the workstep. The result of a PKCS7 signature is, instead of the signed PDF, {the .p7m signature container? A .p7s? Refer to the standard used.} |
Special Recipient Types
Self | A recipient with the sender himself as signer is configured. |
Automatic | See chapter “Automatic Sealing” |
Bulk | Sends Ref to chapter “Bulk Sending” |
Document Visibility Section
The document visibility section, which is shown only when the feature flag "DocumentVisibility" is enabled, and more than one recipients are added as signers, and more than one documents are added to the envelope, can be used to hide a document from some of the recipients while other recipients are able to read all (or other) documents of the envelope.
Typical scenarios:
- A contract has to be signed by 2 signers, but the payment form or SEPA mandate should not be visible to him because it is declared as a present granted by the other signer.
- In insurance business, an external agent who is acting as a broker needs to add a broker statement to an insurance contract. The broker statement should be visible (and signed) by the agent, but should not be visible to the policy owner.
The section is by default collapsed (indicated by the 2-arrows-down icon ![]() ). When clicking on the section headline, the section gets expanded and offers on/off sliders which grant access to a document to a specific recipient.
). When clicking on the section headline, the section gets expanded and offers on/off sliders which grant access to a document to a specific recipient.

Message Section
The message section is intended to overwrite the default signer invitation message and subject.
Note that the text contained in the signer invitation can be defined only in one language, typically the sender language.
Meta Data Section
The metadata section allows to set meta data in free-text format, which are accessible for an integration e.g. in a Callback Handler. We recommend (but do not enforce) to fill the data with a valid XML structure.
Depending on contractual agreements, this section may also be used e.g. to document which agent performed an identification in fulfillment of the oblications of Local Registration Authority (LRA), before issuing a disposable certificate.
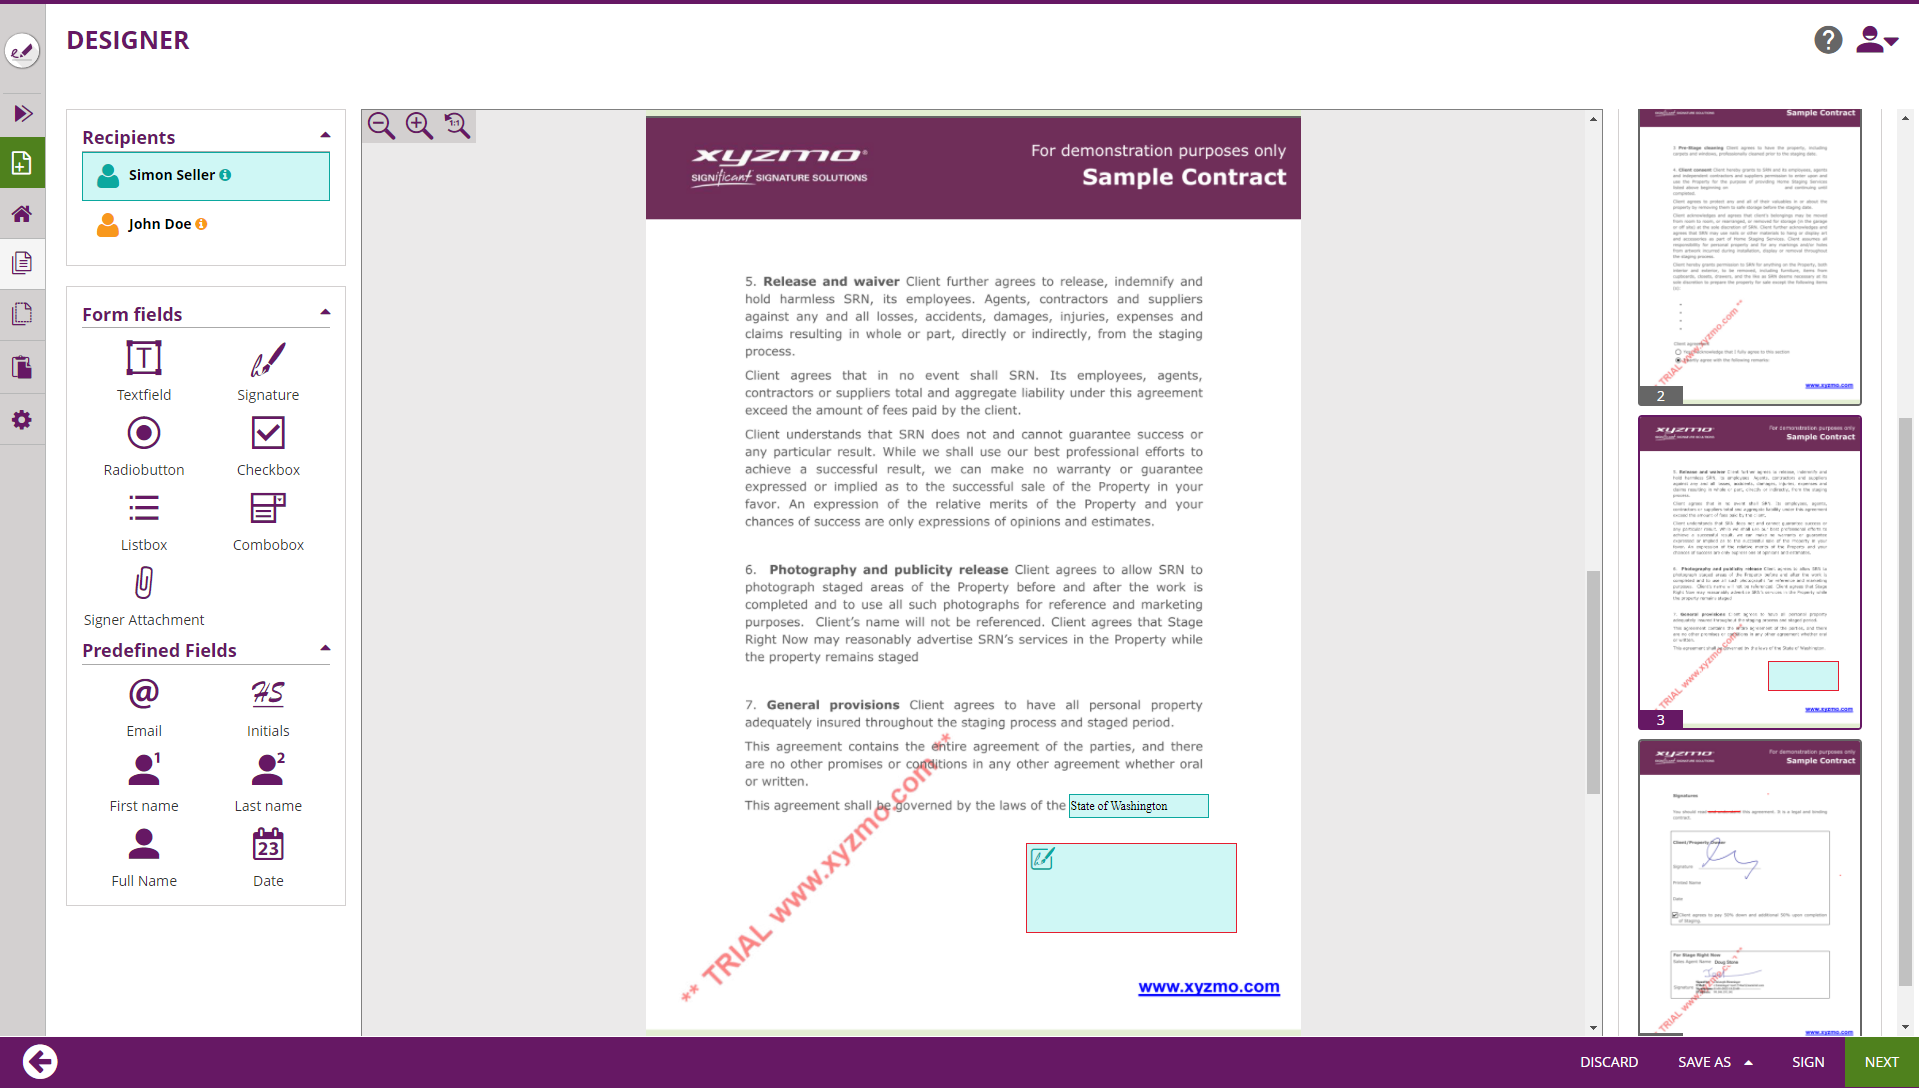
Designer Page
The designer page shows all formerly added (or recognized) interactive fields on the documents and allows to interactively place additional interactive fields.
Summary Page
The summary page provides a summary of the resulting envelope (before sending) and allows to doublecheck different parameters. In addition, it allows to set some envelope-level parameters e.g. about e-mail notifications.

Custom Page before sending
Requires the feature flag "BeforeDraftSendRedirect" to be enabled. Custom pages have to be configured in Settings-Organization as "BeforeSendRedirectUri".
This page(s) are optional and have to be provided by the integration layer when required. To use such custom pages before sending, the URI has to be configured as "BeforeSendRedirectUri" in the organization settings.
Typical scenarios:
- Ask for an Authentication, to get a bearer token which is later-on required for an integration listening on webhooks ("Callback Handlers")
- Validation of Envelope Parameters, showing a validation error when the envelope violates some company-internal rules (in case the business rules require to implement checks not supported by eSignAnyWhere out-of-the-box)
- Collect tagging data for the document(s), e.g. for a DMS/ECM/LTA integration.