...
Open the Settings > Organization page and add a new OAuth 2.0 provider. Enter the LinkedIn credentials as below (see LinkedIn documentation for current configuration!). The Identifier is your unique identifier for using with API. The ressources URIs are called for data, which will be stored in the audit-log.
| Client ID: | your Linked Client ID |
| Client Secret: | your LinkedIn Client Secret |
| Scope: | r_basicprofile r_emailaddress |
| Authorization URI: | https://www.linkedin.com/oauth/v2/authorization |
| Token URI: | https://www.linkedin.com/oauth/v2/accessToken |
| Logout URI: | https://www.linkedin.com |
| Ressource Parameter: | oauth2_access_token |
| Ressource URI: | https://api.linkedin.com/v1/people/~:(id,firstName,lastName,headline,email-address)?format=json |
 Ressources
LinkedIn and OAuth2: https://developer.linkedin.com/docs/oauth2
Authenticate with Facebook
...
Open the Settings > Organization page and add a new OAuth 2.0 provider. Enter the Facebook credentials as below (see Facebook documentation for current configuration!). The Identifier is your unique identifier for using with API. The ressources URIs are called for data, which will be stored in the audit-log (see Facebook documentation).
| Client ID: | your Facebook App ID |
| Client Secret: | your Facebook App Secret |
| Scope: | public_profile email user_about_me |
| Authorization URI: | https://www.facebook.com/v2.8/dialog/oauth |
| Token URI: | https://graph.facebook.com/v2.8/oauth/access_token |
| Logout URI: | http://facebook.com |
| Ressource Parameter: | oauth_token |
| Ressource URI: | https://graph.facebook.com/v2.5/me?fields=id,name,first_name,middle_name,last_name,email,birthday |
The configured Ressource URI returns a JSON object with the specified parameter. These parameters can be defined in the fields to force a specific LinkedIn user to authenticate (e.g. email address). HINT: to see what data is returned in the Ressource URI send yourself an envelope and have a look in the audit trail. It contains the returned object with its parameter. Note: Parameter in Ressource URI of LinkedIn is not the same in the result (email vs. emailAddress).
...
Open the Settings > Identity Providers page and add a new OAuth 2.0 provider. Enter the eSAW app credentials as below.
| Client ID: | your |
| linked Client ID | |
| Client Secret: | your |
| linked Client Secret | |
| Scope: | |
| Authorization URI: | https://<your-instance-url>/Auth/Authorize |
| Token URI: | https://<your-instance-url>/ApiToken/Retrieve |
| Logout URI: | |
| Ressource Parameter: | oauth_token |
| Ressource URI: | https://<your-instance-url>/api/v5/user/me?fields=Email |
The Ressource URI allows to define a validation rule, to ensure that the recipient himself performs the login (and not just any account on that instance).
Therefore, configure a validation rule of the value "Email" (returned from the resource uri) against the recipient's email address. The resource Uri returns a JSON object with the specified parameter. These parameters can be defined in the fields to force a specific eSAW user to authenticate (e.g. email address).
...
- Login to eSignAnyWhere with a user that has administrative permissions on your Organization.
- Open the Settings > Identity Providers page and add new OAuth Settings for Signer Authentication.
| Provider Name | This name will be displayed in the Authentication dialog in SignAnyWhere Viewer, so make sure it identifies your organization. e.g.: Video Ident with LiveId+ |
| Redirect Url | This is already set and has to be white listed on LIP OAuthWrapper. We already provided this URL in the request in Step 2. |
Client Id | your "Application (client) ID" from Step 2 |
| Client Secret: | your secret's value from Step 2 |
| Scope: | |
| Authorization URI: | https://<your-esaw-instance>/OAuthWrapperLiveIdPlus/api/authorize |
| Token URI: | https://<your-esaw-instance>/OAuthWrapperLiveIdPlus/api/getToken |
| Logout URI: | can be blank |
| JWKS URI: | https://<your-esaw-instance>/OAuthWrapperLiveIdPlus/Jwk/getJwks |
| Issuer: | https://<your-esaw-instance>/OAuthWrapperLiveIdPlus |
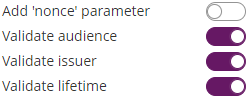
| On-Off Sliders: |
|
And then configure the following field mappings:
| Field property path | Validate/Update | Data Field |
|---|---|---|
| firstname | Update | Recipient First Name |
| lastname | Update | Recipient Last Name |
| identificationType | Update | Disposable Certificate identification type |
| recognitionType | Update | Disposable Certificate document type |
| identificationNumber | Update | Disposable Certificate identification number |
| phone | Update | Disposable Certificate phone number |
| Validate | Recipient Email | |
| documentIssuingCountry | Update | Disposable Certificate document issuing country |
| documentIssuingOrganisation | Update | Disposable Certificate document issued by |
| documentNumber | Update | Disposable Certificate document number |
| documentIdentificationCountry | Update | Disposable Certificate identification country |
| documentIssueDate | Update | Disposable Certificate document issued on |
| documentExpireDate | Update | Disposable Certificate document expiry date |
(if you want to disallow proceeding with data corrected by the video identification agent, change additional mappings from "Update" to "Validate". But note that e.g. small deviations in the name might then disallow to proceed)
...
- Login to eSignAnyWhere with a user that has administrative permissions on your Organization.
- Open the Settings > Identity Providers page and add new OAuth Settings for User Authentication.
| Provider Name | If "Share on login page" is enabled, this name will be displayed on the login page, so make sure it identifies your organization. e.g.: Azure AD for <Organization name> |
| Direct access url | If "Share on login page" is disabled, this link is needed to login to eSignAnyWhere with OAuth 2.0. Make sure you bookmark this link. |
| Redirect Url | This is already set and has to be white listed on Azure AD. We already entered this URL in Step 2, make sure it is the correct URL. |
Client Id | your "Application (client) ID" from Step 1 |
| Client Secret: | your secret's value from Step 3 |
| Scope: | openid email |
| Authorization URI: | your authorization_endpoint from Step 4 or simplyhttps://login.microsoftonline.com/<Directory (tenant) ID>/oauth2/v2.0/authorize |
| Token URI: | your token_endpoint from Step 4 or simplyhttps://login.microsoftonline.com/<Directory (tenant) ID>/oauth2/v2.0/token |
| Logout URI: | can be blank |
| Share on login page | Depending on the server settings this property might not be visible to you. If enabled your provider name will show up on the login page. |
| Ressource Parameter: | oauth2_access_token |
| Ressource URI: | your
Click on "Add field" and enter "email" and map it to "User Email Address" |
- Click on Update to save the configuration
- Click on the slider to enable the OAuth provider
...
- Login to eSignAnyWhere with a user that has administrative permissions on your Organization.
- Open the Settings > Identity Providers page and add new OAuth Settings for User Authentication.
| Provider Name | If "Share on login page" is enabled, this name will be displayed on the login page, so make sure it identifies your organization. e.g.: MyNamirial for <Organization name> |
| Direct access url | If "Share on login page" is disabled, this link is needed to login to eSignAnyWhere with OAuth 2.0. Make sure you bookmark this link. |
| Redirect Url | This is already set and has to be white listed on MyNamirial. We already provided this URL in the request in Step 1. |
Client Id | your "Application (client) ID" from Step 1 |
| Client Secret: | your secret's value from Step 1 |
| Scope: | openid email |
| Authorization URI: | your authorization_endpoint from Step 2 or simply (for production instance of MyNamirial)https://auth.namirial.app/realms/namirial/protocol/openid-connect/auth |
| Token URI: | your token_endpoint from Step 2 or simply (for production instance of MyNamirial)https://auth.namirial.app/realms/namirial/protocol/openid-connect/token |
| Logout URI: | (Optional - can be blank) your end_session from Step 2 or simply (for production instance of MyNamirial)https://auth.namirial.app/realms/namirial/protocol/openid-connect/logout |
| Share on login page | Depending on the server settings this property might not be visible to you. If enabled your provider name will show up on the login page. |
| JWKS URI: | your jwks_uri from Step 2 or simply (for production instance of MyNamirial) |
| Issuer: | your https://auth.namirial.app/realms/namirial |
| On-Off Sliders: |
|
| Field Mappings: | Click on "Add field" and enter "email". Select rule "Validate" and map it to "User Email Address" |
- Click on Update to save the configuration
- Click on the slider to enable the OAuth provider
...