...
In this section, we are describing common OAuth 2.0 configurations which allow users to use an external OAuth identity provider login when authenticating to eSignAnyWhere Web UI. This authentications could of course also be used to set up a signer authentication, but as the configuration steps are just minor (the configuration is just done in the upper section of the identity providers configuration page) we are not going into differences in detail.
Microsoft Azure AD via OAuth 2.0
...
Step 1: Register a new Application in your Azure AD
...
- Login to eSignAnyWhere with a user that has administrative permissions on your Organization.
- Open the Settings > Users page and edit the user you want to add the OAuth provider to
- Under OAuth assignments click on the + icon and choose your previously created OAuth provider
- The user will now get a validation email to finish the setup.
- (optional) ensure that the permission configuration of the user's roles denies password based login for this user, if OAuth2 should be the only allowed login method.
Step 7: Login to eSignAnyWhere using OAuth 2.0
The OAuth provider might not be visible on the login page, depending on the setting "Share on login page" in Step 5.
Use the "Direct access url" instead.
MyNamirial Account
Step 1: Request registration of a new Application in MyNamirial
This needs to be done by Namirial staff. Please provide following information:
- Request to create a MyNamirial OAuth application for a code grant flow with eSignAnyWhere. You need a client_id and client_secret.
- staging level (is it for test/demo, or is it for a production instance?)
- eSignAnyWhere redirect URI which needs to be whitelisted in the MyNamirial configuration
(Optional) Step 2: OpenID Connect discovery document
This step is optional as we won't change the OAuth configuration of MyNamirial very often, but it's good to know where to find your OpenID Connect discovery document.
You need the mynamirial base url, then call the following URL (no authentication needed):
For production instance of MyNamirial: https://auth.namirial.app/realms/namirial/.well-known/openid-configuration
For the eSignAnywhere configuration you need the following properties:
authorization_endpointtoken_endpointuserinfo_endpointjwks_uriissuer
Step 3: Configure eSignAnyWhere
- Login to eSignAnyWhere with a user that has administrative permissions on your Organization.
- Open the Settings > Identity Providers page and add new OAuth Settings for User Authentication.
| Provider Name | If "Share on login page" is enabled, this name will be displayed on the login page, so make sure it identifies your organization. e.g.: MyNamirial for <Organization name> |
| Direct access url | If "Share on login page" is disabled, this link is needed to login to eSignAnyWhere with OAuth 2.0. Make sure you bookmark this link. |
| Redirect Url | This is already set and has to be white listed on MyNamirial. We already provided this URL in the request in Step 1. |
Client Id | your "Application (client) ID" from Step 1 |
| Client Secret: | your secret's value from Step 1 |
| Scope: | openid email |
| Authorization URI: | your authorization_endpoint from Step 2 or simply (for production instance of MyNamirial)https://auth.namirial.app/realms/namirial/protocol/openid-connect/auth |
| Token URI: | your token_endpoint from Step 2 or simply (for production instance of MyNamirial)https://auth.namirial.app/realms/namirial/protocol/openid-connect/token |
| Logout URI: | (Optional - can be blank) your end_session from Step 2 or simply (for production instance of MyNamirial)https://auth.namirial.app/realms/namirial/protocol/openid-connect/logout |
| Share on login page | Depending on the server settings this property might not be visible to you. If enabled your provider name will show up on the login page. |
| JWKS URI: | your jwks_uri from Step 2 or simply (for production instance of MyNamirial) |
| Issuer: | your https://auth.namirial.app/realms/namirial |
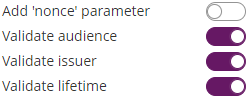
| On-Off Sliders: |
|
| Field Mappings: | Click on "Add field" and enter "email". Select rule "Validate" and map it to "User Email Address" |
- Click on Update to save the configuration
- Click on the slider to enable the OAuth provider
Step 4: Add OAuth provider to existing users
- Login to eSignAnyWhere with a user that has administrative permissions on your Organization.
- Open the Settings > Users page and edit the user you want to add the OAuth provider to
- Under OAuth assignments click on the + icon and choose your previously created OAuth provider
- The user will now get a validation email to finish the setup.
- (optional) ensure that the permission configuration of the user's roles denies password based login for this user, if OAuth2 should be the only allowed login method.
Step 5: Login to eSignAnyWhere using OAuth 2.0
The OAuth provider might not be visible on the login page, depending on the setting "Share on login page" in Step 5.
Use the "Direct access url" instead.
The MyNamirial account can be registered by the user during login; it will require binding of the MyNamirial account to the user's email address during registration for a MyNamirial account.