| Table of Contents | ||||
|---|---|---|---|---|
|
Preliminary Remarks
On this page, the subsequent chapters and their sub pages we are providing the documentation of Namirial's eSignAnyWhere Workflow product. Within the documentation, we are following the story-telling approach, starting to explain the product from a beginners level and getting more into details in later chapters. In addition, in the WebUI Application Reference, we are following an explainatory approach where we are structuring the information as you find them within the user interface of the product.
Target Audience
The documentation should satisfy all audience, from business level to technical integrators. It covers both sides, the envelope sender view and the signer view. Also the system integrator's view is contained, including API documentation and sample integration scenarios. Some documentation (mainly administrative content required only in case of On-Premise installation, or for complex integration scenarios) will be invisible for readers that are not logged in or do not have an account. When accessing the documentation via the servicedesk platform, the content presentation will be filtered for the most relevant functionality in the SMB scenarios.
| Section |
|---|
What is eSignAnyWhere?The eSignAnyWhere Platform is offering signature workflow capabilities based on the signing features of SIGNificant Server Platform combined with the eSignAnyWhere Workflow components. Users of Namirial eSignAnyWhere can
Signatories are enabled to review, fill and sign documents from anywhere anytime on any device. They do not require to open an account with Namirial. They will be authenticated using their email address (and optionally additional authentication methods) and, if available, their local digital certificates are enabled to sign in typing their name or pasting their signature as an image into the document. Signatories may also delegate signing requests in case they are not entitled to sign a particular document. Namirial eSignAnyWhere is delivering complete evidence of a legally binding digital transaction. Any interaction is looplessly documented in an audit trail file: Who was signing which version of a document at which point in time. eSignAnyWhere can be integrated in enterprise business applications via its REST API and callback (webhook) mechanism. The platform is available as On-Premise deployment option, as Private SaaS or as Shared SaaS offering. |
| Section |
|---|
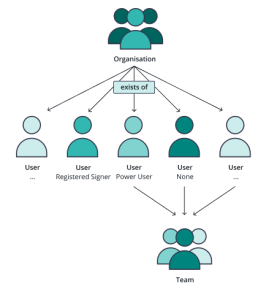
Basic ConceptsOrganization and other Core DataWhen creating an account or trial account on eSignAnyWhere, you are already creating an organization entity (i.e. a tenant). The first user account is created within that organization. This is a design principle of eSignAnyWhere Workflow solution, as it is designed as a multi-tenant platform. Within that eSignAnyWhere organisation, following administrative objects exist: |
...
EnvelopesBasic Idea: Send a document via eSignAnyWhere to a signer (recipient) and collect the signed document later. With eSignAnyWhere you are creating envelopes, which define the signing workflow. An envelope can contain one or many documents (all related to the same business case). Those documents are sent to the recipients to collect signatures, to get a receiving confirmation or just to deliver a copy. The workflow can contain sequential or parallel activities. This allows to design your own signing workflows from very basic to complex. In addition, the product supports sending bulk envelopes - a concept where copies of the same envelope are sent to a list of recipients, and all need to sign their independent copy. Also the use of automatic remote signing certificates (stored in an HSM in the premises of the trust service provider) or hiding certain documents from some recipients within a workflow is supported. The simplest possible signing workflow would be sending one document to one recipient, who has to sign the document. You can use eSignAnyWhere for simple signing tasks and for complex tasks e.g. signing a project order, which has to be signed by some managers. A lot of features allow you to design many different signing ceremonies and use cases. In addition you can use our SIGNificant product suite to extend your use case possibilities (e.g. use native iOS/Android apps and SDKs, Signature Pads or even biometric signature verification options). Workflow Capabilities: |
...
|
...
|
...
Recipient Types:
...
|
...
* optional feature |
| Section |
|---|
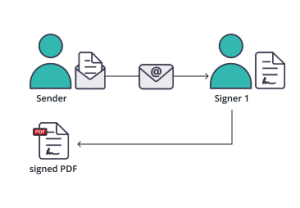
Examples of Signing WorkflowsSimple Workflow (1 Signer): |
...
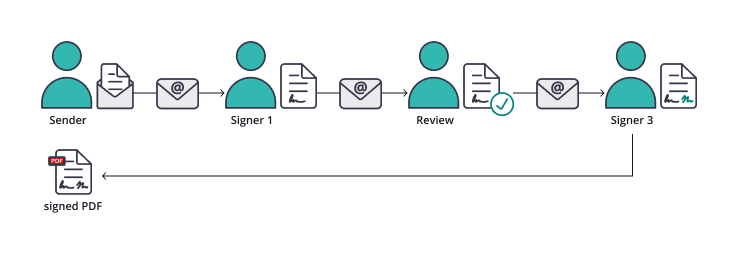
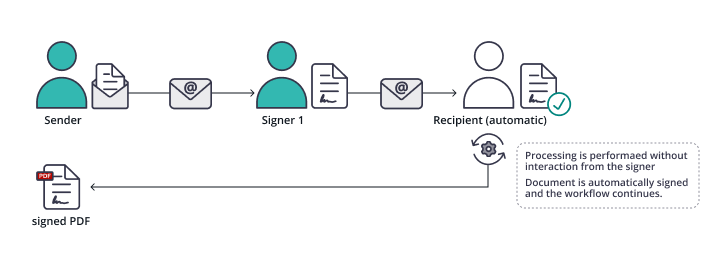
Workflow (1st Signer, Reviewer, 2nd Signer) |
...
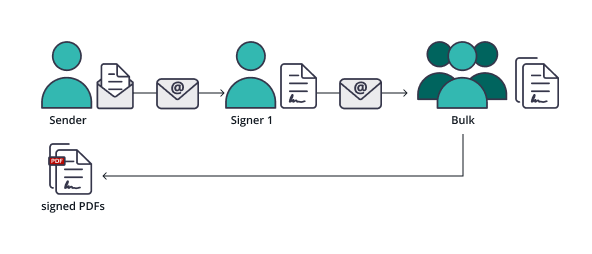
Bulk Workflow (1st Signer, Bulk Signers) |
...
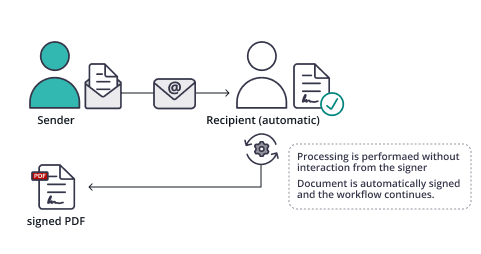
Simple Automatic Workflow (1st Automatic Signer) |
...
|
...
|
| Section |
|---|
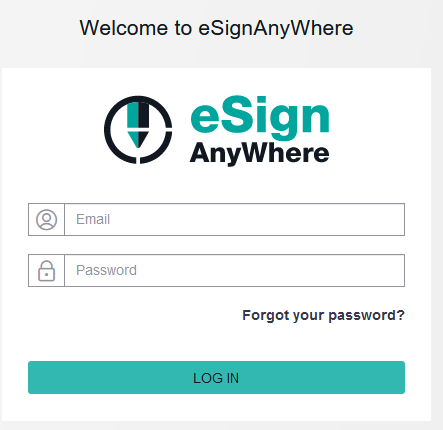
Quick-Start GuideWith this basic introductions of the quick-start chapter you should be able to register for a trial account, send your first envelope and collect the signed document. Please see the Web UI Guide for more information about how to create and send an envelope here. Registration and LoginThe login page requires your email address and your password to login. If you have too many false login attempts an additional captcha (“i am human”) will appear due security reasons. If you have forgotten your password, you can reset it via the “Forgot your password?” link. Moreover, you have the link for the registration page to create a new account/organization. On-Premise and private SaaS customers will see the LDAP/SAML option for login if it is configured. |
...
|
| Section | ||
|---|---|---|
Sending your first EnvelopeUse Case Summary: In this example, we are sending a new insurance contract for internal review (just needs to open it), and then to your client to collect a signature. We are therefore using the Web User Interface. (1) Prepare an example insurance contract and upload the document to eSignAnyWhere to create a new envelope. Therefore, use your preferred word processing software, prepare some example contract or letter-style document. No requirement for this example to put any specific notation into the document; just add some text. Export the document in .PDF format, or use the Print-to-PDF capabilities. Log in to eSignAnyWhere with the account just created, and press the button "NEW DOCUMENT" to create a new envelope. In the envelope creator wizard, on the first page, use the file chooser to upload your PDF file. (2) Design the structure of the signature workflow, by adding recipients. Therefore, add your line-manager as a first recipient (defined by mail address and given name / surname). As the line manager is defined as reviewer, select the recipient type "Needs to view". Add a second recipient (the customer), and keep standard recipient type "Needs to sign". Proceed to the next page in the envelope creator by pressing the NEXT button on bottom-right. The 2nd page is the "Designer" page. Use Drag&Drop to place a signature field on the document. Proceed to the third page in the envelope creator, which is the summary page. Review the configuration and press SEND to send an invitation to the first recipient via mail. As a sender, you see in the envelope list that the envelope is waiting for the first recipient to open the activity. (3) After the line manager has approved the document, the client gets invited to sign. Details about the signer UI are explained in the Signer Guide, but for the basic scenario we expect the UI does not require big explainations. (4) As a sender, refresh the UI with the REFRESH button within the Web UI. Now you should see that the status was updated to "Completed". Click on the row to enter the details view. Here you can download the signed document and also the audit trail document, which is the process evidence. Usually, when using the Web UI, you would store both the signed document and the audit trail to your electronic documents archive for storage.
|
...
User Interface
The eSignAnywhere user interface, with standard appearance of a user having "Power User" and "Administrator" role:
- Menu: on the left you find the menu
- new Document: create a new document
- Documents: your (or our teams) sent documents and documents you have to sign
- Templates: your available templates
- Clipboard: if you install the MS Office Plugin (available in the menu top right), you are able to directly upload documents to MS Word to your clipboard in eSignAnyWhere.
- Settings: change your account or organisation settings
- Dashboard Tiles: in the center area you find tiles for common product functionality, also known as "quickstart buttons".
- Send New Document: create new document
- Sign Document: upload and directly sign a document
- Use Template: Select a template that was defined earlier, and create a new draft based on the template definitions.
- Continue Draft: finish a draft
- Dashboard Statistics: provides statistical information about envelopes currently active on the platform and their status, i.e. envelopes that are not deleted.
- Help: The questionmark icon on top-right, directly next to the account-menu, allows to open the context specific product documentation.
- Account-Action: also at the top right you find the account menu for account settings, issue reporting, Microsoft Office Plugin and log out
...
Figure
...
Description
...
- Menu
- Dashboard Tiles
- Dashboard Statistics
Compact View
If you want to have more space for designing documents, you can enable a compact view by collapsing the menu. Just click on the arrow symbol in the menu bar at the top.
Further Reading
In the next chapters, especially the user guide, the signature guide and the signer guide, we are explaining how to use the product in typical usage scenarios - which are often making use of features not covered in the quickstart guide. In the later chapters, the Application Reference - Web UI contains a documentation about the UI elements and how to use the various configuration options. Sales Partners and customers with their own on-premise installation will find chapters about system configuration. For system integrators, the Integration Guide and the API Reference will give deep insights into possibilities to integrate eSignAnyWhere in enterprise business applications that create, prepare and preprocess documents, or that postprocess and store signed documents.
...
Figure
...
Description
...