...
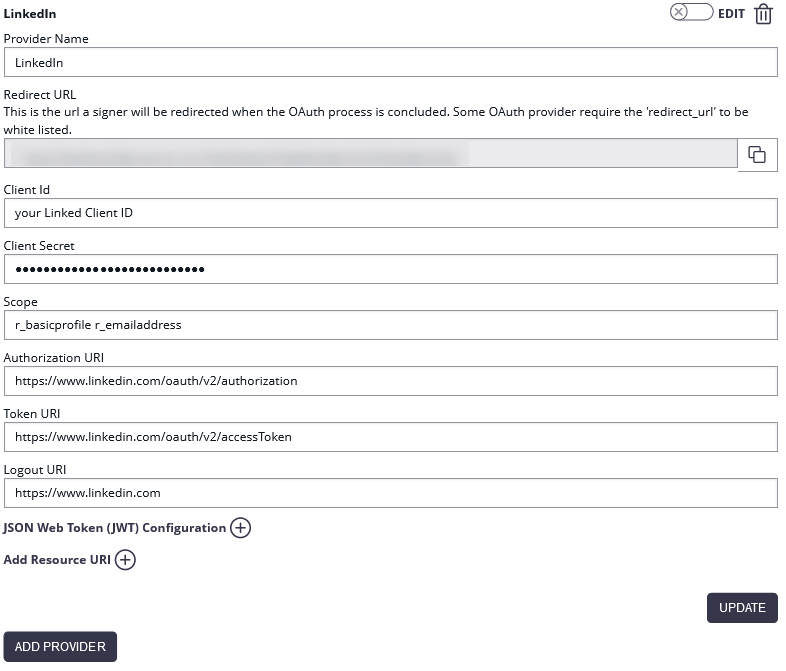
| Client ID: | your Linked Client ID |
| Client Secret: | your LinkedIn Client Secret |
| Scope: | r_basicprofile r_emailaddress |
| Authorization URI: | https://www.linkedin.com/oauth/v2/authorization |
| Token URI: | https://www.linkedin.com/oauth/v2/accessToken |
| Logout URI: | https://www.linkedin.com |
| Ressource Parameter: | oauth2_access_token |
| Ressource URI: | https://api.linkedin.com/v1/people/~:(id,firstName,lastName,headline,email-address)?format=json |

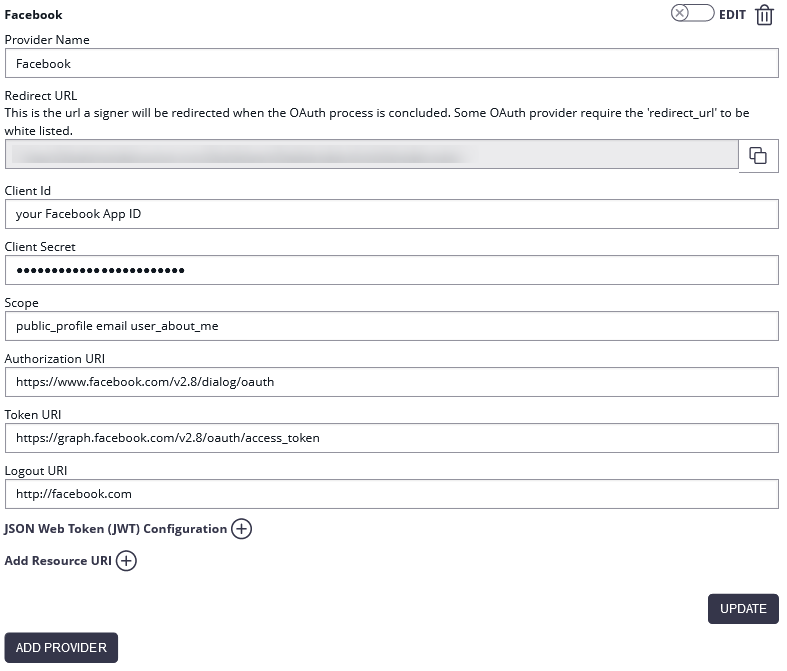
Authenticate with Facebook
...
The configured Ressource URI returns a JSON object with the specified parameter. These parameters can be defined in the fields to force a specific LinkedIn user to authenticate (e.g. email address). HINT: to see what data is returned in the Ressource URI send yourself an envelope and have a look in the audit trail. It contains the returned object with its parameter. Note: Parameter in Ressource URI of LinkedIn is not the same in the result (email vs. emailAddress).

The Ressource URI will return data of the profile. With the “Graph API Explorer” you can build and test your own profile requests. With the optional configuration of “Fields” you can define fields, which are checked for authentication. So you can force a specific user (e.g. identified via email, id or birthdate) to authenticate. Other users are not accepted.
...
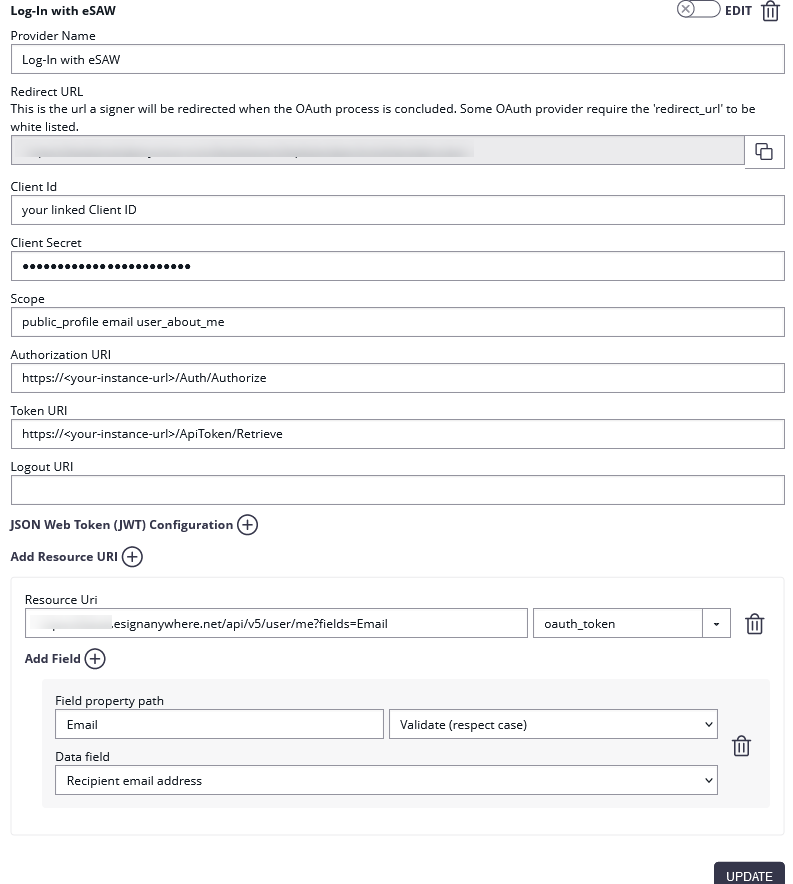
Please see the following figure for more information about the configuration in eSAW:
(Hint: in some older product versions, this settings had been located in Settings-Organization, section "OAuth Settings").
...
HINT: to see what data is returned in the Resource URI send yourself an envelope and have a look in the audit trail. It contains the returned object with its parameter. You can find a sample configuration in the next figure:
The response of the resource URI will also be logged in the audit trail (which might be important in scenarios where you just enforce that someone performs the login, in case you do not validate for a specific user email): .
.
If the user is not allowed to authenticate the following an error will appear: .
.
If authentication was successful, the signer will be logged in and SAW Viewer will grant access to the document.
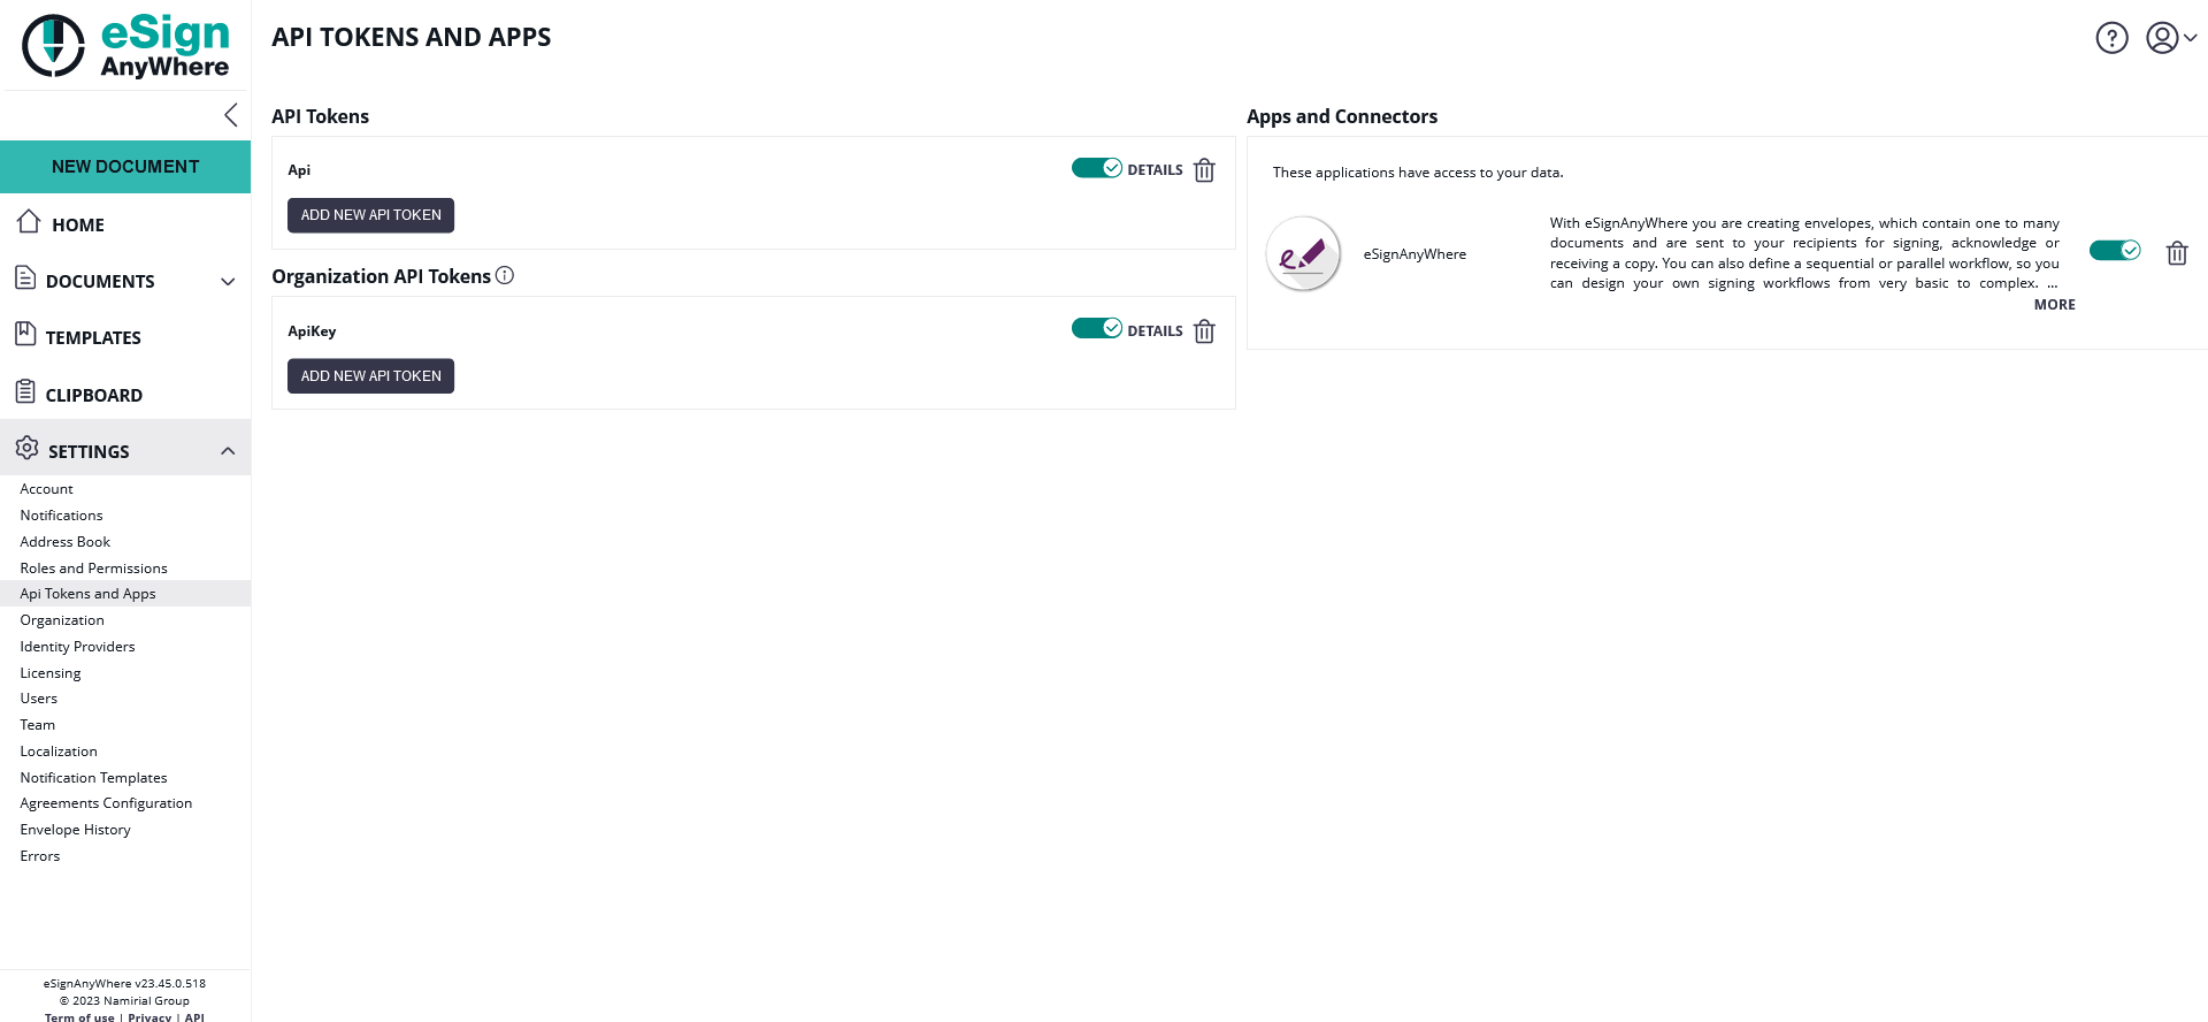
After a successful login, the granted access for the OAuth Application is shown in Settings->Api Tokens and Apps in the section Apps and Connectors:
For more information about the signing process in eSAW please also see the next video:
| Multimedia | ||||||
|---|---|---|---|---|---|---|
|
Force a specific user to authentication via API
...
| Provider Name | This name will be displayed in the Authentication dialog in SignAnyWhere Viewer, so make sure it identifies your organization. e.g.: Video Ident with LiveId+ |
| Redirect Url | This is already set and has to be white listed on LIP OAuthWrapper. We already provided this URL in the request in Step 2. |
Client Id | your "Application (client) ID" from Step 2 |
| Client Secret: | your secret's value from Step 2 |
| Scope: | |
| Authorization URI: | https://<your-esaw-instance>/OAuthWrapperLiveIdPlus/api/authorize |
| Token URI: | https://<your-esaw-instance>/OAuthWrapperLiveIdPlus/api/getToken |
| Logout URI: | can be blank |
| JWKS URI: | https://<your-esaw-instance>/OAuthWrapperLiveIdPlus/Jwk/getJwks |
| Issuer: | https://<your-esaw-instance>/OAuthWrapperLiveIdPlus |
| On-Off Sliders: |
|

And then configure the following field mappings:
...
| Provider Name | This name will be displayed in the Authentication dialog in SignAnyWhere Viewer, so make sure it identifies your organization. e.g.: SmartIdent |
| Redirect Url | This is already set and has to be white listed on SignD side. We already provided this URL in the request in Step 1. |
Client Id | your "Application (client) ID" from Step 1 |
| Client Secret: | your secret's value from Step 1 |
| Scope: | openid flat |
| Authorization URI: | https://openid.signd.id/v1/oauth/authorize |
| Token URI: | |
| Logout URI: | can be blank |
| JWKS URI: | |
| Issuer: | |
| On-Off Sliders: |
|

And then configure the following field mappings:
...
Many eID implementations across EU are offering OAuth 2.0 based integration options.
ID Austria (test environment) (Austria)
| Info |
|---|
Please also see the following documentation about ID Austria (German documentation only): https://eid.egiz.gv.at/anbindung/direkte-anbindung/anbindung-oidc/ |
...
2.0 based integration options.
ID Austria (Austria)
When talking about ID Austria, we have to distinguish 3 different environments which the Austrian government offers:
"E-ID Serviceprovider (Q)" environment, which is a test environment and therefore does not require complex accreditation process.
"E-ID Serviceprovider" environment, which is the production environment.
Early Adopters environment which was used as testing environment before E-ID Serviceprovider (Q) went online
Test Environment - USP Service "E-ID Serviceprovider (Q)"
| Info |
|---|
Please also see the following documentation about ID Austria (German documentation only): https://eid.egiz.gv.at/anbindung/direkte-anbindung/anbindung-oidc/ Mind, that the test environment ("E-ID Serviceprovider (Q)") works just with test identities, not with your individual "Handysignatur" or "ID Austria". Read https://eid.egiz.gv.at/anbindung/testidentitaeten/ for more details. |
Step 1: Create "Service Provider" in USP.GV.AT
- Assign necessary "Verfahrensrechte"
as described in https://eid.egiz.gv.at/anbindung/registrierung/registrierung-von-privaten-service-providern/ - Create your Service provider
as described in https://eid.egiz.gv.at/anbindung/registrierung/registrierung-von-privaten-service-providern/ Undergo the necessary accreditation steps (on test environment (Q) the accreditation will be completed within one hour automatically without "real" accredidation)
On every status change, you will get an automatic email so that you know when you can proceed:From: sp-registrierung@brz.gv.at <sp-registrierung@brz.gv.at>
To: <your USP registered email address>
Subject: Status Ihres ServiceProvider "eSignAnyWhere Demo" wurde aktualisiert. Umgebung Q
Sehr geehrte Damen und Herren,
Der Status eines Ihrer Serviceprovider "<Service Provider name)" wurde geändert. Für mehr Informationen gehen Sie bitte auf <Link to USP administrative interface for the service provider>.
Mit freundlichen Grüßen- Don't forget to activate your service provider version.
As a result, you know the (self-defined) client-ID (must be an URL) and your client-secret.
Step 2: Configure eSignAnyWhere
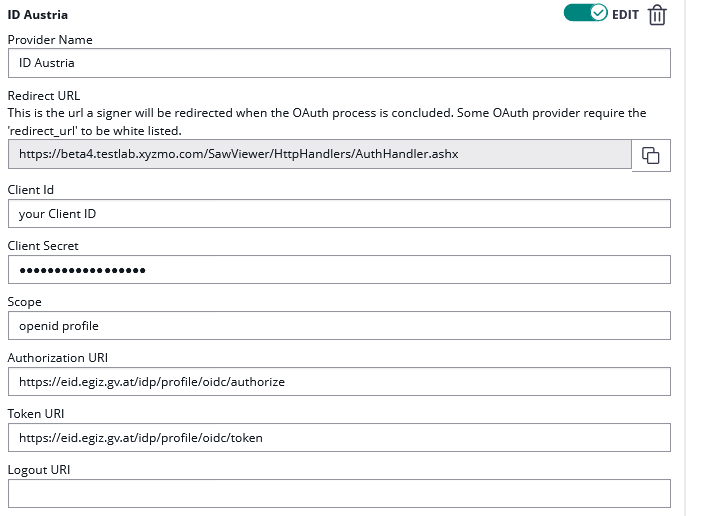
Open Settings > Identity Providers and add a new OAuth2 provider. Enter the ID Austria credentials and configuration values as below.
| Client ID: | your Client ID |
| Client Secret: | your Client Secret |
| Scope: | openid profile |
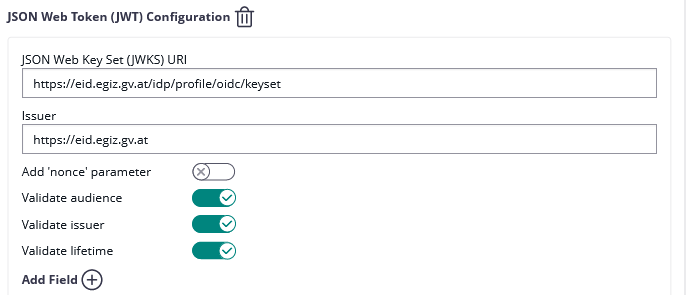
| Authorization URI: | https://eid2.oesterreich.gv.at/auth/idp/profile/oidc/authorize |
| Token URI: | https://eid2.oesterreich.gv.at/auth/idp/profile/oidc/token |
| Logout URI: | |
| JWKS URI: | |
| Issuer: | https://eid2.oesterreich.gv.at |
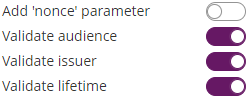
| On-Off Sliders: |
|

The URIs are documented in https://eid.egiz.gv.at/anbindung/direkte-anbindung/anbindung-oidc/ - if above's URIs don't work, check if there was an update on this page.
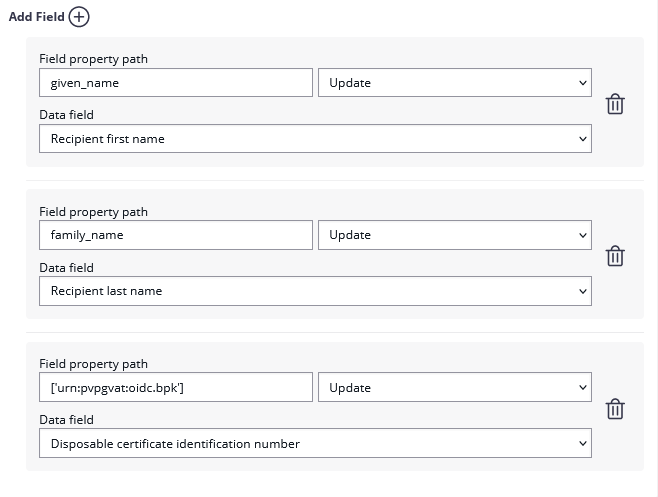
Add the following field mapping configurations:
| Field property path | Validate/Update | Data Field |
|---|---|---|
| given_name | Update | Recipient First Name |
| family_name | Update | Recipient Last Name |
| ['urn:pvpgvat:oidc.bpk'] | Update | Disposable Certificate identification number |
After setting these values, the JWT and field mapping configuraiton should look similar to the following screenshot.
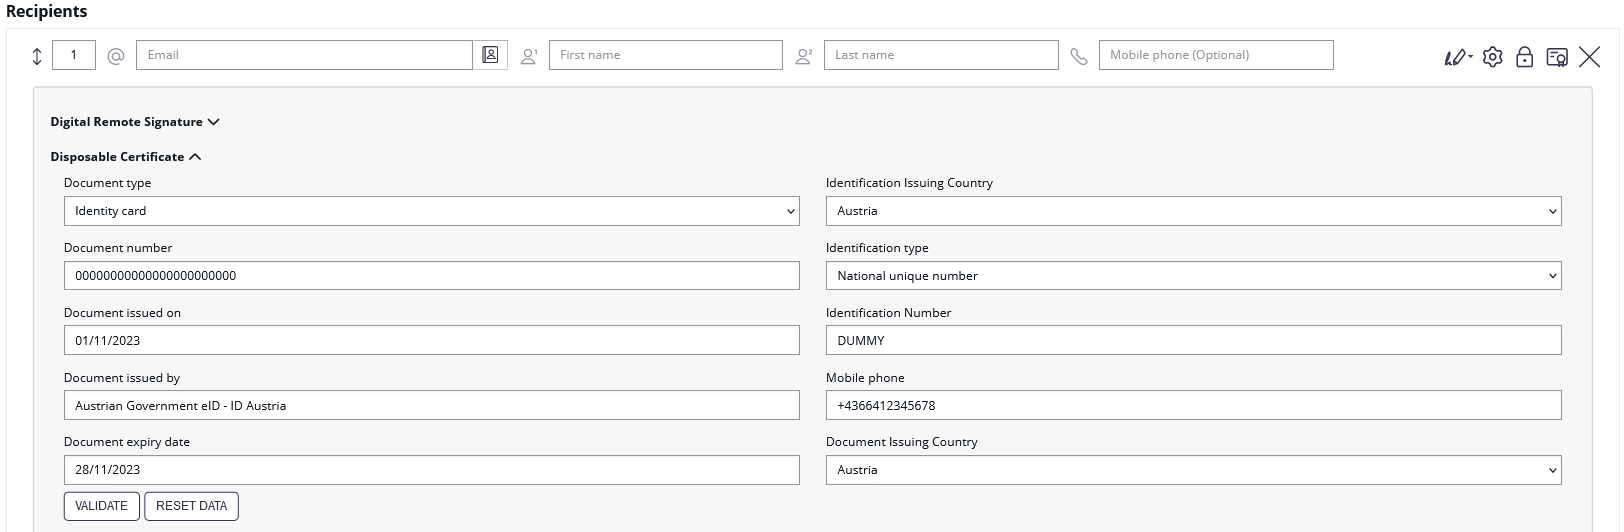
Please note that the disposable certificate identification number will be updated with this configuration. If you want to override the identification number as it is shown in the configuration please also make sure to add a disposable certificate for the signer.
Production Environment - USP Service "E-ID Serviceprovider"
Registration steps are similar to the one explained above for the test environment. Note that it requires for production use an acceditation and approval process triggered via USP, which may take some time.
Configuration is similar to the settings described above for "E-ID Serviceprovider (Q)" but with following changes (in short: "eid" instead of "eid2" in all URIs):
| Authorization URI: | https://eid.oesterreich.gv.at/auth/idp/profile/oidc/authorize |
| Token URI: | https://eid.oesterreich.gv.at/auth/idp/profile/oidc/token |
| JWKS URI: | |
| Issuer: | https://eid.oesterreich.gv.at |
Early Adopter Environment
| Info |
|---|
Please also see the following documentation about ID Austria (German documentation only): https://eid.egiz.gv.at/anbindung/direkte-anbindung/anbindung-oidc/ |
Step 1: Request early adopter access
Current process is published on ID Austria related technical documentation. In the past, it was a process that required to obtain client_secret via an email request.
We understood that registration for the "early adopter" environment is not available any more and interrested service providers should register for the "E-ID Serviceprovider (Q)" test environment via USP.GV.AT (see above).
Step 2: Configure eSignAnyWhere
Open Settings > Identity Providers and add a new OAuth2 provider. Enter the ID Austria credentials as below.
...
Please also see the next figures for the OAuth2 configuration and the JWT configuration:
Add the following field mapping configurations:
| Field property path | Validate/Update | Data Field |
|---|---|---|
| given_name | Update | Recipient First Name |
| family_name | Update | Recipient Last Name |
| ['urn:pvpgvat:oidc.bpk'] | Update | Disposable Certificate document typeidentification number |
Please note that the disposable certificate identification number will be updated with this configuration. If you want to override the identification number as it is shown in the configuration please also make sure to add a disposable certificate for the signer.
...
Czech BankID (Czech Republic)
...
- Login to eSignAnyWhere with a user that has administrative permissions on your Organization.
- Open the Settings > Identity Providers page and add new OAuth Settings for User Authentication.
- Note in case of ADFS that there are no forward slashes at the end. A mistake with the URL will result in the setup not working.
| Provider Name | If "Share on login page" is enabled, this name will be displayed on the login page, so make sure it identifies your organization. e.g.: ADFS Oauth for <Organization name> |
| Direct access url | If "Share on login page" is disabled, this link is needed to login to eSignAnyWhere with OAuth 2.0. Make sure you bookmark this link. |
| Redirect Url | This is already set and has to be added in the Application Group. We already entered this URL in Step 1. Make sure it is the correct URL. |
Client Id | your Client Identifier from Step 1 |
| Client Secret: | The shared secret that you saved earlier. |
| Scope: | openid email |
| Authorization URI: | https://FQDN/adfs/oauth2/authorize |
| Token URI: | https://FQDN/adfs/oauth2/token |
| Logout URI: | can be blank |
| Share on login page | Depending on the server settings this property might not be visible to you. If enabled your provider name will show up on the login page. |
| JWKS URI: | https://FQDN/adfs/discovery/keys |
| Issuer: | Click on "Add field" and enter "email" and map it to "User Email Address" |
- Click on Update to save the configuration
- Click on the slider to enable the OAuth provider
...
| Provider Name | If "Share on login page" is enabled, this name will be displayed on the login page, so make sure it identifies your organization. e.g.: MyNamirial for <Organization name> |
| Direct access url | If "Share on login page" is disabled, this link is needed to login to eSignAnyWhere with OAuth 2.0. Make sure you bookmark this link. |
| Redirect Url | This is already set and has to be white listed on MyNamirial. We already provided this URL in the request in Step 1. |
Client Id | your "Application (client) ID" from Step 1 |
| Client Secret: | your secret's value from Step 1 |
| Scope: | openid email |
| Authorization URI: | your authorization_endpoint from Step 2 or simply (for production instance of MyNamirial)https://auth.namirial.app/realms/namirial/protocol/openid-connect/auth |
| Token URI: | your token_endpoint from Step 2 or simply (for production instance of MyNamirial)https://auth.namirial.app/realms/namirial/protocol/openid-connect/token |
| Logout URI: | (Optional - can be blank) your end_session from Step 2 or simply (for production instance of MyNamirial)https://auth.namirial.app/realms/namirial/protocol/openid-connect/logout |
| Share on login page | Depending on the server settings this property might not be visible to you. If enabled your provider name will show up on the login page. |
| JWKS URI: | your jwks_uri from Step 2 or simply (for production instance of MyNamirial) |
| Issuer: | your https://auth.namirial.app/realms/namirial |
| On-Off Sliders: |
|
| Field Mappings: | Click on "Add field" and enter "email". Select rule "Validate" and map it to "User Email Address" |

...