This guide focuses on the OAuth2 authentication. It provides all information to configure an OAuth2 authentication for signer and for users. The first section focuses on the settings for the signer authentication and provides an overview of all configurations necessary to add a new provider. Please note that all information regarding the configuration of the provider for the signer authentication also apply for the user authentication.
OAuth 2.0 / OIDC for signer authentication or ident provider configuration
Identity provider configuration
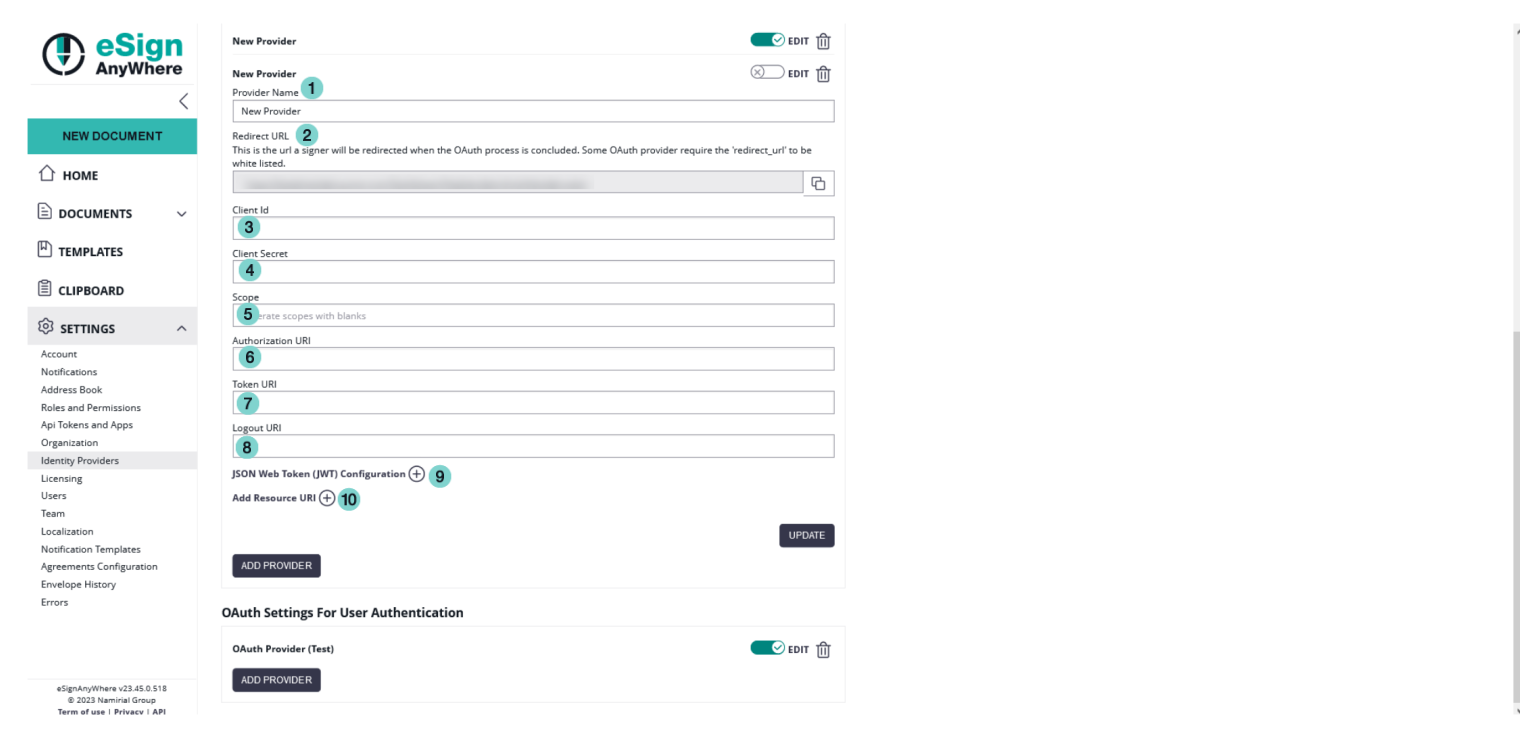
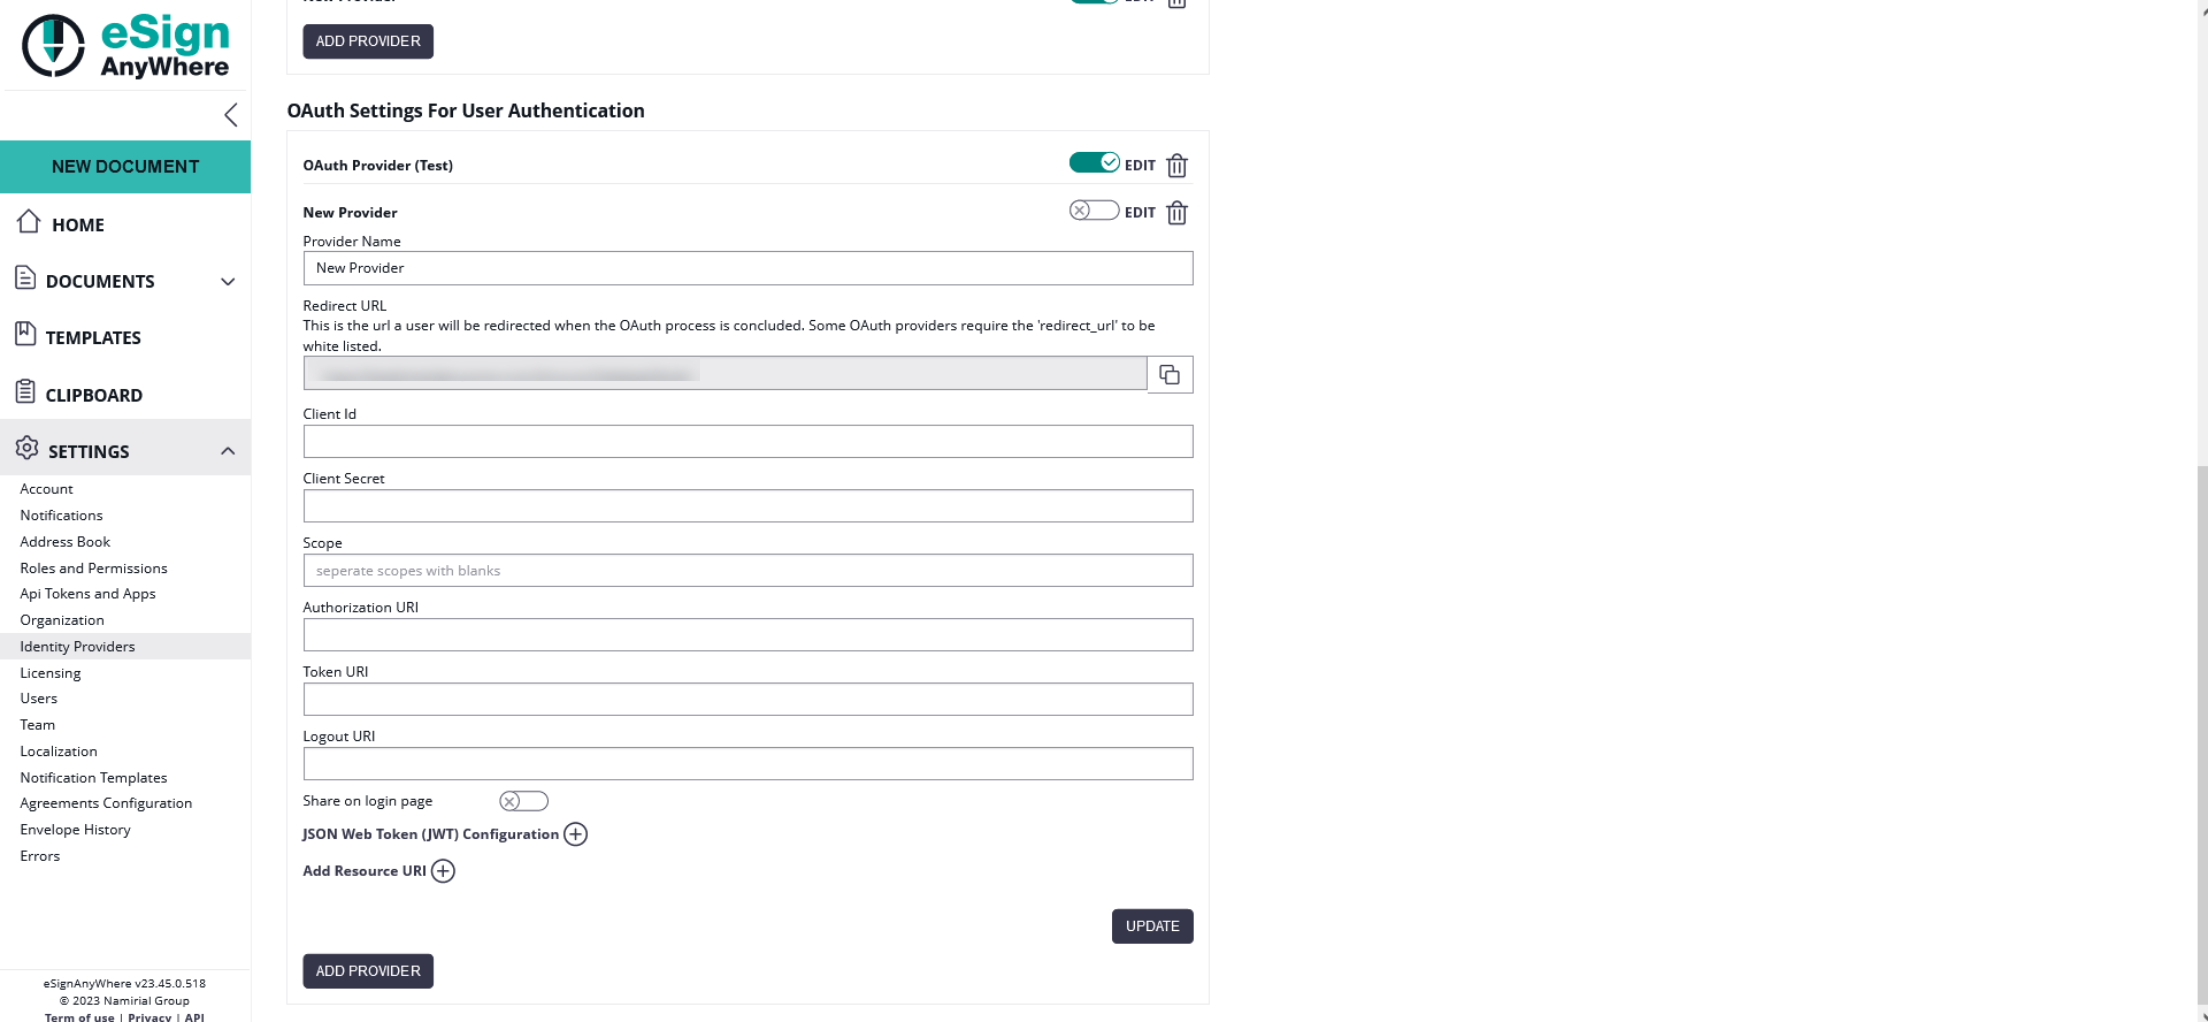
To configure the OAuth2 settings please open the "Identity Providers" section in the Settings.
On the first figure you can find the settings for the signer authentication. If you have configured and enabled the provider, you can then force the signer to authenticate before signing. For the signer authentication, we allow configuring 2 different options: an OAuth 2.0 Authorization Code flow (RFC 6749, Chapter 4.1) where one or several resource URIs are contacted to retrieve identification information, or the OpenID Connect (OIDC) compliant retrieval of a JWT token containing the identification data already. Choose the method offered by your identity provider.
| Figure | Desciption |
|---|---|
|
In this case we used the following Authorization Uri: https://demo.esignanywhere.net/Auth/Authorize and the following Token Uri: https://demo.esignanywhere.net/ApiToken/Retrieve.
OAuth 2.0 compliant retrieval of data from a resource URI
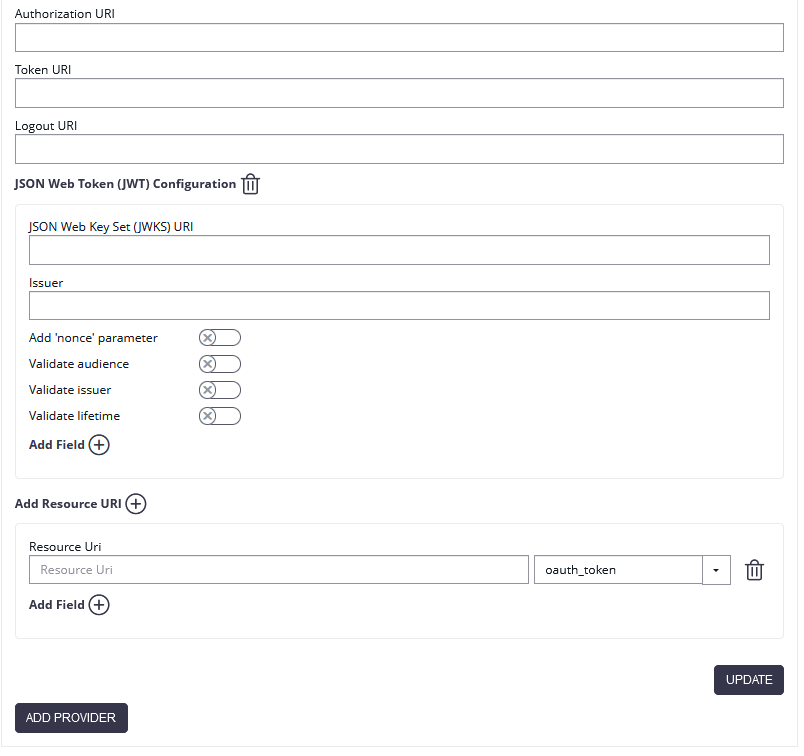
When fetching data from a resource uri instead of the JWT token, you just need the resource uri(s). The exact URI will be provided by your identity provider. For an OIDC complant identity provider, the data will be provided on a /userinfo endpoint (See also: OIDC Specification, UserInfo endpoint). It is expected that the resource URI returns a JSON data structure.
When specifying a resource uri data source, you can select which query parameter for authentication should be added to the resource URI call.
If an authentication based on a query parameter is required, select the appropriate one based on your identity provider's manual.
If the manual doesn't provide clear instructions, or when you are implementing an OIDC compliant authentication on a /userinfo endpoint, select "bearer" (see also: RFC 6750).
Also, whenever the token endpoint (!) returned that the token is a bearer token, the "Authorization: Bearer (token)" header is added to the resource URI calls.
In case the first call returns an HTTP Error response, another call without the query parameter (but with the token still in the Authorization header) is invoked as fallback strategy.
| Value | Authentication |
|---|---|
| oauth_token | The resource URI will be called as HTTP GET call, with a query parameter 'oauth_token' |
| oauth2_access_token | The resource URI will be called as HTTP GET call, with a query parameter 'oauth2_access_token' |
| access_token | The resource URI will be called as HTTP GET call, with a query parameter 'access_token' |
| bearer | The resource URI will be called as HTTP GET call, with a query parameter 'bearer' (and typically with Authorization header of type Bearer & the token - see above) |
All data retrieved via resource uri will be stored in the audit trail. You can find more information about the audit trail in the section below.
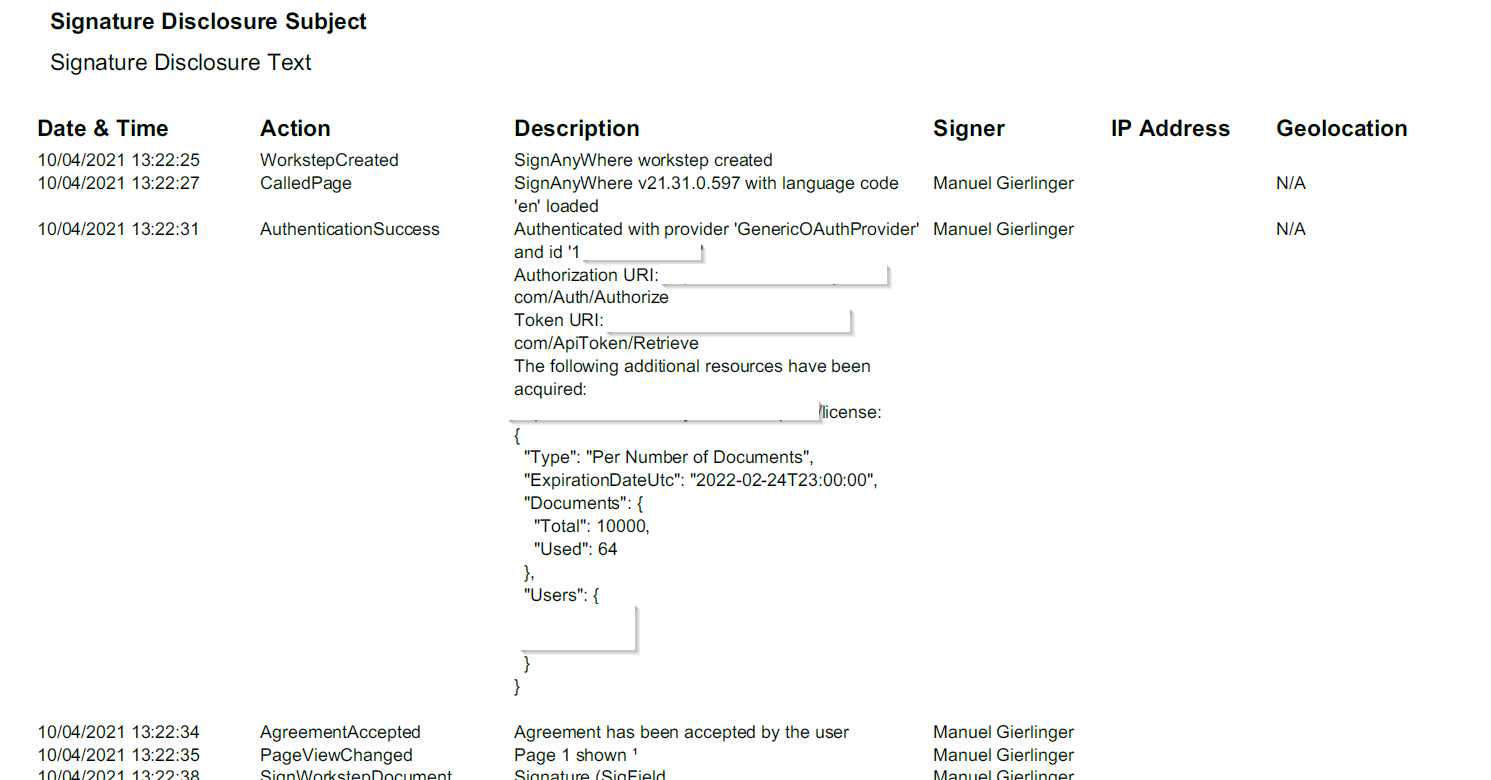
Beside using the resource URI to retrieve identification data, you could also use the resource URI to check (or document in the audit trail) e.g. product version information, in case such is provided. Below you find an example where a /license endpoint provides the product version information.
Data Mappings
For data retrieved from a resource uri, you can define data mappings. Data mappings allow the sender to define expected values, or when used for identification purpose to update recipient information with data provided by the OAuth 2.0 / OIDC identity provider. This can be e.g. in case of an eID provider a confirmed identity number.
To set up such a validation data mapping, or in case of an identity provider where the sender doesn't know the expected value to set up an update mapping, add a Field mapping to the resource URI. The "field property path" is the key of the returned JSON structure of the resource uri. In case of a simple key-value mapping in the JSON, it's just the key (e.g. "given_name"). In case of complex entities returned in the JSON datastructure, the field property path can be a field selector (e.g. "validated_data.given_name") Select the type of field mapping (validate or update), and specify against which data field the retrieved value should be compared (or which data field should be updated with data from the identity provider).
You can set up custom data input fields for validation rules, which means the sender has to provide the expected value in a separate input field. Since eSAW 21.31 you can also use the predefined data fields to validate against (e.g. the recipient mail address, or certain disposable certificate holder information fields). For udpate-rules, of course only the update of predefined fields is available.
Please also see the following table which shows the correlation between the naming in the WebUI (recipient definition) and the OAuth 2.0 provider configuration:
| Recipient definition in Web UI | OIDC JWT mapping configuration | Description |
|---|---|---|
Recipient line: First Name | Recipient first name | To override the first name (given name). Will update the last name also for subsequent worksteps with same recipient mail address. |
Recipient line: Last Name | Recipient last name | To override the last name (family name). Will update the last name also for subsequent worksteps with same recipient mail address.
When provided via JWT, it is mapping to both “recipient last name” and “disposable certificate holder last name”. |
Recipient line: Email | Recipient email address |
|
Recipient line: Phone Nr | Recipient phonenumber | Phone number of the recipient. May be used to authenticate (also in subsequent worksteps), of for signature type “OtpSignature” if no other number is specified for OtpSignature in the recipient configuration. If no disposable certificate phone number is provided, the recipient phone number will also be used to access the disposable certificate. |
Disposable Certificate: Document Type | Current: Disposable Certificate document recognition type Note: Will be updated to Disposable Certificate document type |
|
Disposable Certificate: Document Number | Disposable Certificate document number | Alphanumeric; special characters allowed |
Disposable Certificate: Document Issued On | Disposable Certificate document issued on | The date when the document was issued. |
Disposable Certificate: Document Issued By | Disposable Certificate document issued by | The authority which issued the document, as it is written on the document. “Ministry of Immigration” |
Disposable Certificate: Document Expiry Date | Disposable Certificate document expiry date | The date when the document may expire – as printed on the document; if not printed on the document then as specified by law. |
Disposable Certificate: Identification Issuing Country | Disposable Certificate Identification Country |
|
Disposable Certificate: Identification Type | Disposable Certificate Identification Type |
|
Disposable Certificate: Identification Number | Disposable Certificate Identification Number | Alphanumeric; special characters allowed |
Disposable Certificate: Mobile Phone | Disposable Certificate Phonenumber | The phone number used for accessing the disposable certificate. An OTP will sent to the number via SMS. |
Disposable Certificate: Document Issuing Country | Will be available soon! | The document issuing country is requested when using “Lean Disposable Certificates” (which is recommended). |
Disposable Certificate: Country of Residence | Disposable Certificate Country of Residence | The country of residence is requested when NOT using “Lean Disposable Certificates” - DEPRECATED. |
OpenID Connect (OIDC) with JWT (JSON Web Token)
Please note the following: Some IDPs require the "openid" scope to provide necessary information. Therefore, please check the necessary scopes of your IDP if JWT validation is used.
For more information about the JWT and OAuth please also see the following RFC:
- RFC 6749 (OAuth2 Autorization Framework)
- RFC 7519 (JWT)
- RFC 7515 (JWS)
- RFC 7517 (JWK)
For the JWT configuration you need the JWKS (JSON Web Key Set) Url the Issuer and you can define which dates should be validated. Per default all validations are disabled:
- Add 'nonce' parameter (to prevent replay attacks)
- Validate audience (the audience is the Client Id!)
- Validate issuer
- Validate lifetime
JWT sample:
The JWT specifies seven so called "claims" for example the "iss" for issuer, the "sub" for subject and more. Moreover the JWT typically consists of two parts, the type of the token (JWT) and the signing algorithmus.
For example:
eyJhbGciOiJIUzI1NiIsInR5cCI6IkpXVCJ9.eyJzdWIiOiIxMjM0NTY3ODkwIiwibmFtZSI6IlNpbW9uIFNlbGxlciIsImlzcyI6MTIzNDV9.##JWS-Signature##
The first two parts base64 decoded:
{"alg":"HS256","typ":"JWT"}.
{"sub":"1234567890","name":"Simon Seller","iss":12345}
Additionally you can add the Field property path. Afterwards, you can choose if you want to validate or update the data. Then you can choose the WorkstepData_Change (in this case the recipient email address was chosen). Please note that you can only validate, but not update the email address!
Data Mappings
Data mappings for data retrieved as claims of the JWT token work similar to the data mappings of the resource uri described above.
Since eSignAnyWhere 21.40, the field value can reference to hierarchical data structures within the JWT. Therefore use the dot (.) separator to address different levels.
Example:
Assuming the JSON structure is:
{
  "person_data" : {
    "given_name" : "John",
    "family_name" : "Doe"
  }
}
Then, the given name can be accessed as
person_data:given_name
In case the JWT contains claims with a name that contains the dot (.) or colon (:), ensure to wrap the identifier within ['..']
Assuming the JSON structure is:
{
  "given_name" : "John",
  "family_name" : "Doe",
  "urn:pvpgvat:oidc.bpk" : "1234567+"
}
Then, the bpk value can be accessed as
['urn:pvpgvat:oidc.bpk']
Note that eSignAnyWhere up to (including) version 21.31 does NOT support addressing elements within complex data structures in the JWT. Therefore, in these releases you have to use the identifier of a flat structure, without ['..']
Sending an Envelope with OAuth 2.0 / OIDC authentication
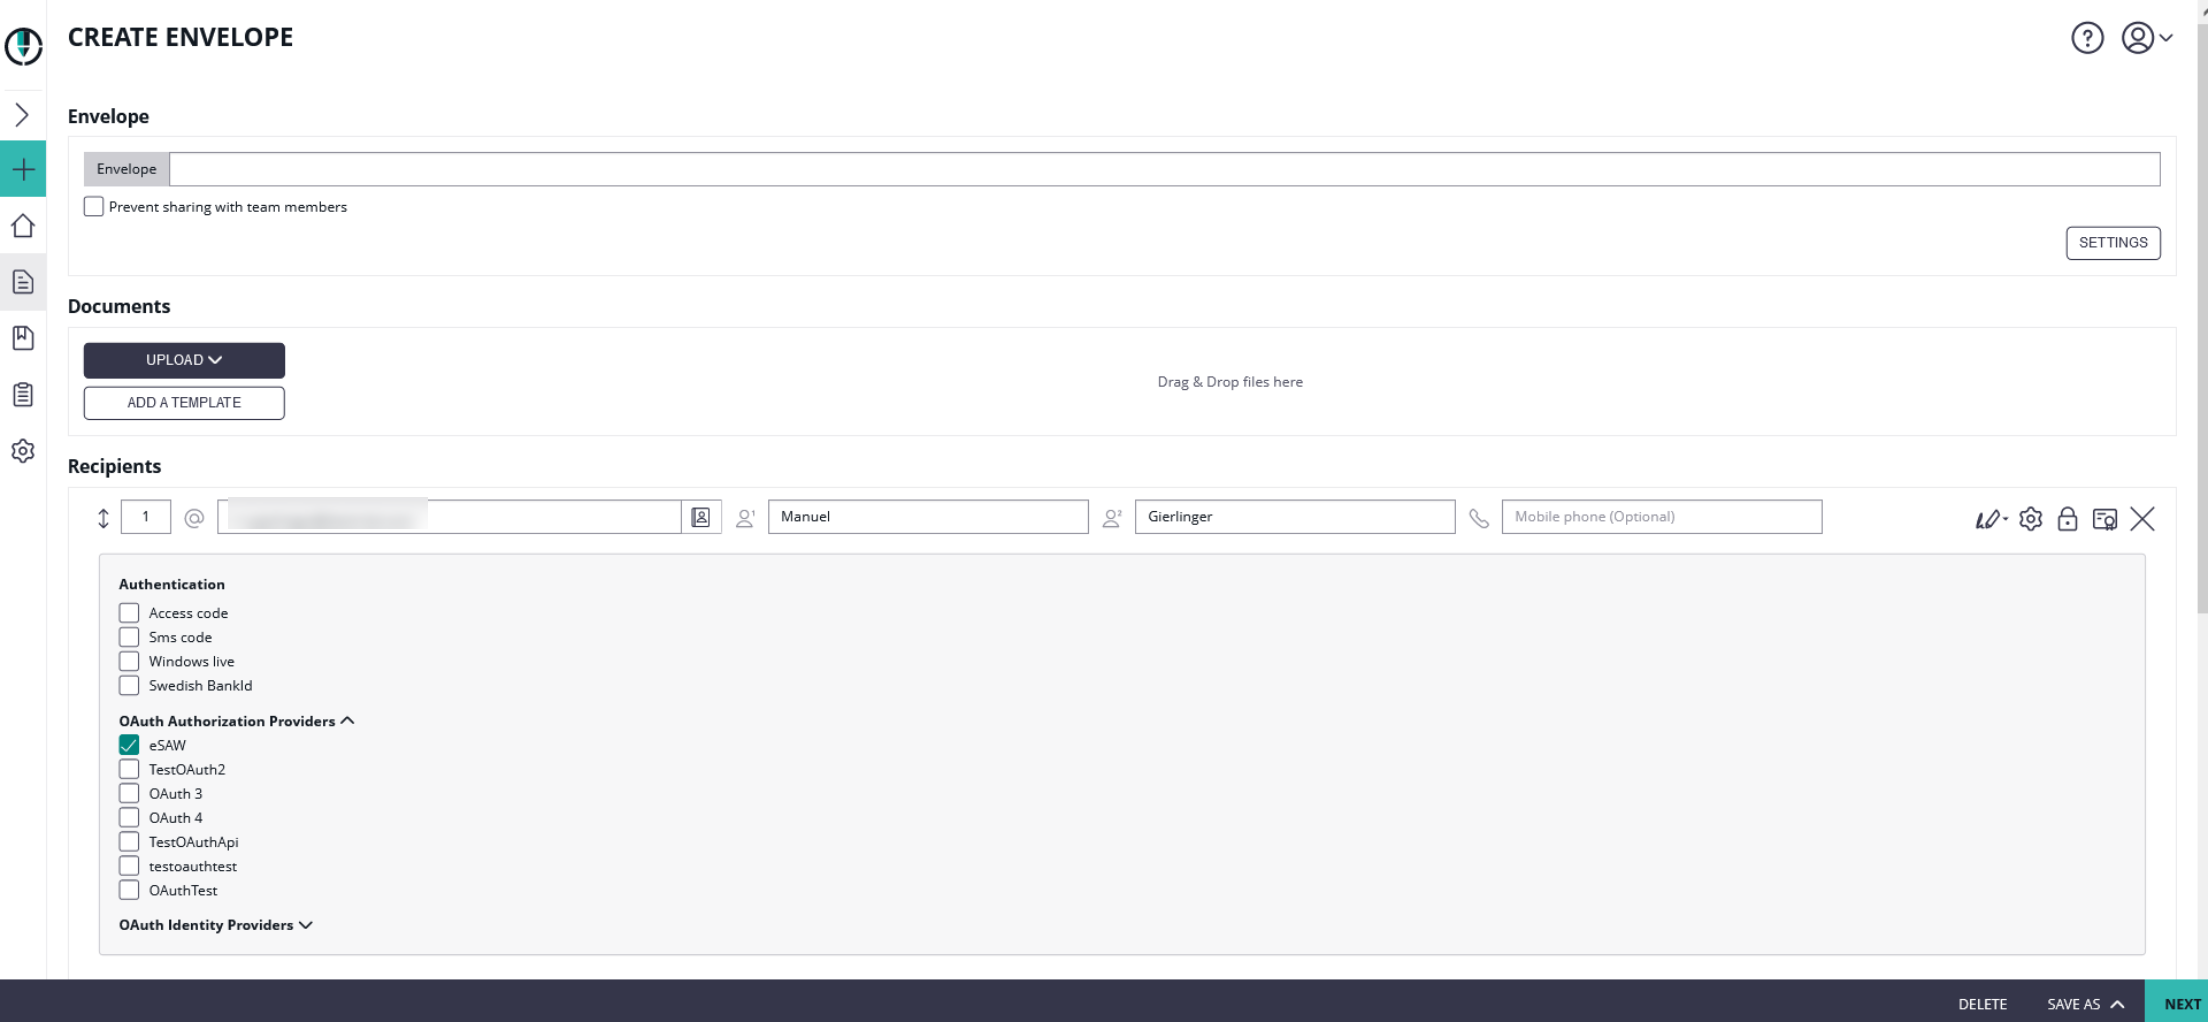
After the configuration you can add the authentication for the signer on the designer page. Please see the next figure:
Authenticating for a signer activity via OAuth 2.0 / OIDC
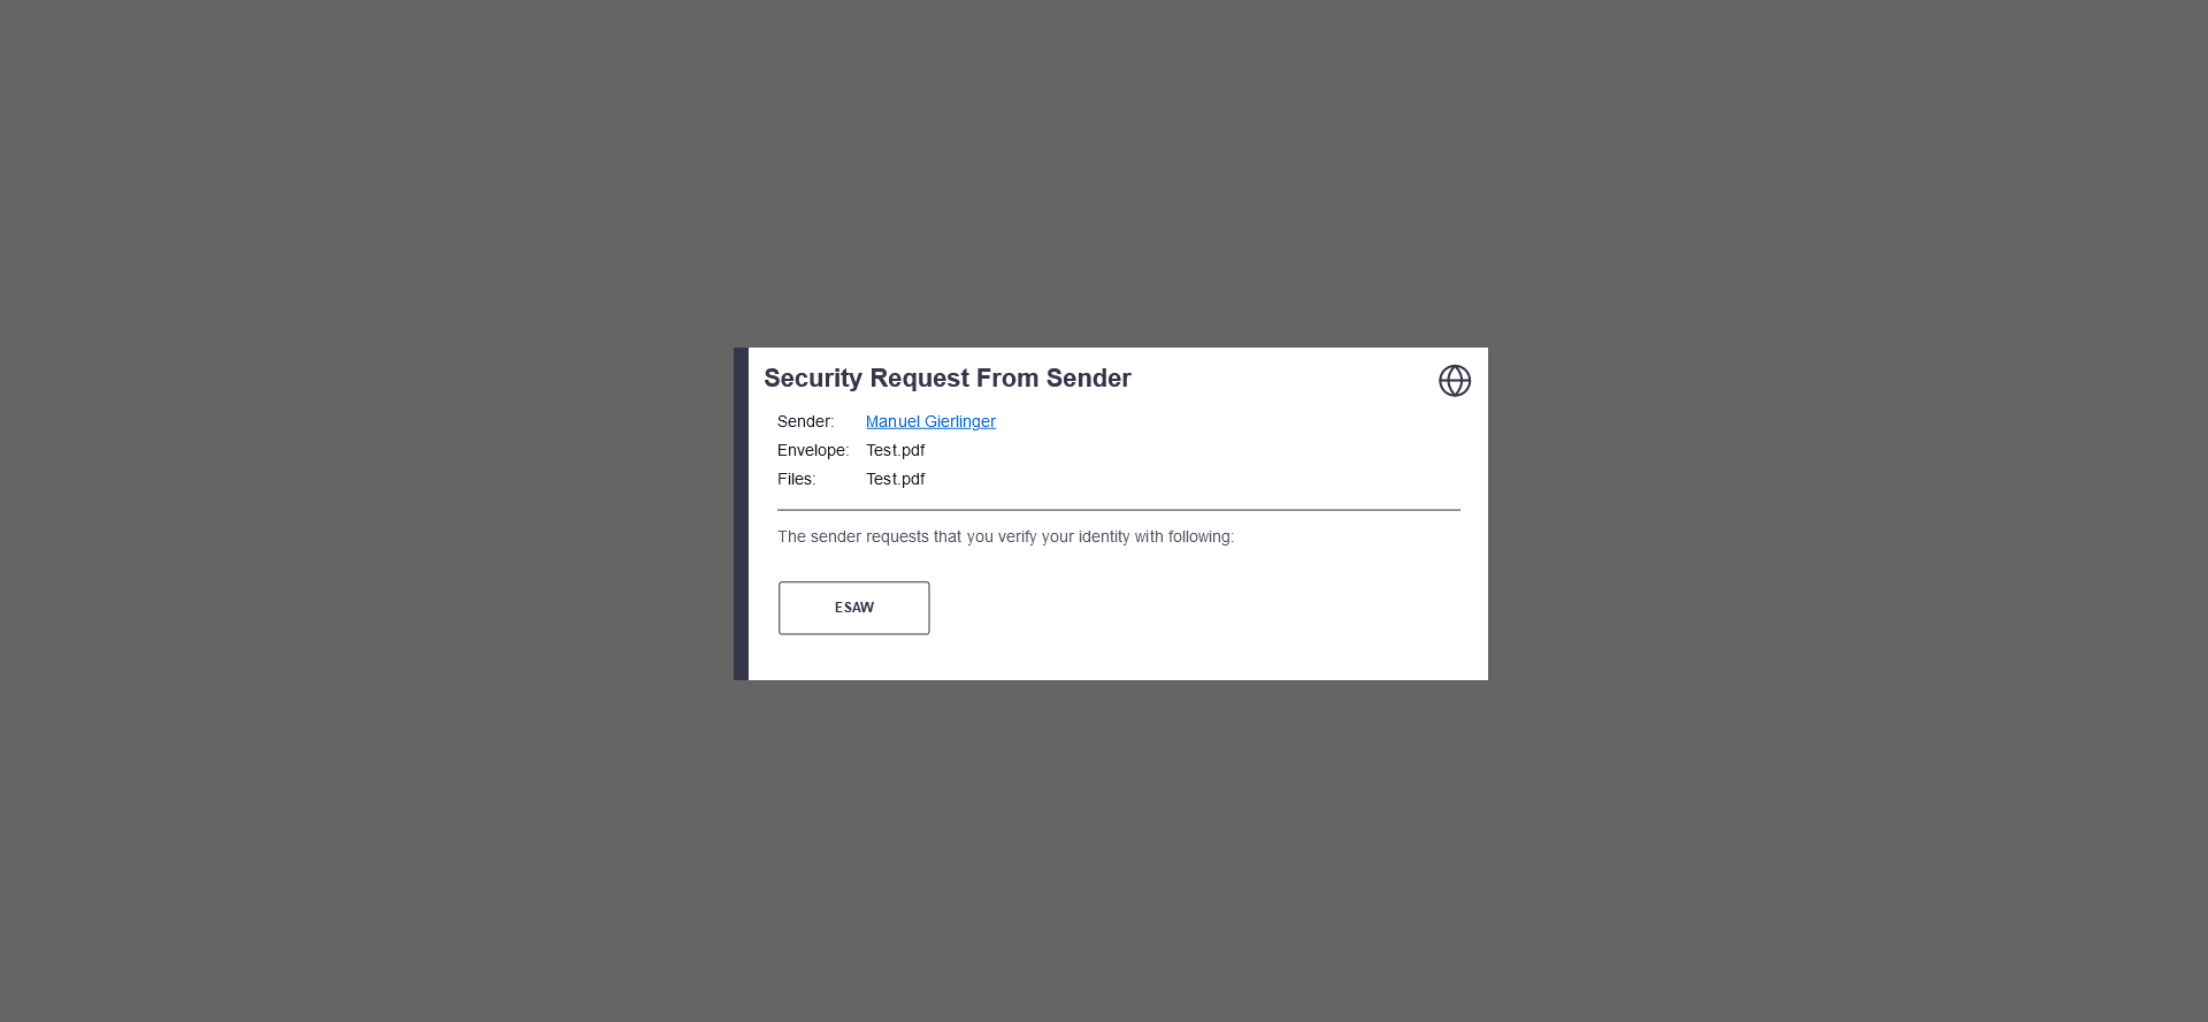
After enabling the authentication for the signer, the signer will see the following window appearing before signing:
Instead of authenticating with eSAW, the different OAuth identification options allowed for signer authentication will be presented to the signer. The signer can select the preferred one, and proceeds to the OAuth identity provider specific login page or signer identification procedure.
After signing the envelope you can find all information regarding the authentication in the audit trail.
Because we added as a resource uri the license encpoint (https://demo.esignanywhere.net/api/v5/license), we can see all information about the license:
REST configuration
This configuration contains one resource uri with one field validating the email address.
{

  "SspFileIds": [
    "##FileId##"
  ],
  "SendEnvelopeDescription": {
  "Name": "test",
  "EmailSubject": "Please sign the enclosed envelope",
  "EmailBody": "Dear #RecipientFirstName# #RecipientLastName#

#PersonalMessage#

Please sign the envelope #EnvelopeName#

Envelope will expire at #ExpirationDate#",
  "DisplayedEmailSender": "",
  "EnableReminders": true,
  "FirstReminderDayAmount": 5,
  "RecurrentReminderDayAmount": 3,
  "BeforeExpirationDayAmount": 3,
  "ExpirationInSecondsAfterSending": 2419200,
  "CallbackUrl": "",
  "StatusUpdateCallbackUrl": "",
  "LockFormFieldsAtEnvelopeFinish": false,
  "Steps": [
    {
      "OrderIndex": 1,
      "Recipients": [
        {
          "Email": "##EMAIL##",
          "FirstName": "##NAME##",
          "LastName": "##NAME##",
          "LanguageCode": "en",
          "EmailBodyExtra": "",
          "DisableEmail": false,
          "AddAndroidAppLink": false,
          "AddIosAppLink": false,
          "AddWindowsAppLink": false,
          "AllowDelegation": true,
          "AllowAccessFinishedWorkstep": false,
          "SkipExternalDataValidation": false,
          "AuthenticationMethods": [
            {
              "Method": "CustomOAuthProvider",
              "Parameter": "OAuthTest",
              "Filters": [
                {
                  "CompareOperation": "Equals",
                  "FilterId": "Email",
                  "FilterValue": "##EMAIL##"
                }
              ]
            }
          ],
          "IdentificationMethods": []
        }
      ],
      "EmailBodyExtra": "",
      "RecipientType": "Signer",
      "WorkstepConfiguration": {
        "WorkstepLabel": "test",
        "SmallTextZoomFactorPercent": 100,
        "FinishAction": {
          "ServerActions": [],
          "ClientActions": []
        },
        "ReceiverInformation": {
          "UserInformation": {
            "FirstName": "##NAME##",
            "LastName": "##NAME##",
            "EMail": "##EMAIL##"
          },
          "TransactionCodePushPluginData": []
        },
        "SenderInformation": {
          "UserInformation": {
            "FirstName": "##NAME##",
            "LastName": "##NAME##",
            "EMail": "##EMAIL##"
          }
        },
        "TransactionCodeConfigurations": [],
        "SignatureConfigurations": [],
        "ViewerPreferences": {
          "FinishWorkstepOnOpen": false,
          "VisibleAreaOptions": {
            "AllowedDomain": "",
            "Enabled": false
          }
        },
        "ResourceUris": {
          "DelegationUri": "##DelegationUri##",
          "SignatureImagesUri": "##SignatureImagesUri##"
        },
        "AuditingToolsConfiguration": {
          "WriteAuditTrail": true
        },
        "Policy": {
          "GeneralPolicies": {
            "AllowSaveDocument": true,
            "AllowSaveAuditTrail": true,
            "AllowRotatingPages": false,
            "AllowAppendFileToWorkstep": false,
            "AllowAppendTaskToWorkstep": false,
            "AllowEmailDocument": true,
            "AllowPrintDocument": true,
            "AllowFinishWorkstep": true,
            "AllowRejectWorkstep": true,
            "AllowRejectWorkstepDelegation": true,
            "AllowUndoLastAction": true,
            "AllowColorizePdfForms": false,
            "AllowAdhocPdfAttachments": false,
            "AllowAdhocSignatures": false,
            "AllowAdhocStampings": false,
            "AllowAdhocFreeHandAnnotations": false,
            "AllowAdhocTypewriterAnnotations": false,
            "AllowAdhocPictureAnnotations": false,
            "AllowAdhocPdfPageAppending": false,
            "AllowReloadOfFinishedWorkstep": true
          },
          "WorkstepTasks": {
            "PictureAnnotationMinResolution": 0,
            "PictureAnnotationMaxResolution": 0,
            "PictureAnnotationColorDepth": "Color16M",
            "SequenceMode": "NoSequenceEnforced",
            "PositionUnits": "PdfUnits",
            "ReferenceCorner": "Lower_Left",
            "Tasks": [
              {
                "Texts": [
                  {
                    "Language": "en",
                    "Value": "Signature Disclosure Text"
                  },
                  {
                    "Language": "*",
                    "Value": "Signature Disclosure Text"
                  }
                ],
                "Headings": [
                  {
                    "Language": "en",
                    "Value": "Signature Disclosure Subject"
                  },
                  {
                    "Language": "*",
                    "Value": "Signature Disclosure Subject"
                  }
                ],
                "IsRequired": false,
                "Id": "ra",
                "DisplayName": "ra",
                "DocRefNumber": 1,
                "DiscriminatorType": "Agreements"
              },
              {
                "PositionPage": 1,
                "Position": {
                  "PositionX": 84.0,
                  "PositionY": 573.0
                },
                "Size": {
                  "Height": 80.0,
                  "Width": 190.0
                },
                "AdditionalParameters": [
                  {
                    "Key": "enabled",
                    "Value": "1"
                  },
                  {
                    "Key": "completed",
                    "Value": "0"
                  },
                  {
                    "Key": "req",
                    "Value": "1"
                  },
                  {
                    "Key": "fd",
                    "Value": ""
                  },
                  {
                    "Key": "fd_dateformat",
                    "Value": "dd-MM-yyyy HH:mm:ss"
                  },
                  {
                    "Key": "fd_timezone",
                    "Value": "datetimeutc"
                  }
                ],
                "AllowedSignatureTypes": [
                  {
                    "AllowedCapturingMethod": "Click2Sign",
                    "Id": "98dd404c-1507-4162-b023-a23bb4ddec69",
                    "DiscriminatorType": "SigTypeClick2Sign",
                    "Preferred": false,
                    "StampImprintConfiguration": {
                      "DisplayExtraInformation": true,
                      "DisplayEmail": true,
                      "DisplayIp": true,
                      "DisplayName": true,
                      "DisplaySignatureDate": true,
                      "FontFamily": "Times New Roman",
                      "FontSize": 11.0,
                      "OverrideLegacyStampImprint": false,
                      "DisplayTransactionId": true,
                      "DisplayTransaktionToken": true,
                      "DisplayPhoneNumber": true
                    },
                    "SignaturePluginConfigurationId": "ltaLevelId"
                  }
                ],
                "UseTimestamp": false,
                "IsRequired": true,
                "Id": "1#XyzmoDuplicateIdSeperator#Signature_f51586fa-e856-e06a-879d-0ffa11d9ee8c",
                "DisplayName": "",
                "DocRefNumber": 1,
                "DiscriminatorType": "Signature"
              }
            ]
          },
          "FinalizeActions": {
            "FinalizeActionList": [
              {
                "DocRefNumbers": "*",
                "SpcId": "ltaLevelId",
                "DiscriminatorType": "Timestamp"
              }
            ]
          }
        },
        "Navigation": {
          "HyperLinks": [],
          "Links": [],
          "LinkTargets": []
        }
      },
      "DocumentOptions": [
        {
          "DocumentReference": "1",
          "IsHidden": false
        }
      ],
      "UseDefaultAgreements": true
    },
    {
      "OrderIndex": 2,
      "Recipients": [
        {
          "Email": "##EMAIL##",
          "FirstName": "##NAME##",
          "LastName": "##NAME##",
          "LanguageCode": "en",
          "EmailBodyExtra": "",
          "DisableEmail": false,
          "AddAndroidAppLink": false,
          "AddIosAppLink": false,
          "AddWindowsAppLink": false,
          "AllowDelegation": false,
          "SkipExternalDataValidation": false,
          "AuthenticationMethods": [],
          "IdentificationMethods": []
        }
      ],
      "EmailBodyExtra": "",
      "RecipientType": "Cc",
      "DocumentOptions": [],
      "UseDefaultAgreements": false
    }
  ],
  "AddFormFields": {
    "Forms": {}
  },
  "OverrideFormFieldValues": {
    "Forms": {}
  },
  "AttachSignedDocumentsToEnvelopeLog": false
}
}
OAuth for user authentication
Before starting with the configuration please note that two new templates are available for OAuth2 authentication. You can find those templates in the section "Email Templates":
- OAuth user assignment invalidation information
- Initial OAuth verification request
For more information about the configuration please see the OAuth2 settings for signer authentication above. The settings for the user authentication are equal to settings of the signer authentication.
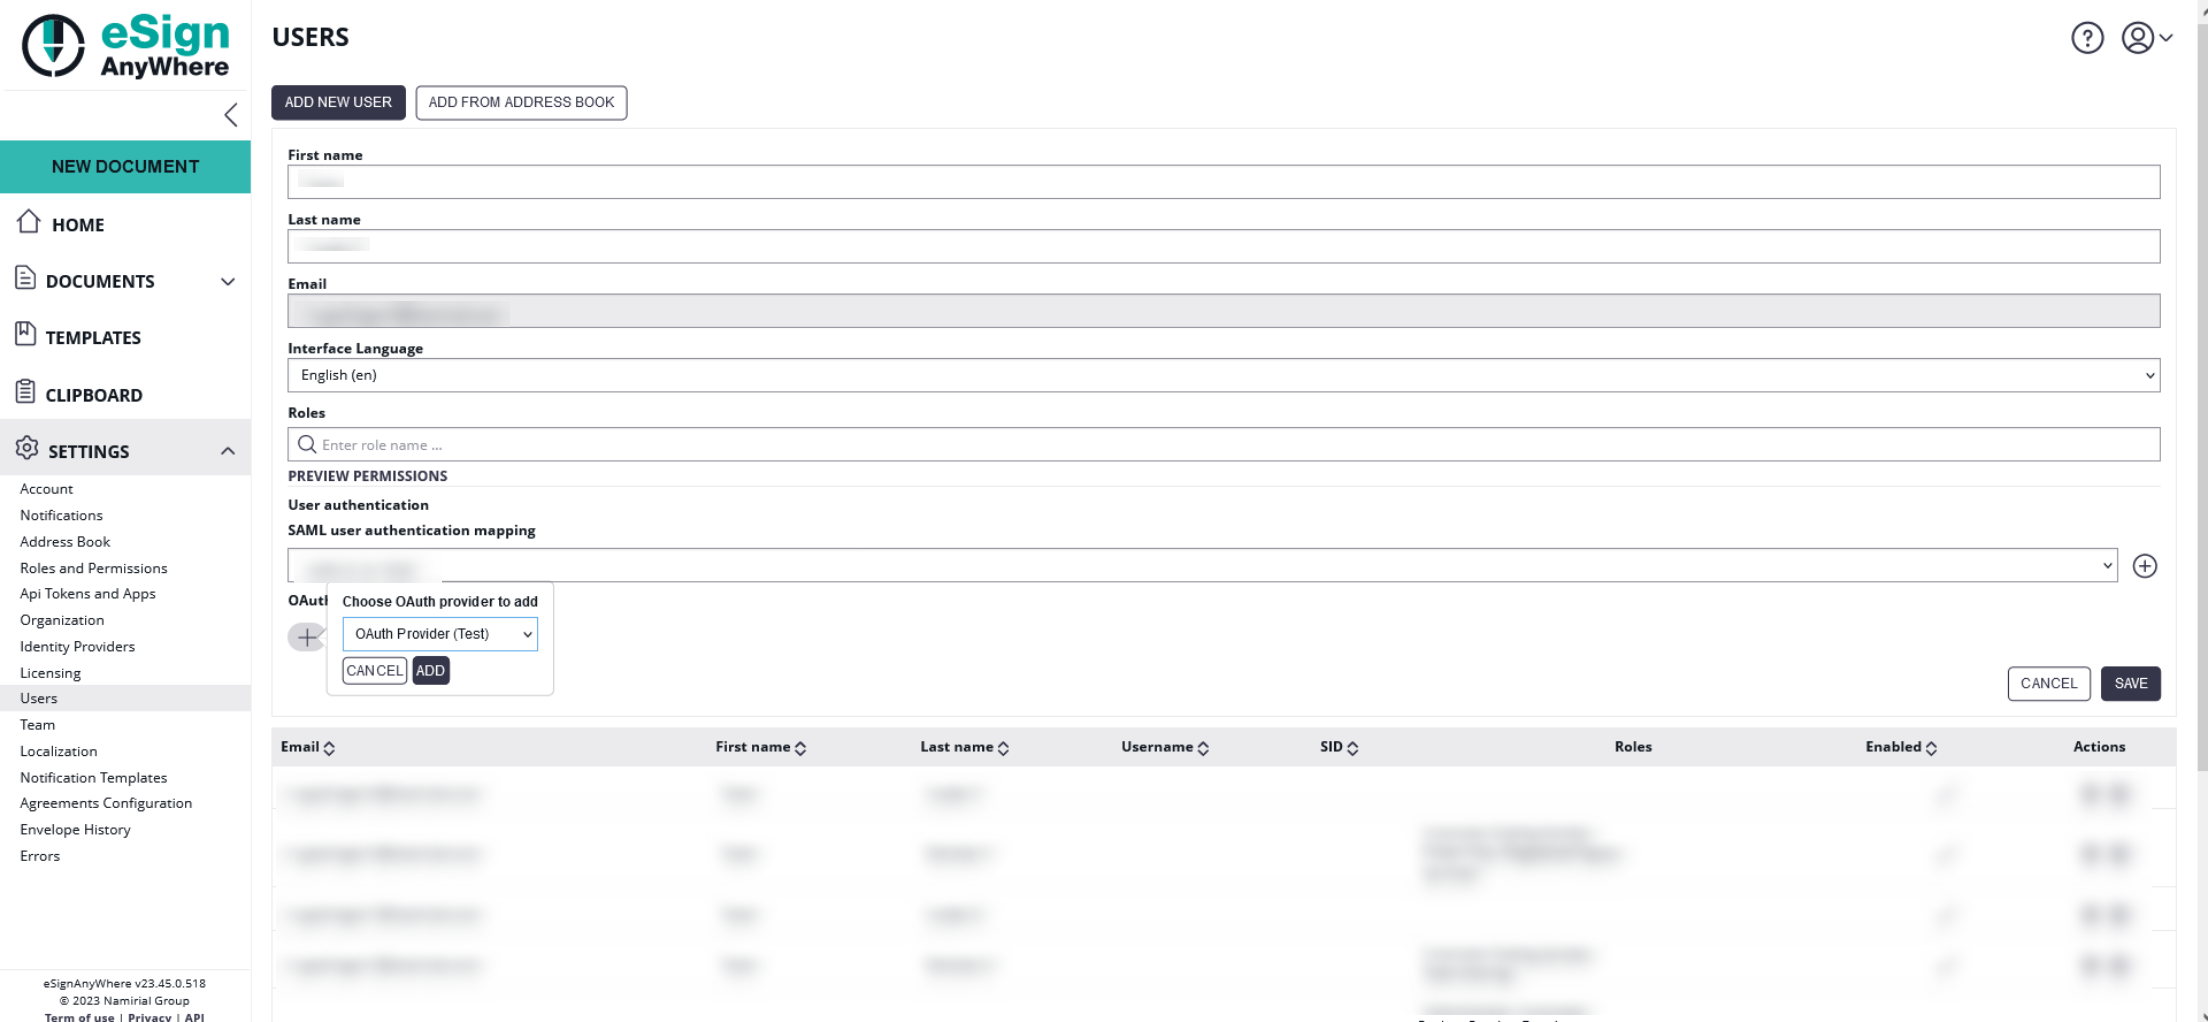
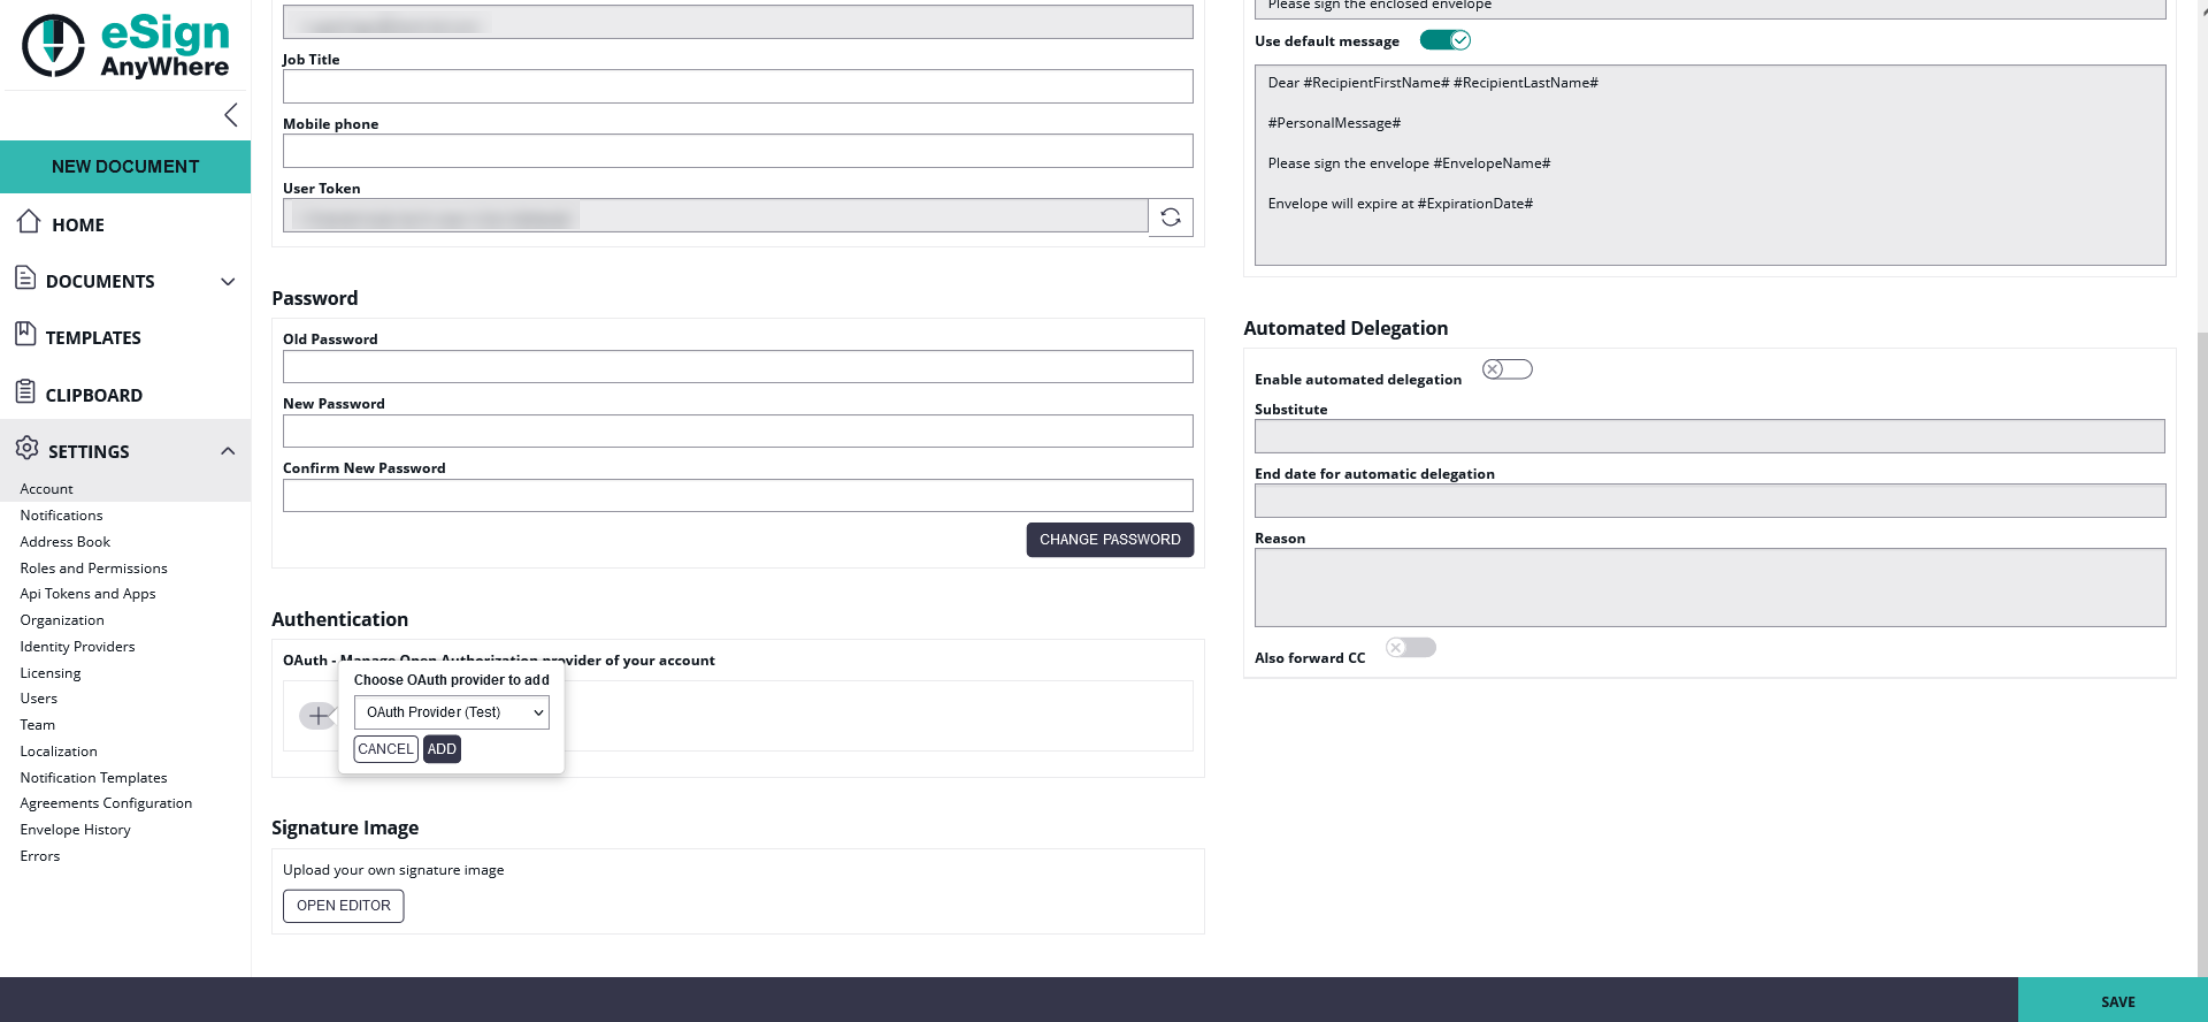
After configuration add the new provider to a user. You can either add the provider for users in the users setting or you can add the provider in the account setting. Please see the next two figures for more information:
When configuring a mapping, the user will get an email inviting him to bind his account to an OAuth identity provider. Once authenticated successfully, the user is linked to that identity. This step is required to avoid that someone with administrative permissions gets full control of another's account.
After setting up the OAuth2 binding, the user has to use the (readonly) Logon URL provided in the OAuth2 configuration.
If allowed in the instance configuration (_global.xml), the admin could even decide to add the OAuth login option on the main login page.
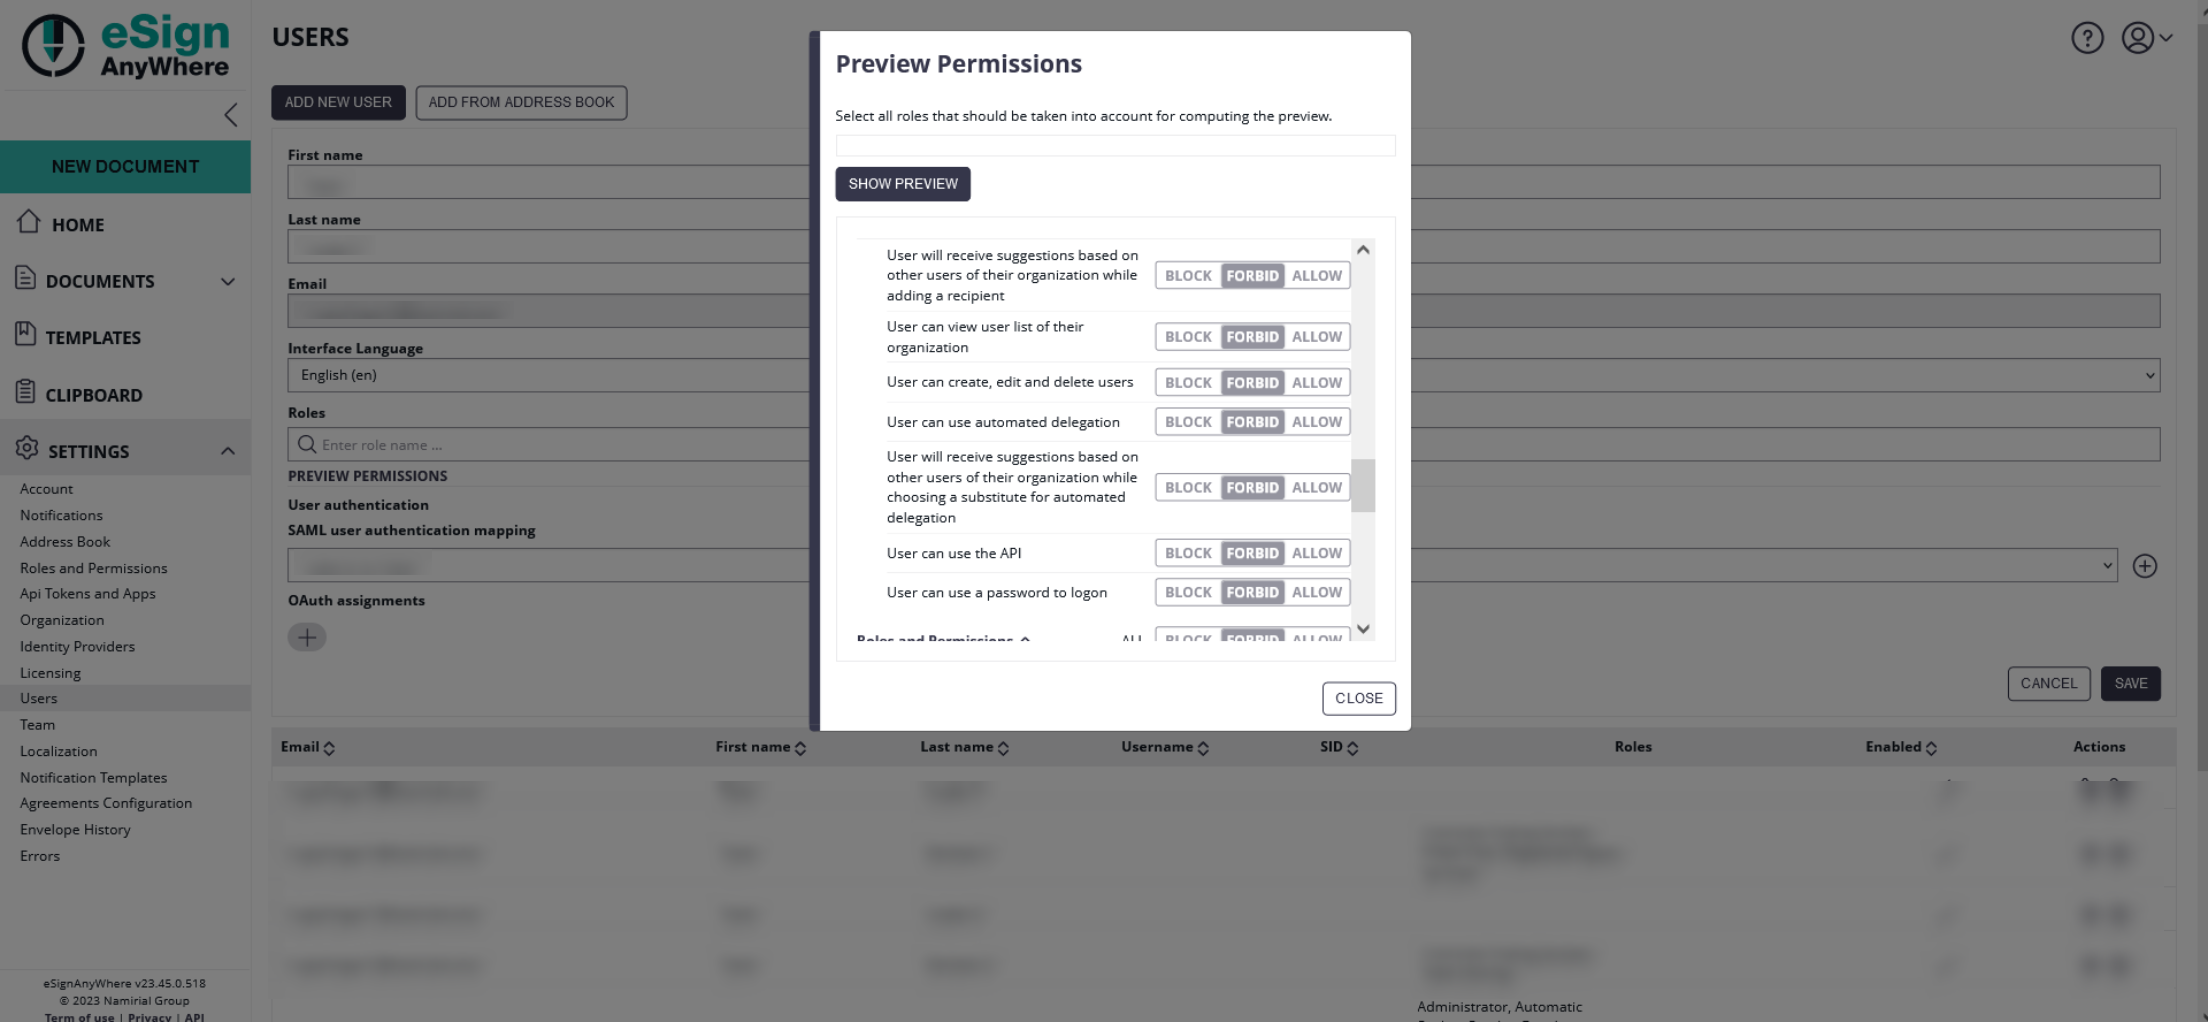
Note that the user, in case he has the permission "User can use a password to logon", could bypass the OAuth authentication. You can find this permission if you choose a user and click on the "Preview Permissions".
FAQ
After successful login in the external system, I am getting "The validation of the OAuth login could not be processed" with a OAuth User Authentication configuration. What am I doing wrong?
During login with an external OAuth Identity Provider, you are first redirected to the authorization (login) page of the external system which provides identification dataset via a resource endpoint, or which issues a JWT token with a signed response. The error shows that your configuration is not compatible with the external identity provider configuration. Therefore please verify your configuration and compare it against the manual of the OAuth Identity Provider. Please mind that also the error message in serverside application logs just indicates that "something in token retrieval was wrong", but will not be verbose about potential causes. The serverside log message "<TOKEN_FETCH_CALL_FAILED - Failed to fetch OAuth access token" could indicate reasons such as:
- Token URI is invalid
- JWKS URI is invalid and therefore a retrieved JWT cannot be verified
- Other verifications on JWT level, such as token validity, are not fulfilled
