| Table of Contents |
|---|
Introduction
The purpose of this document is to describe the installation, configuration and management procedures for the Virtual Appliance (VA) named SignEngineWeb (SWS). The VA SWS was created to be manageable and ready-to-use. You should import this virtual machine (".ovf") in your infrastructure and then do the setup (for example, set up the proxy). With VA SWS, it is possible to sign, apply timestamps and verify the signature. SWS supports different types of signature devices:
- Automatic signature
- Remote signature
- Disposable
- Lean Disposable
- eSeal (electronic seal)
The supported signature standards are:
- CAdES
- PAdES
- XAdES
- RAW signature (PKCS#1)
Additionally, it is possible to set the different levels of signature such as B, T, LT, LTV etc... These details are described in the documentation about integration with SWS.
The timestamps applied are in accordance with RFC 3161 and RFC 5544 standards.
During the verification of the signatures, SWS can verify certificates issued by all accredited Certification Authorities in the Countries of the European Community. Also, it is possible to verify signatures in any of the CAdES, PAdES and XAdES formats.
In this guide will be described how to import the SWS appliance into VMWare workstation player.
Architectural Elements
SWS is intended to be hosted in the same environment as the applications that need to use the signature and verification services. Applications that require the signature will connect to and send the entire file content to SWS. SWS calculates the file hash and asks from the FRA component (located in the Namirial CA datacenter) to sign it. FRA represents the system component which manages HSMs and uses the RSA algorithm-type signature.
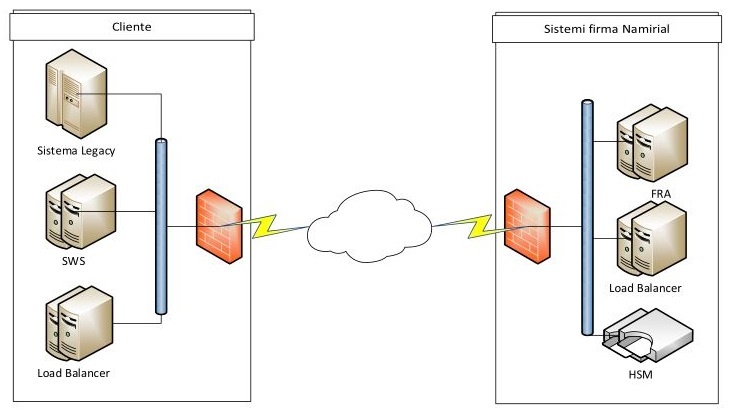
Assuming SWS is inside the LAN (the same LAN hosting the applications that require the signature services) the documents are exchanged inside a private network. We have the confidentiality of the information contained in the hash that SWS has transmitted to FRA and a low impact on the Internet bandwidth. For each signature sent between SWS and FRA, approximatively 7KB are used, regardless of the document size. In the case of submissions of merged requests, the bandwidth usage decreases thanks to TCP, HTTPS and SOAP lower impacts.
Inflows and Outflows
SWS exposes its services via the SOAP protocol.
On the other hand, it operates as a client in the following ways:
- For signing operations it needs to contact the RAW signature services (PKCS#1 format) at https://fra.firmacerta.it
- For timestamping operations it must be able to contact the Timestamping Authority (TSA) set in the call. In this case the supported protocols are HTTP and HTTPS. More precisely, Namirial TSA can be reached at http://timestamp.firmacerta.it and at https://timestamp.firmacerta.it
- For signing verifications it must be able to contact the CA that issued the signer's certificate in order to prove its validity
- For Updating TLS (TrustedList), it contacts periodically every EC national agency that supervises the Certification Authority (in Italy, this is AgID).
Minimum Requirements
For proper operation it is necessary that the virtual machine has allocated at least the following resources:
- 4 GB RAM (8 GB are suggested)
- 40 GB Hard Disk
- 2 core
- 1 network interface
This configuration allows to sign files till 80 Mb by SOAP interface and till 1 Gb by REST one (currently limited to PAdES and CAdES signature).
Ports and Protocols Usages (firewall rules)
Below the list of port and protocol used by SWS:
| Operation | Description | Frequency | Protocol | Ports | TCP/UDP | Address | SWS Environment |
|---|---|---|---|---|---|---|---|
| Signature | Sends a request to the Namirial server for signing the hash | Every call | HTTPS | 443 | TCP | fra.firmacerta.it | PROD |
| Timestamp | Sends a request to the Namirial server for applying the timestamp to the hash | Every call | HTTP | 80 | TCP | timestamp.firmacerta.it | PROD |
| Timestamp | Sends a request to the Namirial server for applying the timestamp to the hash | Every call | HTTPS | 443 | TCP | timestamp.firmacerta.it | PROD |
| Verification OCSP | Sends a request to the OCSP link for checking the certificate | Every call (whenever possible) | OCSP | 80 | TCP | It depends on the the CA that issued the certificate for the signature. For Namirial, the link is: "ocsp.firmacerta.it" | PROD |
| Signature | This operation sends a request to the Namirial server for signing the hash | Every call | HTTPS | 443 | TCP | fra.test.firmacerta.it | TEST |
| Timestamp | Sends a request to the Namirial server for applying the timestamp to the hash | Every call | HTTP | 80 | TCP | timestamp.test.firmacerta.it | TEST |
| Timestamp | Sends a request to Namirial server for applying the timestamp to the hash | Every call | HTTPS | 443 | TCP | timestamp.test.firmacerta.it | TEST |
| Verification OCSP | For validate the certificate send request to OCSP for check the certificate | Every call (whenever possible) | OCSP | 80 | TCP | It depends on the CA issued the certificate used for the signature. For Namirial it's: "ocsp.firmacerta.it" | PROD |
| Verification CRL | For validate the signature certificate check the serial number into CRL | HTTP/LDAP | 80, 389 | TCP | It depends on the CA issued the certificate used for the signature. For Namirial it's: "crl.firmacerta.it" | PROD | |
| Verification | At startup SWS download all European Trusted Root from European supervisory agenciences | HTTPS | 443 | TCP | ec.europa.eu (the full link is: https://ec.europa.eu/information_society/policy/esignature/trusted-list/tl-mp.xml) | TEST, PROD | |
| Updates and Monitoring | Used for receiving automatic updates and receive | Always | JABBER, HTTP, HTTPS | 5222, 443, 80 | TCP | scm.firmacerta.it | TEST, PROD |
| NTP sync | Used for synchronization of date and time | Always | NTP | 123 | UDP | TEST, PROD |
Outbound communication to the Namirial FRA service are done through HTTPS, with a mutual authentication, and take place via a unique TLS certificate that Namirial distributes to every applicant, in order to identify the virtual appliance SWS caller.
Here is a table with the incoming protocols:
| Service | Description | Protocol | Port | TCP/UDP | SWS Environment |
|---|---|---|---|---|---|
| Web Services | Web services interfacing | HTTP | 8080 | TCP | TEST, PROD |
High Reliability Implementation
The RAW signature service (PKCS#1) is high reliability provided. The HSM and the FRA element are functional purpose redundants. The VA SWS high reliability can be achieved operating as you usually do for a generic web server: run the VA SWS setup (2 or more) and display the web services via a load balancer. Since SWS does not handle any application session, it is enough to set a load balancer policy with a same-weight Round-Robin type.
Using Apache as Reverse Proxy
A possible configuration consists in using Apache Web Server as reverse proxy and load balancer for SWS. Here is a suggestion for the configuration to use:
| Code Block | ||||
|---|---|---|---|---|
| ||||
<Proxy balancer://sws>
	BalancerMember http://sws1.localdomain:8080
	BalancerMember http://sws2.localdomain:8080
</Proxy>
<VirtualHost *:443>
	ServerName sws.mydomain.it
	SSLEngine on
	LogLevel warn
	ErrorLog logs/sws/ssl_error_log
	CustomLog logs/sws/ssl_request_log "%t %h %{SSL_PROTOCOL}x %{SSL_CIPHER}x \"%r\" %b"
	RewriteEngine on
	RewriteRule !^/SignEngineWeb/(.*)$ /SignEngineWeb/ [L,PT]
	ProxyPass /SignEngineWeb balancer://sws/SignEngineWeb
	ProxyPassReverse /SignEngineWeb balancer://sws/SignEngineWeb
</VirtualHost> |
Deployment and test
Here is some information about the Appliance deployment via some of the most popular virtualization systems. The virtual machine is released in the Open Virtualization Format (OVF), where the HD are in the VMDK format. In the deployment environments, it is recommended the installation of the virtual appliance in VMware vSphere*.
*Namirial S.p.A. does not provide any support for the virtualization environments in which the VA SWS will be installed.
How to obtain SWS onPremise distribution?
To use SWS in onPremise the customer must create a server and after will be install the rpm package with SWS application.
The steps are:
1) Create a server with RedHat 8 or AlmaLinux 9 → Namirial support only this OSs
If you decide to use AlmaLinux, you can download the image minimal from this link:
| Code Block |
|---|
https://almalinux.org/get-almalinux/ |
2) After the server has been installed and configured, you can install the rpm package
NOTE: If you have choosen the Almalinux minimal you must execute this commands before install rpm package of SWS:
| Code Block |
|---|
sudo yum install wget sudo yum install tar |
And now, we can install rpm package of SWS using this command:
| Code Block |
|---|
wget https://sws.firmacerta.it/download/sws2_packages.tar.gz tar xzfv sws2_packages.tar.gz |
After download, move into directory just extracted and run this command:
| Code Block |
|---|
./install.sh |
During the setup the script will be created a user "sws" on OS, and you will insert the password associated to this account → don't forget the password inserted (will be used during the migration from test to prod enviroment)
Once the installation has been completed you will have the SWS service installed on your OS
How can i manage the SWS service?
SWS use wildfly to run, you can see the status using this command:
| Code Block |
|---|
sudo service wildfly status |
And you can manage the SWS using this command:
| Code Block |
|---|
sudo service wildfly [start|stop|restart] |
How to obtain the OVF virtual appliance (deprecated)
Actually this solution has been deprecated because use Centos 7 and in June 2024 will be in end-of-life
You can obtain the OVF at this link:
Default Credentials
After downloading and importing the OVF, the default credentials are:
| Code Block | ||||
|---|---|---|---|---|
| ||||
USER: sws PASSWORD: sws2015 |
How to import the OVF into VMware Workstation Player
For importing the OVF, you can follow these steps:
- Download VMware workstation player from this link: https://www.vmware.com/products/workstation-player.html
- Install VMware workstation player and open
- Go to: File → Play → Open → select the OVF just downloaded
How to import the OVF into VirtualBox
For importing the OVF, you can follow these steps:
- Download VirtualBox from: https://www.virtualbox.org/
- Install VirtualBox and open
- Go to: File → Import Virtual Appliance → select the OVF just downloaded
How to import the OVF in Amazon Web Services (AWS) EC2
Below the steps to load SWS appliance on Amazon Cloud:
1) Download and install AWS CLI from this link (https://docs.aws.amazon.com/en_us/cli/latest/userguide/cli-chap-install.html)
2) Execute AWS CLI with the command aws configure
3) Load the virtual machine disk (.vmdk) on S3 bucket using this command of AWS CLI:
| Code Block | ||
|---|---|---|
| ||
aws s3 cp "<vmdk-path>" s3://<nome-bucket-S3>/ Example → aws s3 cp "C:\Users\utente\Desktop\SWS\Disk.vmdk" s3://my-bucket-S3/ |
4) When the loading is complete, create the AMI with this command:
| Code Block | ||
|---|---|---|
| ||
aws ec2 import-image --description "SWS AMI" --disk-containers "Format=vmdk,UserBucket={S3Bucket=<nome-bucket-S3>,S3Key=<vmdk-path>}"

Example -> aws ec2 import-image --description "SWS AMI" --disk-containers "Format=vmdk,UserBucket={S3Bucket=il-mio-bucket-S3,S3Key=Disk.vmdk}" |
5) Now is possible to monitor the AMI creation with this command:
| Code Block | ||
|---|---|---|
| ||
aws ec2 describe-import-image-tasks |
6) When the AMI creation is complete, will be available at this path:
EC2 Section → Images → AMIs
Now is possible deploy EC2 instance.
At step 1 and 2 describe how install aws client on the workstation that will be used for all the import activity of the application solution. The aws client just created will be used for next steps.
At step 3 the data disk (vmdk file) of the sws appliance is loaded. Usually the data disk is called "swsappliance-release-number-sws-1.vmdk" the disk in order to be imported must be loaded on an s3 bucket of the customer who can freely choose among those he has or can create at the moment. The latter will be used to convert the data disk from vmdk files to the native AWS format
At step 4 the disk conversion takes place and the values between <...> must be replaced with those that the customer has chosen to use:
| Code Block | ||
|---|---|---|
| ||
aws ec2 import-image --description "SWS AMI" --disk-containers "Format=vmdk,UserBucket={S3Bucket=<S3-bucket-name>,S3Key=<vmdk-path>}"

Exampe ->  aws ec2 import-image --description "SWS AMI" --disk-containers "Format=vmdk,UserBucket={S3Bucket=swsrocks,S3Key=swsappliance-2-5-33-1.vmdk}"
|
At this step the vmdk file remains in the bucket, but an AMI with description SWS AMI is created in the default region with which aws cli has been configured (it is set when the client configuration is carried out at step 2)
At step 5 is possible to monitor the procedure started at step 4 (because this step is very slow)
At step 6 is possible to monitor from AWS panel console if the AMI has been imported correctly and is ready to be used.
Menu Console (MC)
After the import has been completed, you start the virtual machine and configure the parameters via "Menu Console".
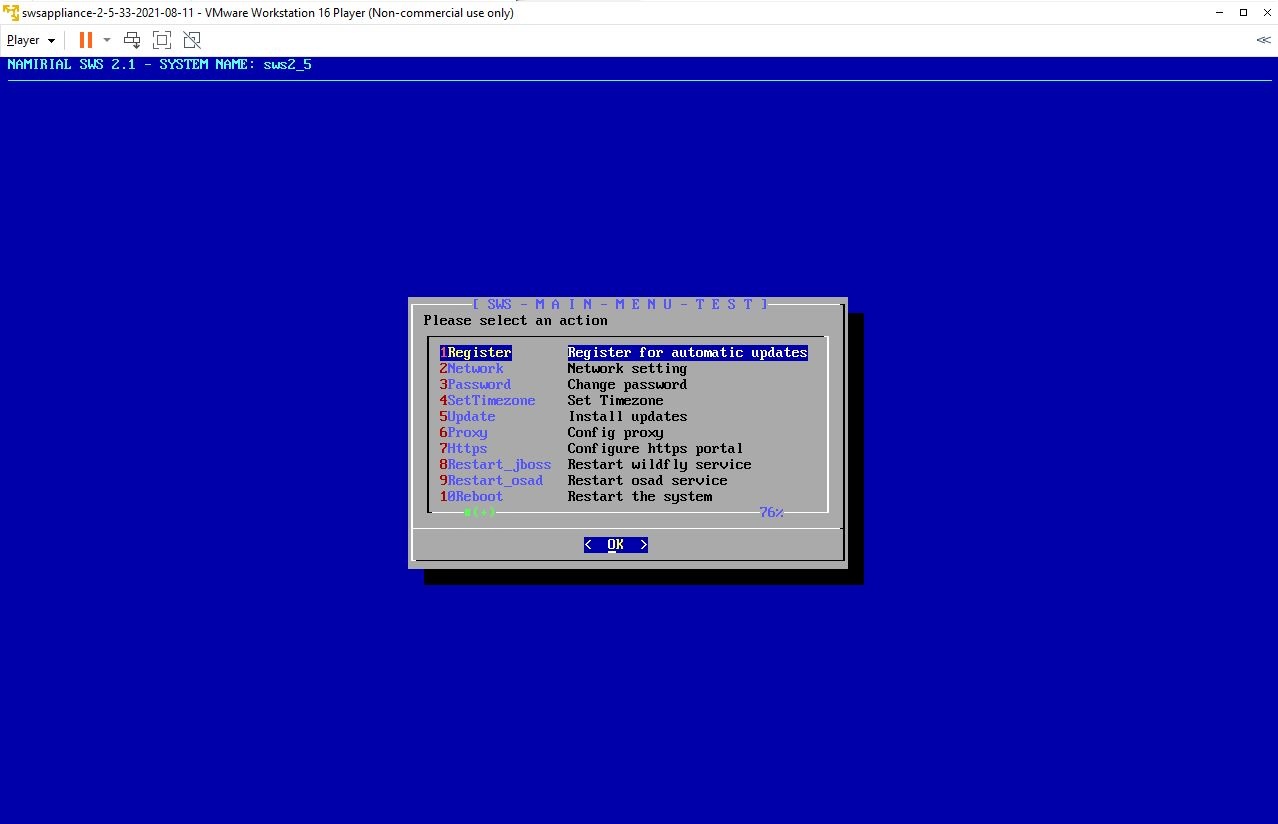
This menu allows to set parameters such as proxy, IP etc. The options of the menu are:
- Register: VA registration to our centralized update system (SCM)
- Config: IP ADDRESS, GATEWAY, DNS and ROOT PASSWORD configuration
- Update: Updates installation (system and push updates)
- Proxy: proxy configuration NTLM and port
- Restart_jboss: restart of the application server SWS
- Restart_osad: restart of sync module VA/SCM
- Reboot: VA restart
- Shutdown: VA shutdown
- Logout: exit from Menu Console
- Exit: go to Bash shell*
*This option must be selected under the monitoring of a Namirial operator. Namirial doesn’t give any support about modifications executed without WEB interface or Console Menù
Register: SCM Registration and Updates
SWS has the possibility of being associated to an updates released centralized system. The updates can be released in two different ways:
- Channel Updates (updates available for all the VAs that are registered)
- Push Updates (updates sent directly to the specified VA)
The registration system will result in a VA restart, and consequently the resulting hostname will change according to the following scheme: NameOfCertificate_Last4DigitsofMACAddress. The maintenance of the hostname* is a prerogative to use the update centralized system (SCM).
Changing the hostname will restrict the SCM system from releasing the Push Updates service. It will not keep track of SWS releases and packages changes inside the VA. It is strongly discouraged to change this parameter.
From Menu Console, there is the option to launch this operation (registration / updates).
Proxy properties: specify credentials user and password
If your proxy require username and password you must follow this step:
1) Login SSH to appliance
2) Execute this command for set proxy username:
| Code Block |
|---|
sudo /opt/wildfly/bin/jboss-cli.sh -c --command="/system-property=proxyUser:add(value=PROXY_USERNAME)" |
3) Execute this command for set proxy password:
| Code Block |
|---|
sudo /opt/wildfly/bin/jboss-cli.sh -c --command="/system-property=proxyPassword:add(value=PROXY_PASSWORD)" |
NOTE: this properties works only from sws version 2.5.53-1.1
Configure Https portal
This function enable SWS to work on port 8443, in input accept ONLY p12 format
The steps for enable the https comunication are:
- Login with sftp client (like WinScp or FileZilla)
Move to directory:
Code Block /home/sws/certs
- Paste the p12 files for encrypt the communication
- Follow the procedure on screen
NOTE: for example you can obtain the ssl certificate at this link:
| Code Block |
|---|
https://www.namirial.it/certificati-ssl-tls/ |
Functional Verification
Appliance SWS offer a GUI for test if signature and verify works correctly.
Test if the signature device works
Make sure that system works: start the virtual machine, open a browser on a workstation able to reach the machine and enter the following url:
http://<IP-APPLIANCE>:8080/SignEngineWeb/index.xhtml
A page as the one below will be shown:
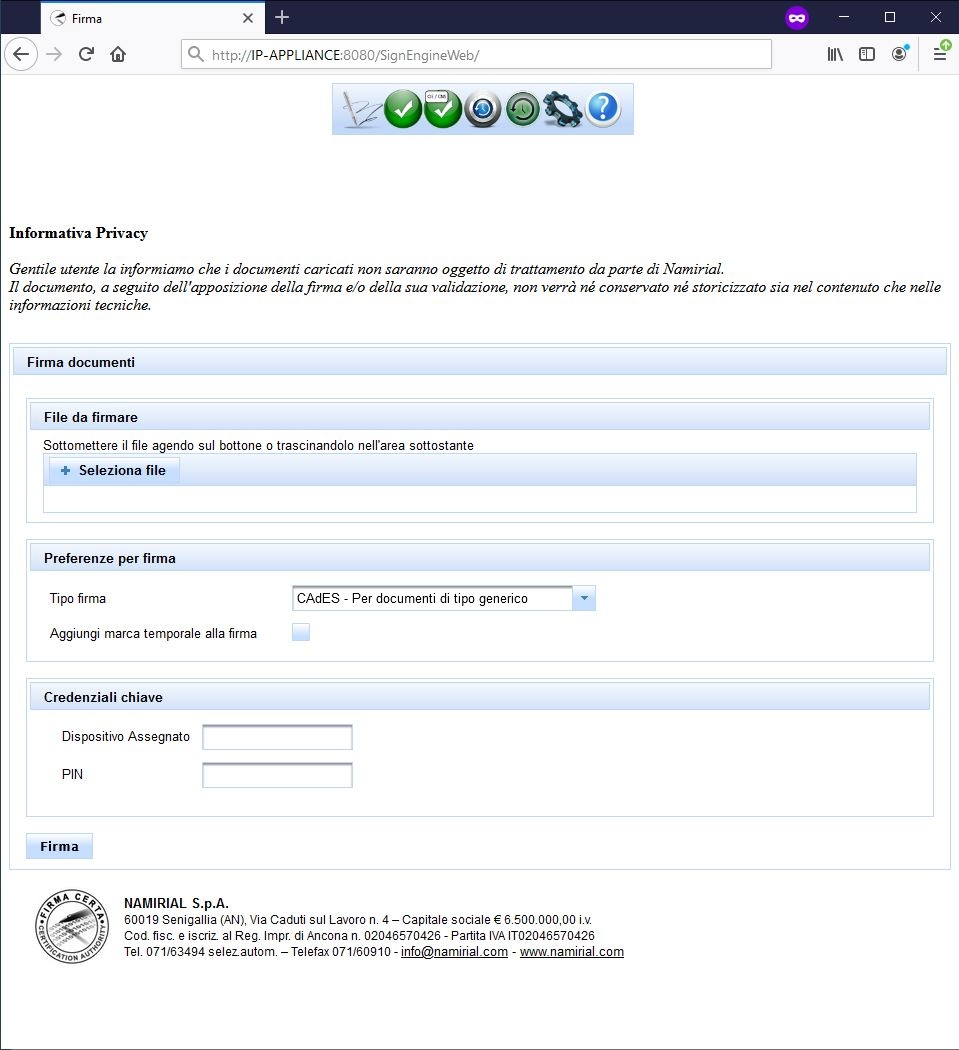
Make sure that the signature system works properly:
Submit any document and drag it in the area below the box “File da firmare”.
Enter the following parameters:
- Dispositivo Assegnato: <YOUR-DEVICE-NAME>
- PIN: <YOUR-DEVICE-PASSWORD>
Click on “Firma”. If all is ok, the browser will propose to save the created signature
Check if the signature has been applied
SWS appliance offers a web page dedicated for validating a signature, at this link:
http://IP-APPLIANCE:8080/SignEngineWeb/verify.xhtml
Follow these steps for validating the file just signed:
- Click on "Seleziona file" and choose the file just signed
- Press on "Verifica"
At the end of validation, in otput will obtain this:
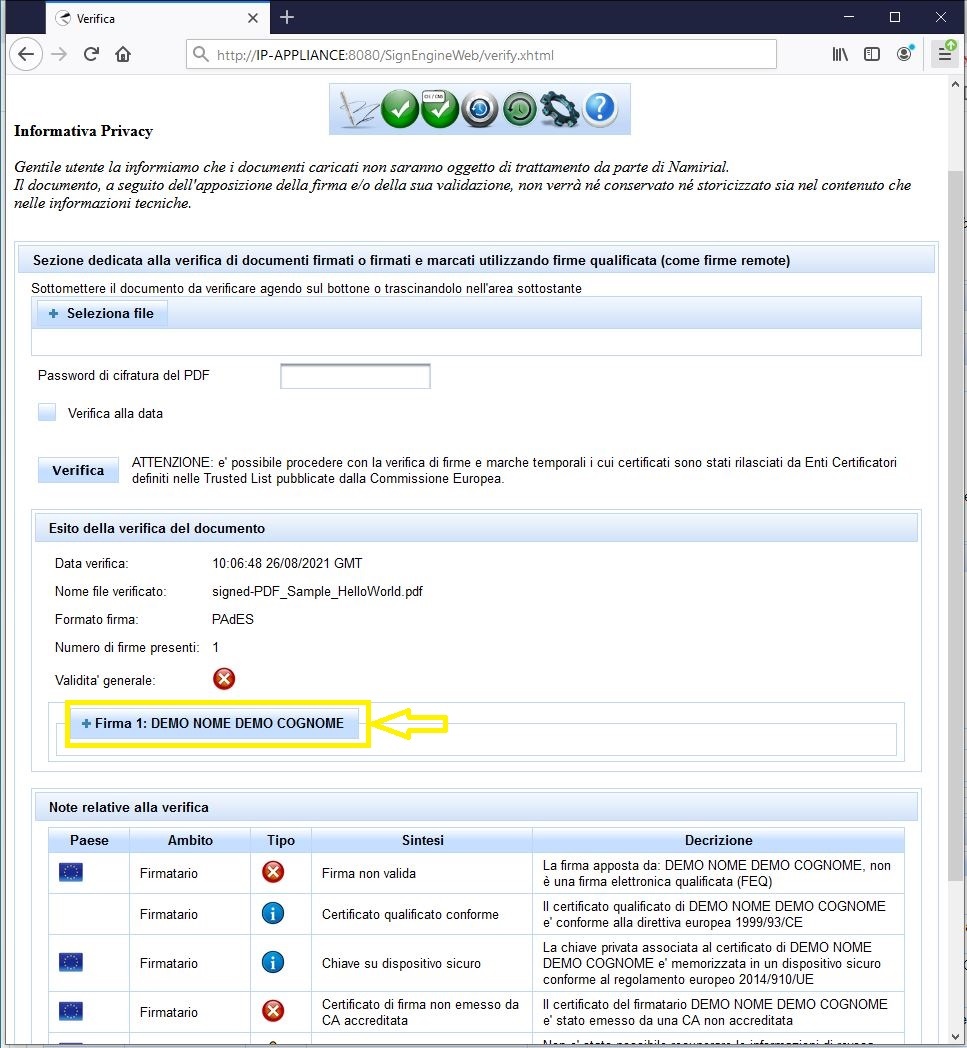
Don't worry about red cross, this caused by certificate associated to device name "demo" not enrolled by trusted Root CA.
The important message is: "Firma 1: DEMO NOME DEMO COGNOME" in the yellow rectangle.
Environment SWS
SWS is released with a default configuration that allows carrying out all necessary tests, using a pre-production signature system by Namirial. Obviously the resulted signatures are performed with certificates that are NOT issued by an accredited Certification Authority. Any verification of these signatures with third-party tools will report errors for unknown CA. If you want to sign with certificates enrolled by trusted CA, you should migrate from the TEST to a PROD configuration of SWS.
By default SWS is configured with TEST environment. At this link you can see the SWS configuration:
http://<IP-APPLIANCE>:8080/SignEngineWeb/help.xhtml
Like in this figure:
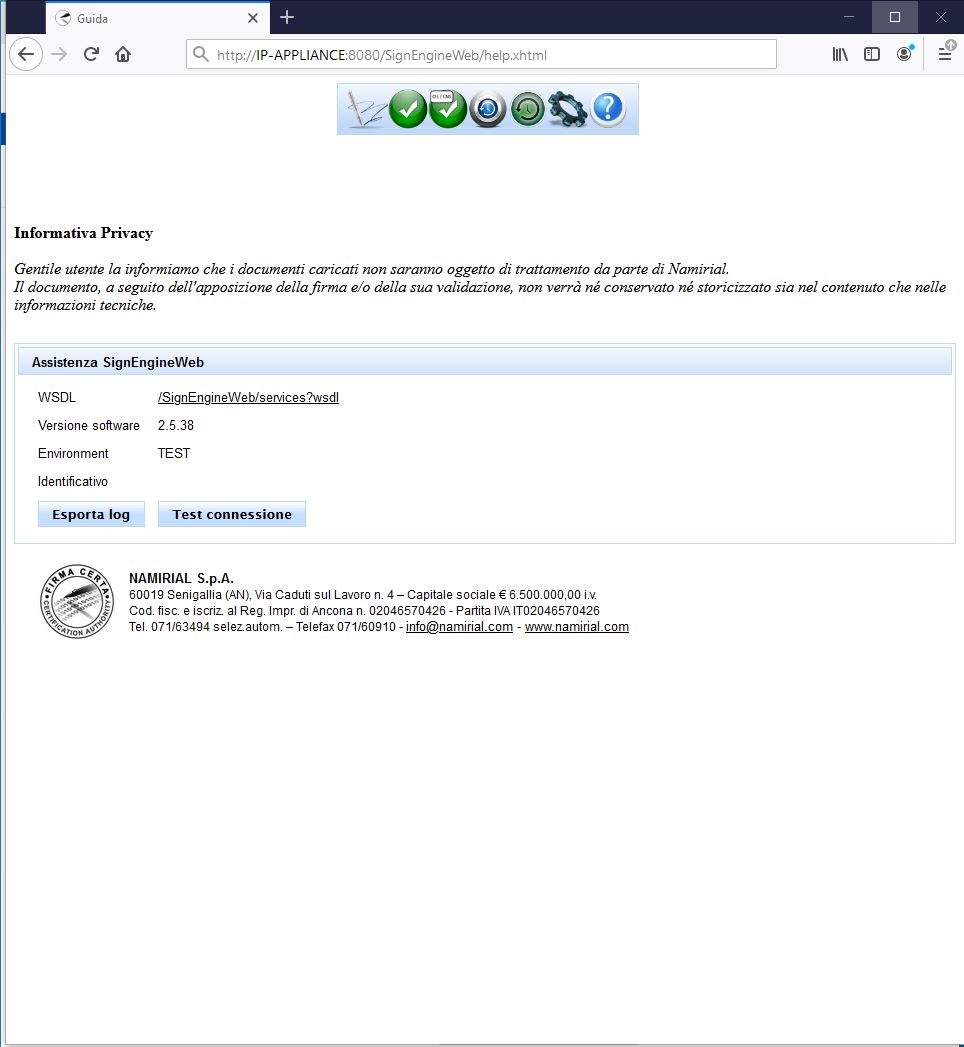
Below are the steps for migrating from TEST to PROD. It is very easy: you should only upload one JKS file, which contains the certificates for connecting to our system of signature.
Please get in touch with our consultants for obtaining such a certificate.
Migrate from TEST to PROD environment
For migrating from TEST to PROD, you should have received by mail the password-protected zip, containing the JKS. You will get the password of the zip by SMS.
The steps are:
- Go to link http://IP-APPLIANCE:8080/SignEngineWeb/settings.xhtml
- Insert the password of SWS (see the section "Default Credentials") and press "Login"
- Go to tab "Impostazioni generali"
- Press on "Seleziona file" and select the JKS received by mail
- Press "Salva"
- Press "Riavvia server"
If the migration has been completed correctly, go to this link:
http://<IP-APPLIANCE>:8080/SignEngineWeb/help.xhtml
And you will see the label PROD (like in the yellow rectangle):
Service platform operations: Monitoring System
The SWS Appliance offers tools for download log files and for checking if all connections (to Namirial services) work correctly.
Log files
Below is the list of logs generated by SWS:
| Code Block | ||||
|---|---|---|---|---|
| ||||
/var/log/wildfly/signengineweb.log /var/log/wildfly/tsl.log /var/log/wildfly/server.log /var/log/wildfly/boot.log /var/log/wildfly/console.log |
In order to ensure continuity of services, the files older than 4 weeks will be automatically deleted.
Export Log Files
From the SWS GUI is possible to export the log as a zip, by following these steps:
- Go to link: http://<IP-APPLIANCE>:8080/SignEngineWeb/help.xhtml
- Press to "Esporta log"
At the end, the zip file containing the log will be exported.
Service Testing
The standard checks for the correct operation of the virtual machine (memory usage, processor usage, etc....) can be executed through the management functionalities offered by the virtualization area. However, it is possible to make a further check via the http GET function. The string “OK” is expected to be returned in case of no problems. The link is:
http://<IP-APPLIANCE>:8080/SignEngineWeb/ckeck.jsp
Reccomandations
The SWS appliance must not be publicly displayed on the internet!!!!
Namirial don't assume responsability.
License
Below the list of library/framework used in SWS:
| Library/framework name | license link |
|---|---|
| DSS (Digital Signature Service) | https://www.gnu.org/licenses/lgpl-3.0.en.html |
| bouncycastle | https://www.bouncycastle.org/licence.html |
| apache-commons | https://www.apache.org/licenses/LICENSE-2.0 |
| CXF | https://www.apache.org/licenses/LICENSE-2.0 |
| pdfbox | https://www.apache.org/licenses/LICENSE-2.0 |
| xerces | https://www.apache.org/licenses/LICENSE-2.0 |
| xalan | https://www.apache.org/licenses/LICENSE-2.0 |
| xml-apis | https://www.apache.org/licenses/LICENSE-2.0 |
| xmlschema-core | https://www.apache.org/licenses/LICENSE-2.0 |
| xmlsec | https://www.apache.org/licenses/LICENSE-2.0 |
...