...
| Section | |||||||||||||||||||||||||||||||||||||||||||||||||||||||||||||||||||||||||||||||||||||||||||||||||||||||||||||||||||||||||||||||||||||||||||||||||
|---|---|---|---|---|---|---|---|---|---|---|---|---|---|---|---|---|---|---|---|---|---|---|---|---|---|---|---|---|---|---|---|---|---|---|---|---|---|---|---|---|---|---|---|---|---|---|---|---|---|---|---|---|---|---|---|---|---|---|---|---|---|---|---|---|---|---|---|---|---|---|---|---|---|---|---|---|---|---|---|---|---|---|---|---|---|---|---|---|---|---|---|---|---|---|---|---|---|---|---|---|---|---|---|---|---|---|---|---|---|---|---|---|---|---|---|---|---|---|---|---|---|---|---|---|---|---|---|---|---|---|---|---|---|---|---|---|---|---|---|---|---|---|---|---|---|
In addition an electronic signature guide are available for further information (also linked at relevant chapters). Settings
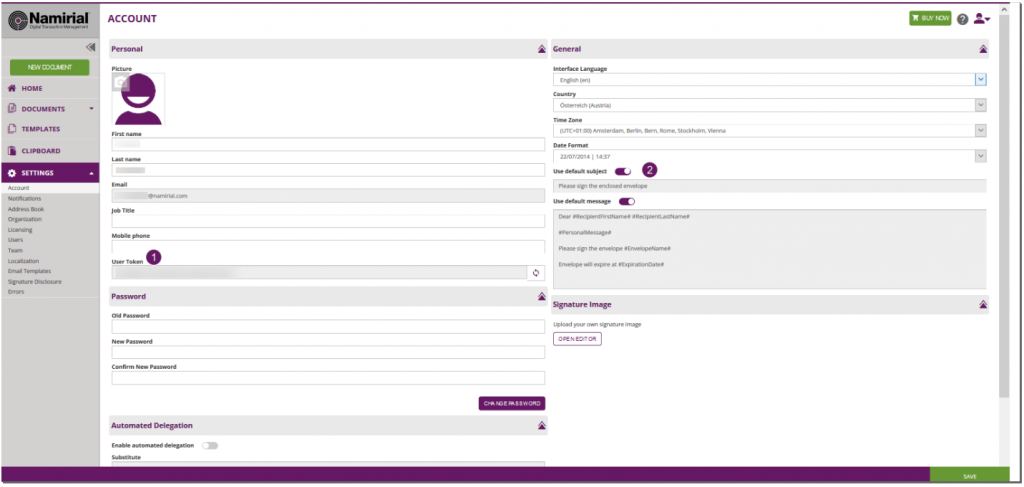
AccountHere you find your personal account settings.
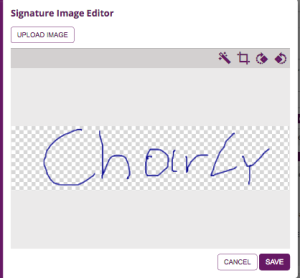
Signature ImageYou can upload a picture of your signature (e.g. written on write paper and take a picture). This signature can be modified (cropped, set background level and rotate). If you are logged into eSAW and sign documents you can select your signature picture for Click-to-Sign signatures.
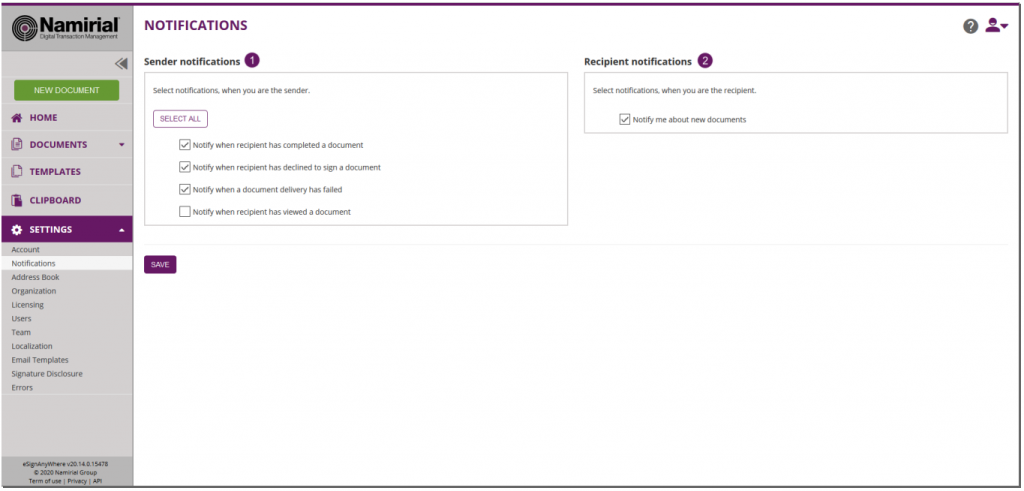
NotificationsIn this section you can define sender and recipient notifications.
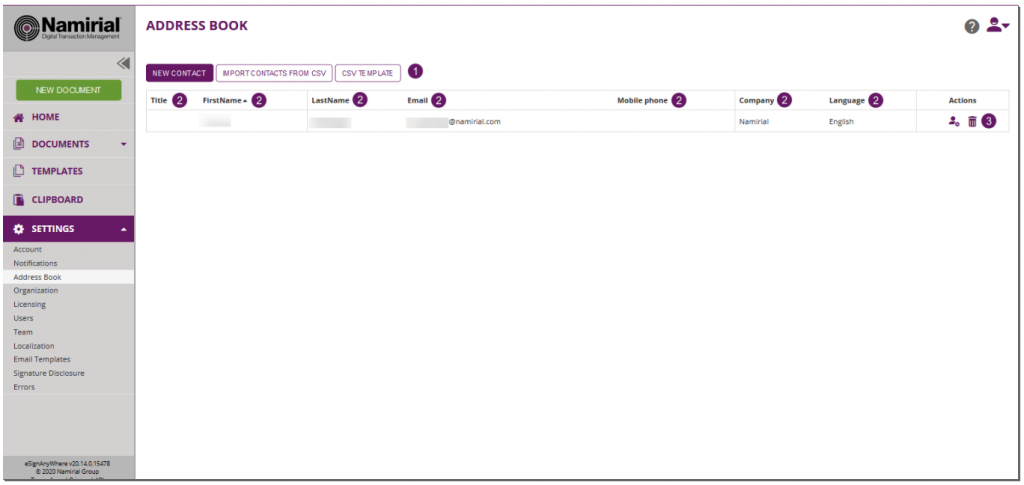
Address BookHere you can manage your personal address book. You can add new contacts manually or import them via CSV. Moreover you can filter the list (see highlighted filter in screenshot) and easily modify or remove a contact.
The import CSV should have the following parameter, where the first line is required as column identifier: first name, last name, e-mail address, primary phone, business address, company Bob, Xyzmo, bob@xyzmo.mail, +55123551255, Companycenter 1, Namirial 1 Charly, Xyzmo, charly@xyzmo.mail, +55123551255, Companycenter 2, Namirial2 Roles and Permissions |
| Figure | Description |
|---|---|
 |
|
Api Token and Apps 
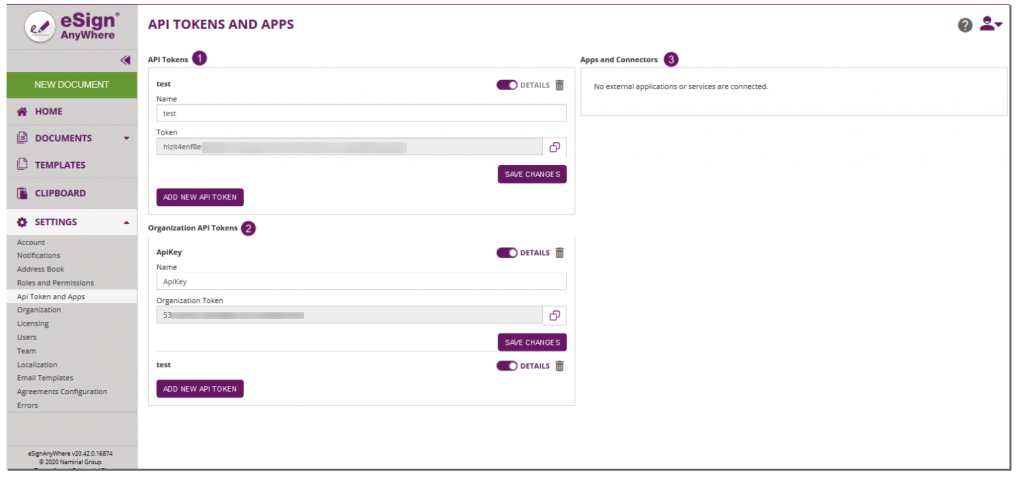
In this section you can generate an api token for a user or for the organization. A user can have multiple api tokens that allow a more granular usage of them (one token for integration A, one token for integration B). For information about the configuration in REST please also have a look at the Postman Tutorial. A configuration for SOAP can be found on this page: Hello World Tutorial.
Figure | Description |
|---|---|
|
|
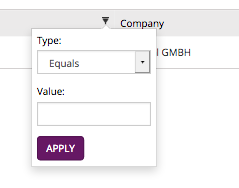
Apply a Filter for an attribute:
Add new contact manually: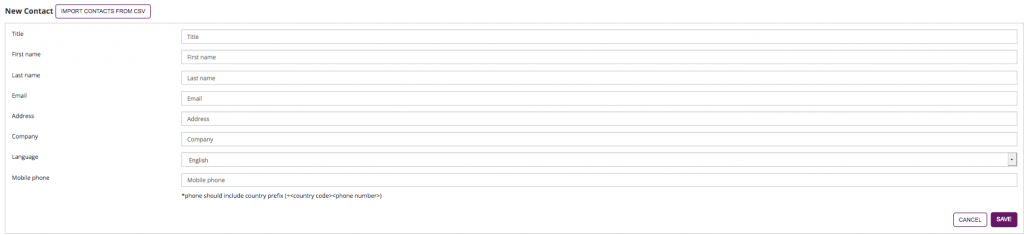
Organization
Here you can change your organization settings. Note: In the list below you can find just some information to introduce the feature. You can click on the headline of the feature to get to the detailed explanations.
- Organization Details
- Set your logo and name of your organization
- Application Key (used for API access)
- CustomizationID is shown (might be required for integration)
- Contact URL and Support URL used in the notifications
- Default Callback URL
- If you set a callback, every finished or changed envelope will cause a request on your defined URL. With this URL you can add your own service for e.g. performing an automatic archiving via eSAW API. If the URL is empty no callback is fired on finish or change of the envelope. More details about the callbacks are available in our API Reference and below this enumeration as a separate chapter.
- Placeholder for envelope complete callback: ##EnvelopeId## and ##Action## (only envelopeFinished action available)
- Placeholder for envelope status change callback: ##EnvelopeID## and ##Action## (workstepFinished, workstepRejected, workstepDelegated, workstepOpened, sendSignNotification, evnelopeExipired, workstepDelegatedSenderActionRequired)
- If you set a callback, every finished or changed envelope will cause a request on your defined URL. With this URL you can add your own service for e.g. performing an automatic archiving via eSAW API. If the URL is empty no callback is fired on finish or change of the envelope. More details about the callbacks are available in our API Reference and below this enumeration as a separate chapter.
- Design of the document viewer for recipients
- Set a default redirect URL for finished documents
- Upload and download designs
- Information about the biometric encryption key
- Disposable Certificate
- Configuration of the LRA to use the disposable certificates. Settings for LRA credentials, certificate type and disclaimer usage.
- SwissCom OnDemand Certificate
- Configuration for the SwissCom OnDemand Certificate

- SwissCom OnDemand Certificate UI configuration

- Configuration for the SwissCom OnDemand Certificate
- BankId Authentication

- Set the authentication certificate
- Generic Signing Plugins
- Configure the signing plugin
- Policy for the document viewer for recipients
- Upload and download the default policy for the document viewer for recipients
- Retention Period
- Enable Retention Period of Organization Drafts and Envelopes. This will automatically delete envelopes after a certain time, when they reached a final state (expired, finished, canceld). Please note that templates are not affected by the retention period.
- Backup
- Download all finished envelopes. A backup-process will be started and you will be informed if the backup is ready for download.
- OAuth Settings
- Add provider for the OAuth authentication (See OAuth Guide)
- SAML Settings for Signer Authentication
- Due its complexity of the configuration, we highly recommend you to contact us about the SAML configuration.
- Add provider for the SAML signer authentication
Examples of Use Cases
- ADFS integration for eSAW backend users
- Signer authentication with external SAML service
- SAML Settings for User Authentication

- Add provider for the SAML user authentication
- Recipient Settings
- Set the recipient settings of your organization
- Default Signature Settings
- Default signature method (preselected)
- Imprint settings, such as font-type, font-size, date-format
- Biometric signature batch configuration (allow usage of biometric signature over different physical documents). Check with your legal consultant about its usage (default is disabled)
- Settings for draw to sign signatures
- Envelope Defaults
- default organization settings about reminders for signers
- Audit Log Settings
- Settings of the audit log (audit trail). It is not recommended to disable the audit-log, because it is an important evidence (see signature guide).
- Settings for separate logs per document
- Email Settings
- User Logout Redirect Url
- Envelope Details Page
- Signature PAdES (PDF Advanced Electronic Signature) Configuration
Organization Details
Before the version 20.42 you were able to configure the following settings in this section:
- Organization Name
- Organization Key (can since 20.42 be found in the section Api Token and Apps
- For more information about the mentioned section please see the documentation directly above.
- Customization Id
- Contact URL
- Support URL
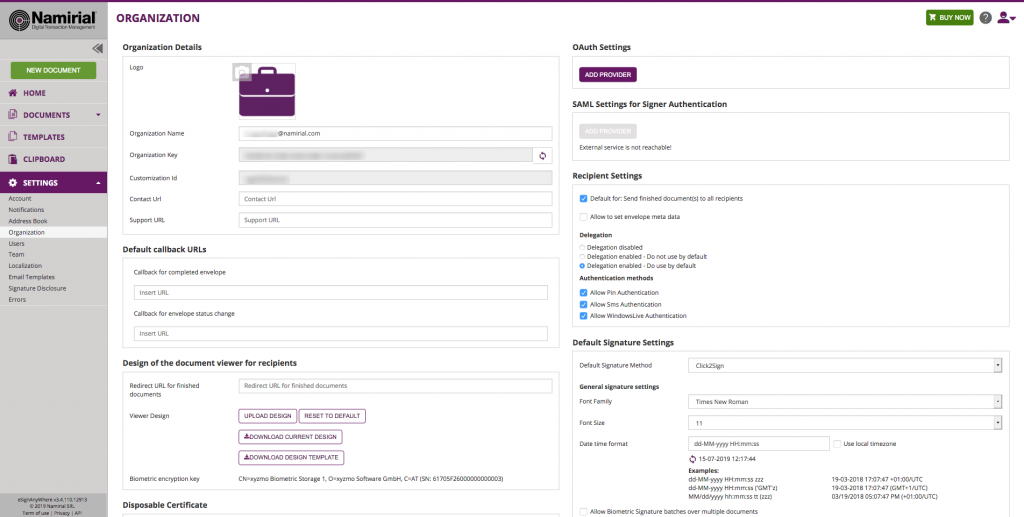
Overview of the organization settings
Default Callback URL
In section “Default Callback URLs” you can define which URLs should be invoked as callback for envelopes sent via WebUI. When sending envelopes via API, the callback URL can be specified on envelope level via API.
Following callback URLs can be defined for envelopes sent via WebUI:
| Callback type | Status Change |
|---|---|
| Callback for completed envelope | Gets fired whenever an envelope gets finished (completed or rejected) |
| Callback for envelope status change | Gets fired whenever an envelope's status value changes |
In both URLs, you can use following placeholders:
| Placeholder | Value |
|---|---|
##EnvelopeId## | the envelope id; typically in GUID format |
| ##Action## | the action which triggered the callback; usually one of workstepFinished, workstepRejected, workstepDelegated, workstepOpened, sendSignNotification, envelopeExpired, workstepDelegatedSenderActionRequired. But consider in a callback handler implementation, that future versions may fire additional callbacks. |
For envelopes sent via WebUI, it is currently not supported to specify a workstep event callback handler URL.
Read the Integration Guide, section Api Reference - Introduction REST, for further information about integrating with callback handlers.
You can define an authentication for the callback. 
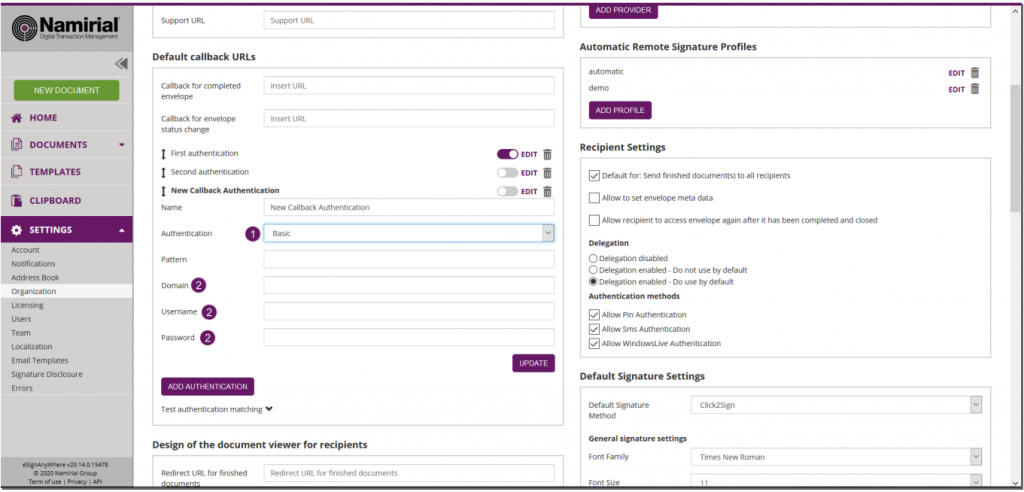
The next screenshot shows an overview where you can find the settings:
| Figure | Description |
|---|---|
|
|
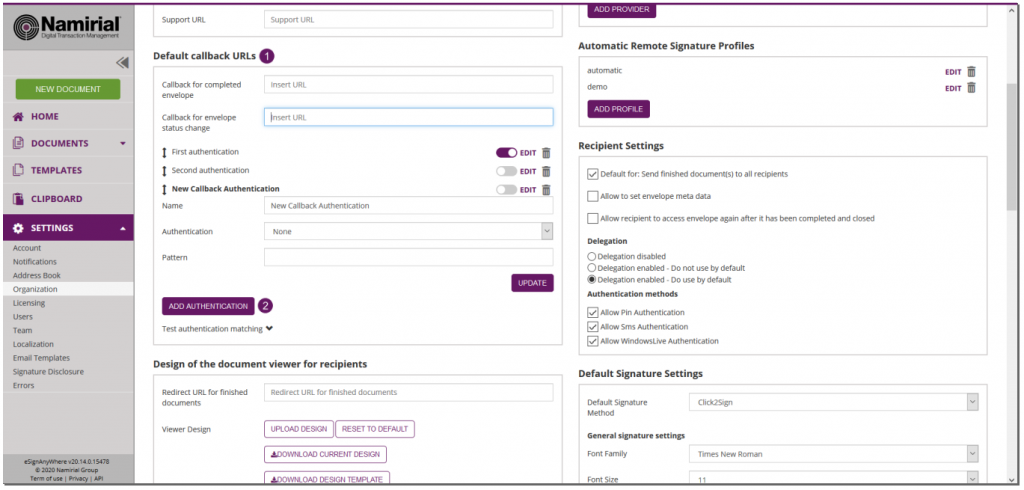
If you click on the button “add authentication” the following window appears:
| Figure | Description |
|---|---|
|
|
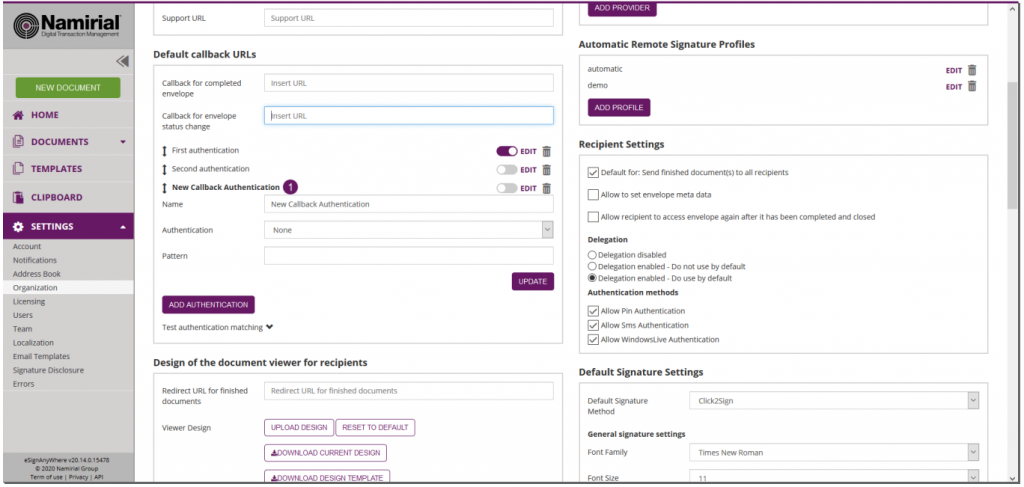
In this section you can define:
- The name of the callback (default value: “New Callback Authentication”)
- The authentication (None or basic, default: none)
- The pattern (the URL should contain the given pattern)
- The pattern “*” matches anything
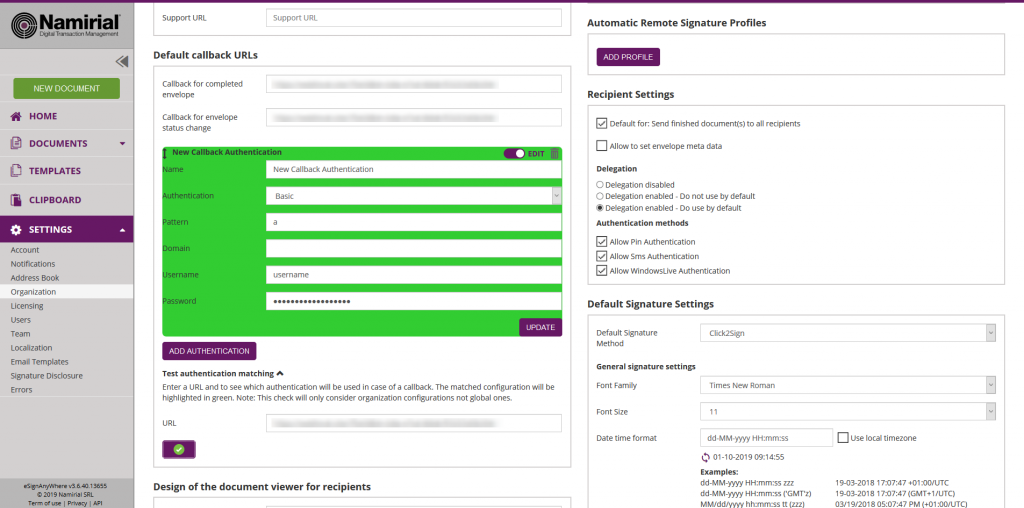
If you choose “basic” as authentication the following window appears:
| Figure | Description |
|---|---|
 |
|
Within this section you can define:
- The domain
- The username
- The password
After filling in the dates for the authentication you can test if the URL matches any pattern of the authentications. If no pattern matches you get an information. The following screenshots show you a warning and a successful matching of the patterns.
| Warning | Matching pattern |
|  |
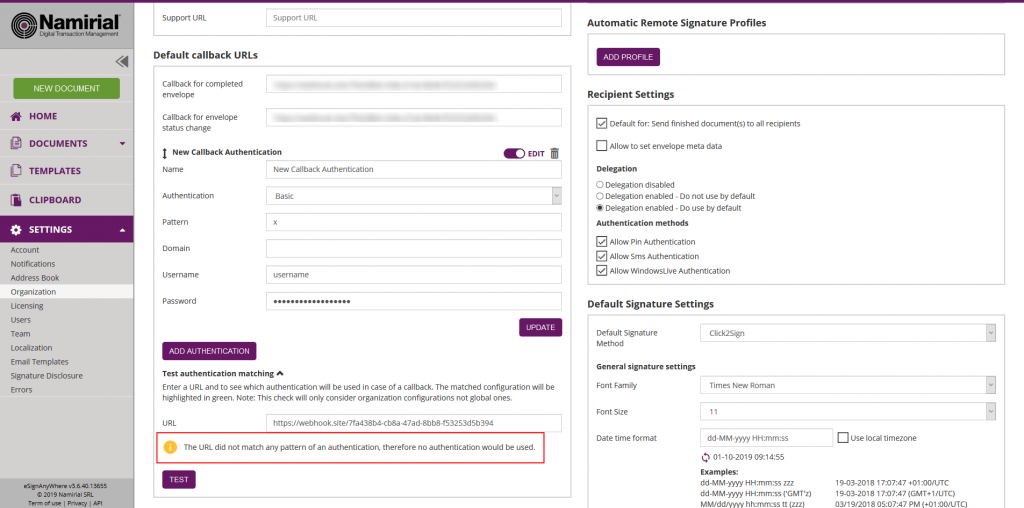
If you have more than one authentication and you check the URL for the pattern and more than one authentication matches, always the first one of the list will be highlighted green.
After those settings you can send an envelope as usual. If you have authentication activated but the given dates are wrong you get an information.
In the next Screenshot you can see both scenarios (with a valid authentication and with a invalid authentication). If you click on the exclamation mark following text appears: “Response status code does not indicate success:401 (unauthorized)”.
| Warning |
|---|
Using the following two websites by your own risk. These two websites are not part of Namirial! |
If you want to try the callback URL without authentication you can try it with: https://webhook.site
If you want to try the callback URL with authentication you can try it with:postman echo
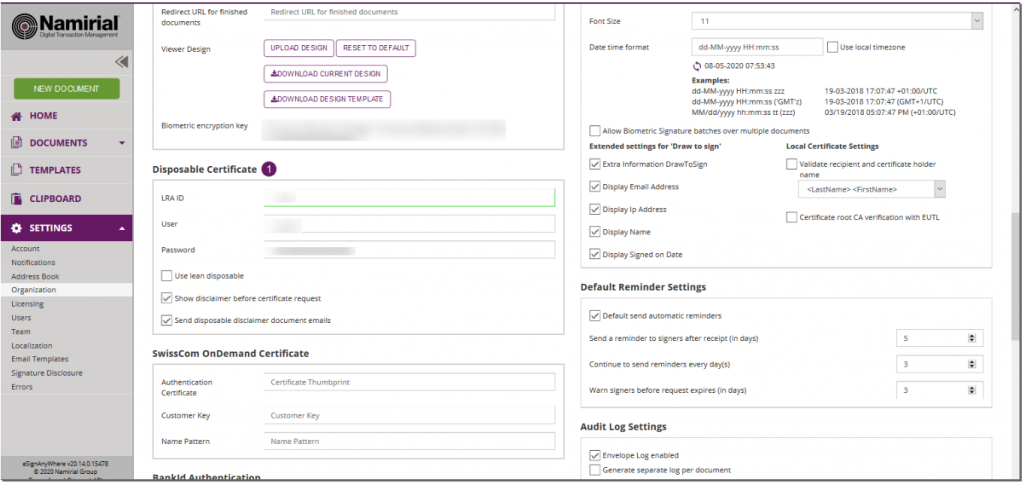
Design of the document viewer for recipients
In this section you can define the redirect URL for finished documents. Moreover you can upload the current design, reset the design to default, download the current design and download the design template. For more information about designing the viewer please also have a look at the Viewer Guide.
Disposable Certificate
In this section of your organization you can define a disposable certificate. For this setting you need following dates:
- LRA ID
- User
- Password
Moreover, you can decide if you want to use a lean disposable, if you want to get a disclaimer before certificate request and if you want to send disposable disclaimer document emails. The following screenshot shows you where to find those settings.
| Figure | Description |
|---|---|
|
|
For more details and information of how to use the disposable certificate please also see the Beginner Guide.
BankId Authentication
| Info |
|---|
This feature is not available with basic subscription, so please contact your Namirial sales. |
You can find a sample configuration (REST and SOAP) on the following page: Beginner Guide
Generic Signing Plugin
| Info |
|---|
This feature is not available with basic subscription, so please contact your Namirial sales. |
In your organization settings you can find the configuration for the generic signing plugin. Configure the plugin in this settings to use the signature in creating an envelope. Please see the next figure (sample of a plugin).

For more information about how to create an envelope with a generic signing plugin in the UI please also have a look at the Beginner Guide.
For information about how to send an envelope with a generic signing plugin in REST please see a sample configuration at the Beginner Guide.
Policy for the document viewer for recipients
In this section you can:
- upload a policy
- reset the policies to default
- download the current policy
- and download the policy template
Please see the following sample of the policy template.
<GeneralPolicies>
  <AllowSaveDocument>1</AllowSaveDocument>
  <AllowSaveAuditTrail>1</AllowSaveAuditTrail>
  <AllowUndoLastAction>1</AllowUndoLastAction>
  <AllowAdhocPdfAttachments>0</AllowAdhocPdfAttachments>
</GeneralPolicies>
You can find an overview of all policies on this page: Document-Policy
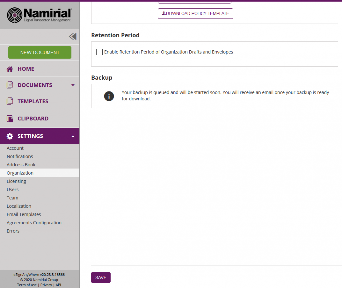
Retention Period
In this section you can define a retention period for the organization drafts and envelopes. Please note the following rules for the different types of documents (add the days you selected in this section to the following rules:
- Drafts will be removed from creation date
- completed/rejected and canceled envelopes will be removed from completed/rejected/canceled date
- expired envelopes will be removed from expiration date
- templates are not removed
Backup
In this section you can download all finished envelopes you have signed or sent.
If you click on the “Finished Envelopes” button you can see that the backup is prepared. If the backup is ready you will receive an email to download the backup.
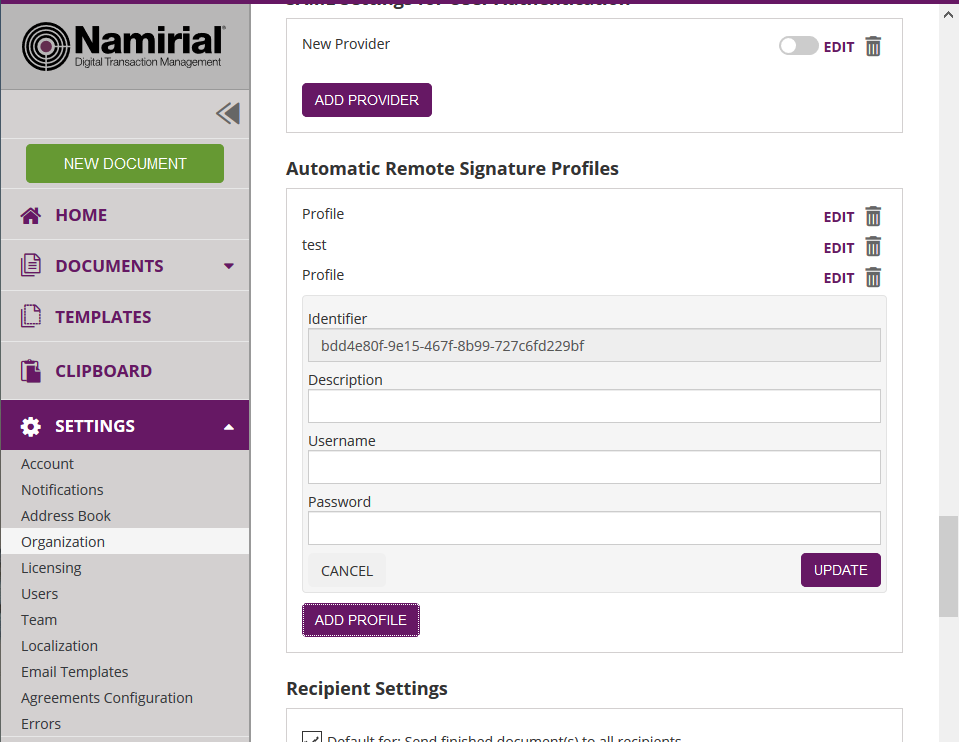
Automatic Remote Signature Profiles
In this section the user manager of an organization can add automatic remote signature profiles, which can be used for any workflow as a recipient (recipient type “Automatic”). This recipient signs automatically the signatures and the workflow continues automatically. For more information please also have a look at the electronic signature guide.
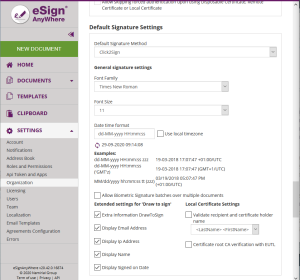
Default Signature Settings
In this section you can set the default signature type for the envelopes. After you have set the configuration in this section the defined signature type will be preselected if you create a new envelope.
Envelope Defaults
You can set the following settings for the envelope defaults:
- Prevent editing of form fields after envelope is finished
- default send automatic reminders
- Set the reminders
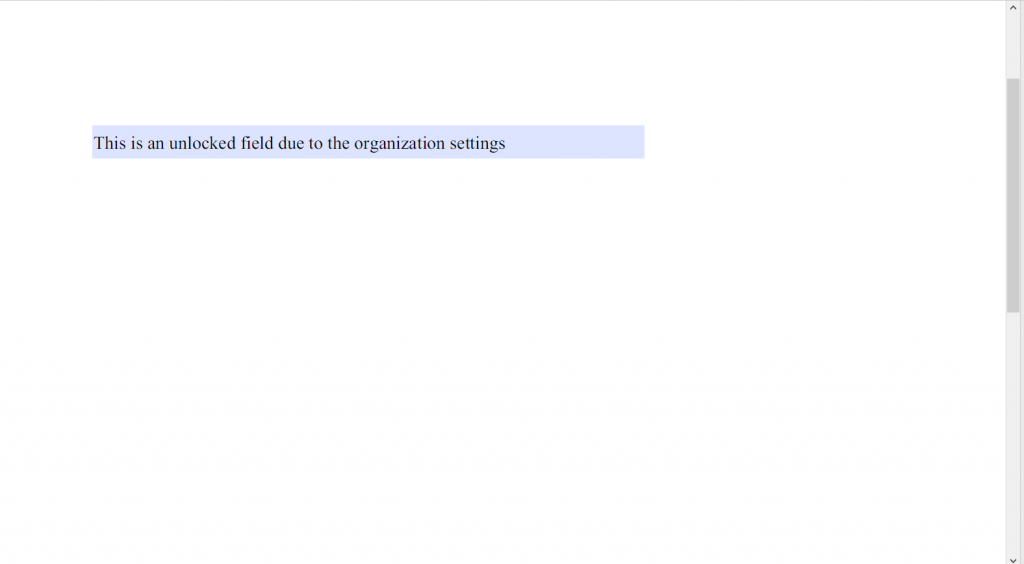
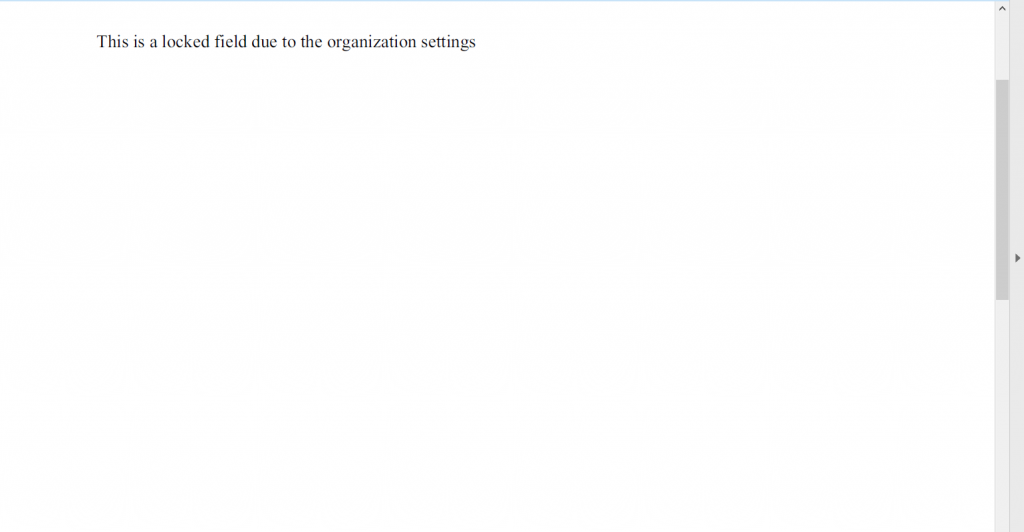
If you prevent editing form fields after the envelope is finished the form fields in the PDF are all read only.
Therefore, after locking the form fields (after the final workstep), the form fields are not editable any more with other PDF tools.
Please also see the next figures:
Locked | Unlocked |
|---|---|
|  |
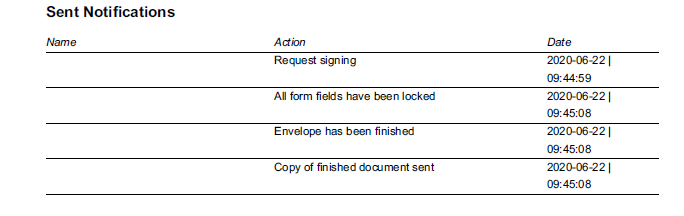
Information on whether the form fields are locked or not can also be found in the audit trail. Please see the next figure:
Audit log Settings
| Info |
|---|
Note: It is not recommended to disable the audit-log, because it is an important evidence (see signature guide). |
In this section you can define the following settings:
- Settings of the audit log (audit trail).
- Settings for separate logs per document
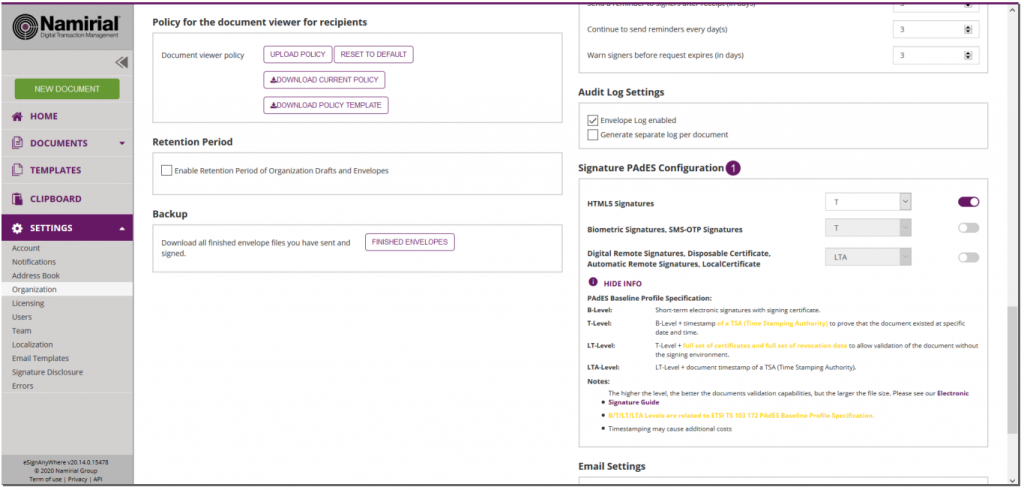
Signature PAdES Configuration 
Allows to set the signature configuration based on the different PAdES levels, for following types of signatures.
- HTML5 Signatures (Click2Sign, Type2Sign, Draw2Sign)
- Biometric Signatures, SMS-OTP Signatures
- Digital Remote Signatures, Disposable Certificate, Automatic Remote Signatures, P7M-Signature, SwissCom, A-Trust, LongLiveDisposable, PushTan, LocalCertificate
Description of the different PAdES baseline levels supported by eSignAnyWhere:
- PAdES level BASELINE-B without using an external timestamp server
- B-Level: Short-term electronic signature with signing certificate
- contains just the time information from local machine; without an external server time stamp
- contains just the time information from local machine; without an external server time stamp
- B-Level: Short-term electronic signature with signing certificate
- PAdES level which require using an external timestamp server: BASELINE-T, BASELINE-LT and BASELINE-LTA
- T-Level: Includes B-Level and a time stamp
- Use the configured time stamp server on the signature itself
- Ensures that the document existed at a specific date and time, where time is granted by the external timestamp server
- LT-Level: Includes T-Level and a full set of certification and full set of revocation data
- Use the configured time stamp server on the signature itself
- Allows validation of the signature without access to the signing environment.
- LTA-Level: Includes LT-Level and a timestamp of a TSA (Time Stamping Authority)
- produces in addition to the signature field defined a time stamp signature on the document
- T-Level: Includes B-Level and a time stamp
| Figure | Description |
|---|---|
|
|
Email Settings
- Set the email sender appearance configuration
User Logout Redirect Url
- Set a redirect Url for eSignAnyWhere users, when they logout (e.g. to an intranet page)
Default redirect url before sending a draft
| Info | ||
|---|---|---|
| ||
This setting is available only when the feature flag "BeforeDraftSendRedirect" was granted to the organization. |
Configures a Redirect URL to which the envelope creator is redirecting instead of sending an envelope.
Instead of the page sequence
"Recipients Page" - "Designer Page" - "Summary Page"
, with a configured redirect url before sending, the sequence is following:
"Recipients Page" - "Designer Page" - "Summary Page" - (custom redirect page)
In this scenario, the custom redirect page may adopt the draft with the draft update API methods, and has to send the draft via API methods.
See Document Tagging Scenario - Example showing how to collect metadata for DMS archiving for an example on how to integrate a DMS tagging using that functionality.
Envelope Details Page
- Allows the sender to copy the viewer link from the envelope details page (if sender role grants required envelope permission)
- For more information please also see this page
Recipient settings
You can set the following settings for the recipient:
- default CC for all signers
- usage of envelope metadata
- allow recipients to access envelope again after it has been completed and closed
- delegation settings
- allowed authentication methods for signers
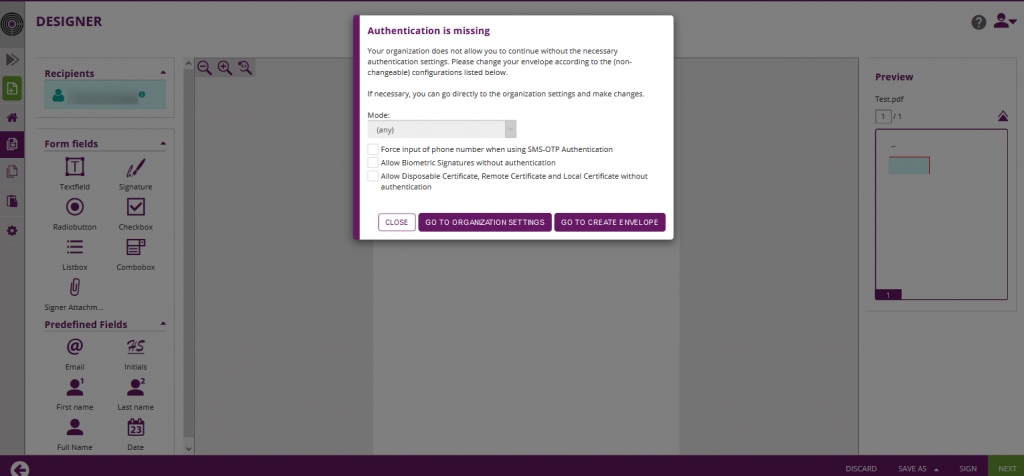
- force authentication
If you force an authentication and the user does not select any or a specific authentication method then the user will get the following notification:
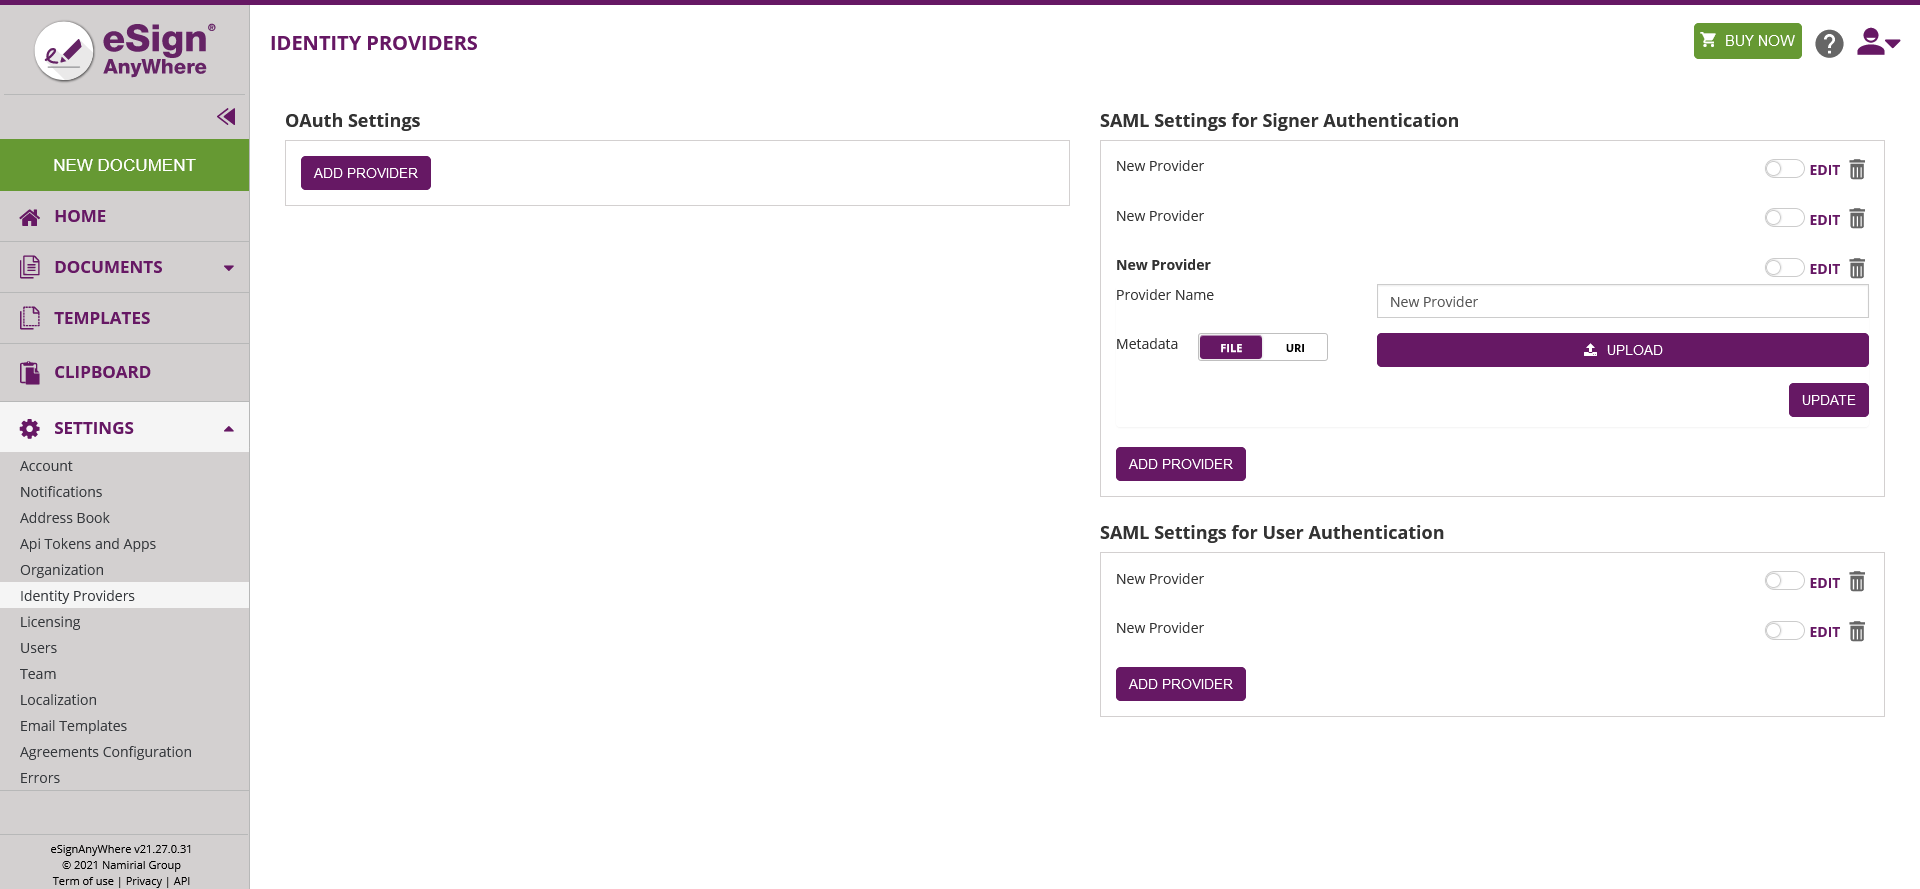
Identity Providers
OAuth Settings
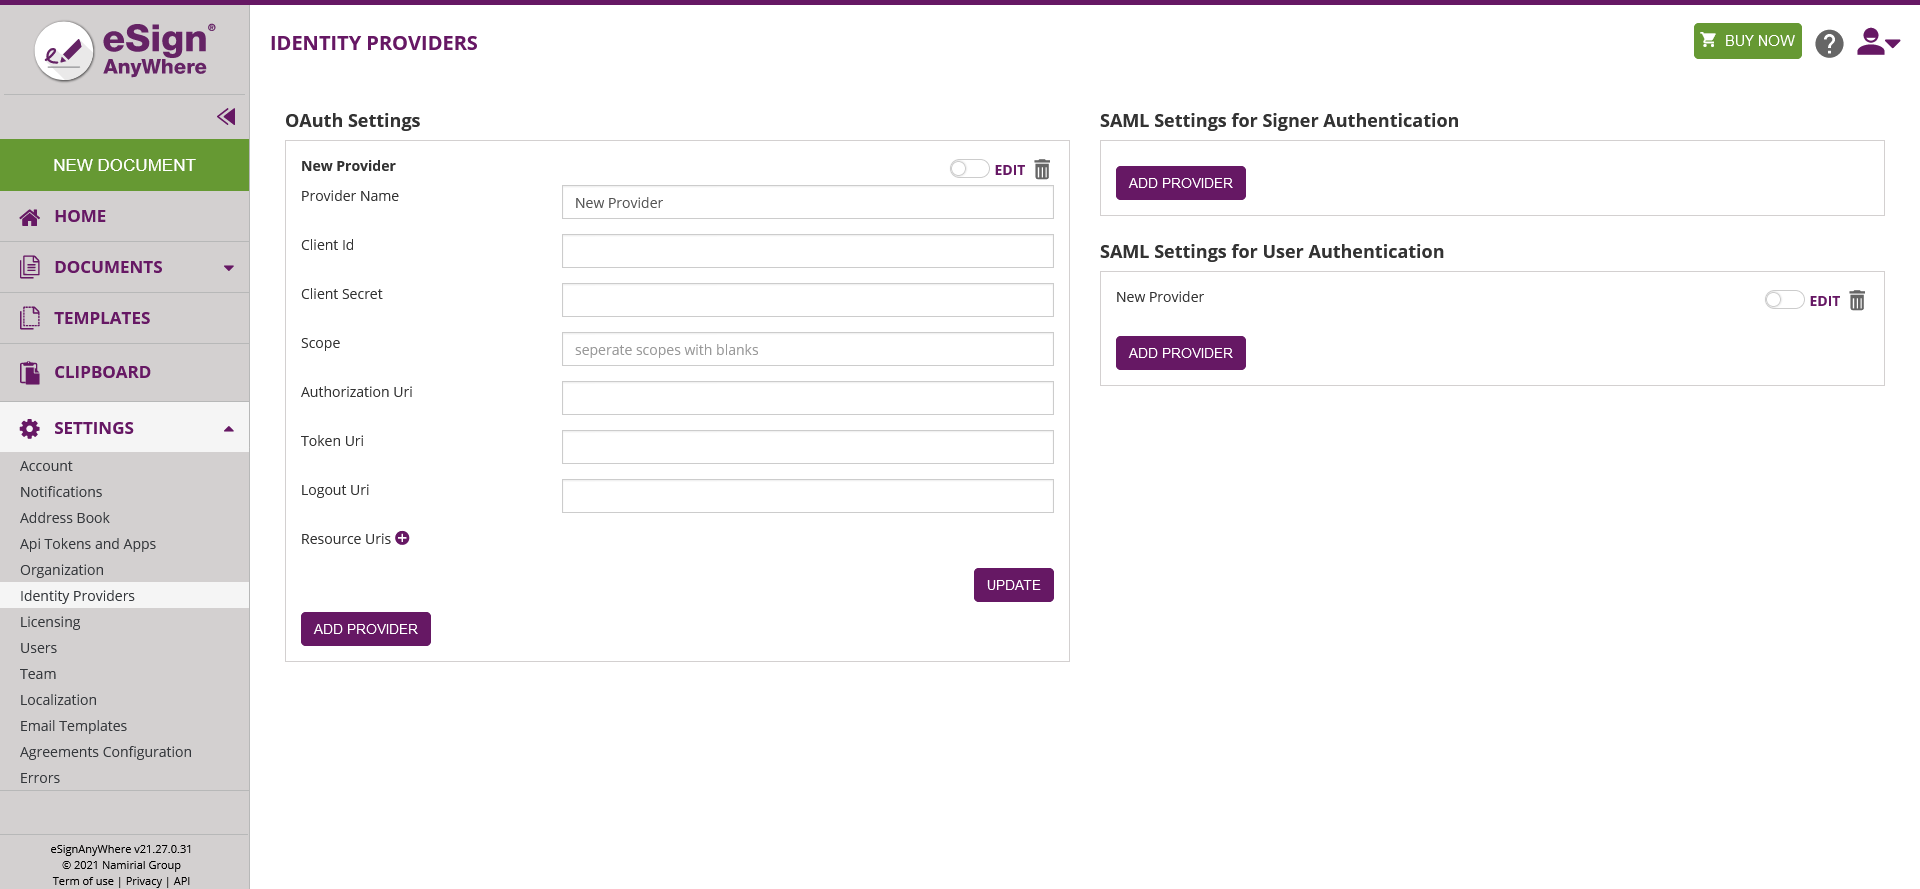
In this section you can add a provider. Please see the next figure for more information. For a detailed guide please also have a look at the OAuth Guide.
SAML Settings
In this section you can add a provider once for the signer authentication and once for the user authentication. Please see the next figure for more information.
Licensing
The licensing page is structured in three sections:
- The current license overview
- The envelope statistics
- The license notification configuration
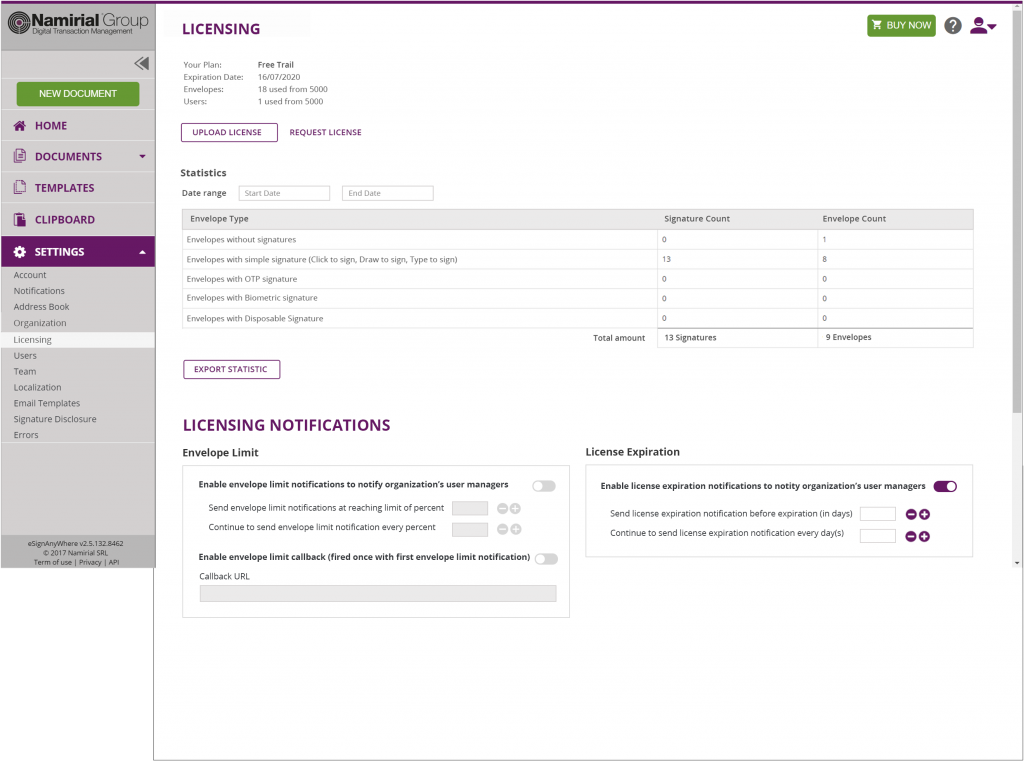
The current license overview shows:
- The plan (free trial, per number of documents…)
- The expiration date of the license
- How many envelopes have been sent since the license has been applied
- How many registered users have been created
The envelope statistics table displays the license-relevant counters of envelopes, and as additional information the number of signatures contained in the envelopes. This statistics count all envelopes that have been created, always considering the “most complex” signature variant contained in the envelope or allowed on a signature field. Because of that definition, and counting the envelope at creation time, the numbers do not contain information about e.g consumed SMS for OTP signatures – because an envelope may allow both click2sign (or other) and OTP signature on the same field; probably was never opened by the recipient, or the recipient probably requested several SMS for the authentication.
| Info |
|---|
Note that the statistics data also include historical data that may have been recorded before a license has been renewed. Because of that, it is valid and by design that the number of envelopes sent in the license overview section is different from the sum of all envelopes shown in the statistics table. |
In the license notification configuration, notifications and callback endpoints for an alert before reaching the hard limit of a volume-based license or mail alerts for time-based licenses can be configured. For example, it is possible to configure to receive a notification if the consumption-based envelope limit reaches 80%. The license expiration callback URL allows you to define an HTTP/HTTPS endpoint which is called when the warning threshold is reached. For the license expiration date, you can define how many days before the expiration you want to get an alert about expiration.
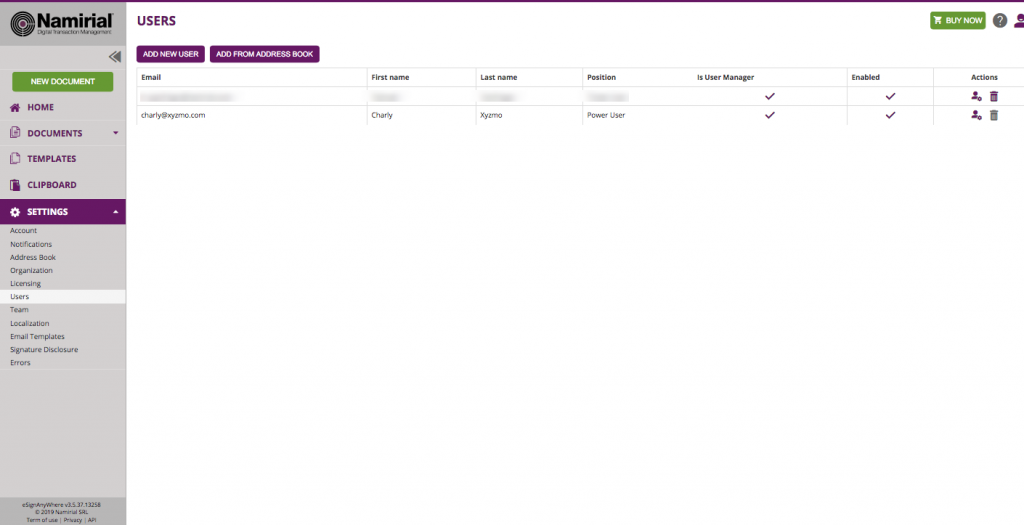
Users
In this section you can manage the users of your organization. You can add new users and manage the user rights.
| Info |
|---|
After you added a new user, the user gets an email with a link and has to activate his profile and set up his password. |
User Rights
- Position
- Power User: can send and manage envelopes
- Registered Signer: can sign documents and see his signed documents and tasks
- None: just can be used with “Is User Manager”, is a organisation manager without right to send or documents
- Is User Manager is able to change organisation settings, manage user and can define teams
- Developer Mode allows the user to download the envelope XML of his/her envelopes. This makes it easier for developers to use eSAW UI as a workflow designer.
- Allow automatic eSealing allows the user to use the automatic remote signatures in a workflow (See the electronic signature guide)
| Info |
|---|
A “user manager” can delete the organization account! Similar to system administrator accounts! Every user can set her/his own settings, so also her/his preferred language. If this user is a receiver of an envelope (sent via the same eSAW instance), the recipient language settings are taken from the user account and not from the sender’s preference! |
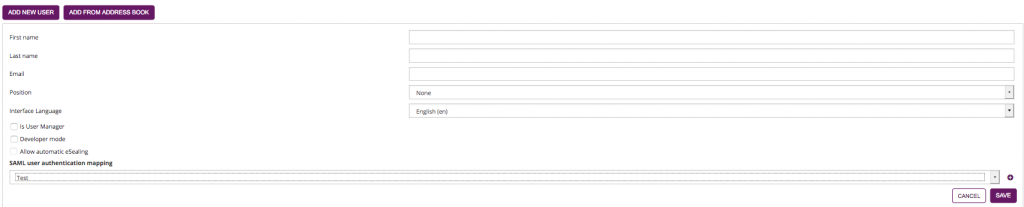
Add new User:
Delete User:
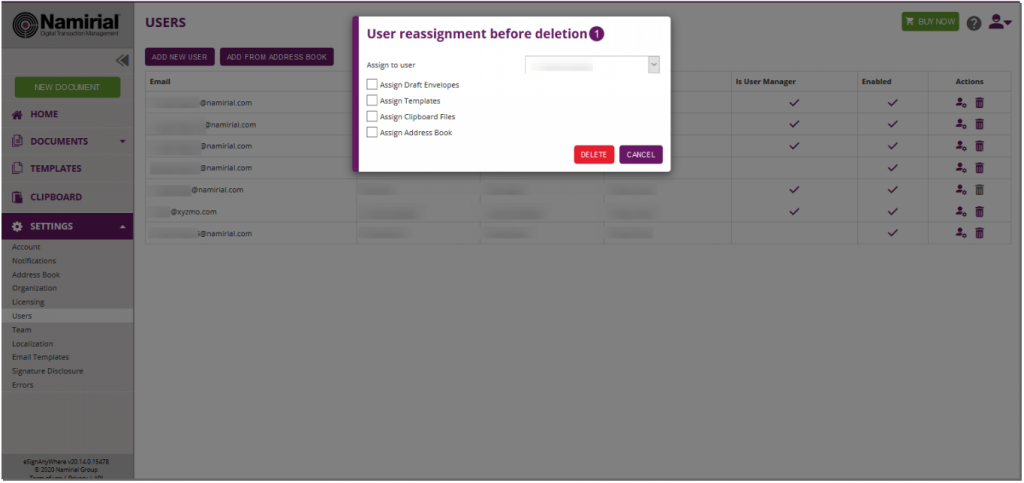
If you want to delete a user who already sent envelopes or created templates you can decide if you want to reassign these envelopes, templates, clipboards and address book to another user or not.
| Figure | Description |
|---|---|
|
|
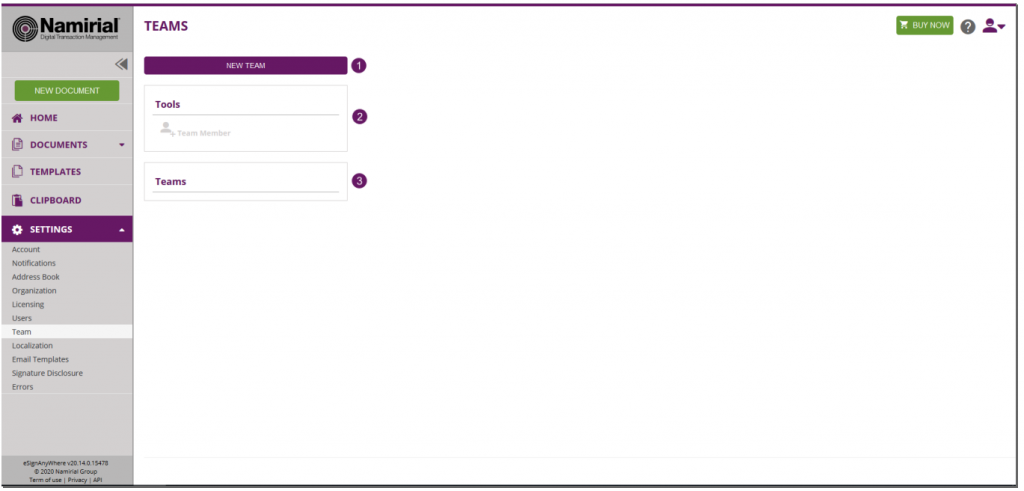
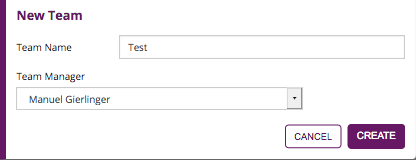
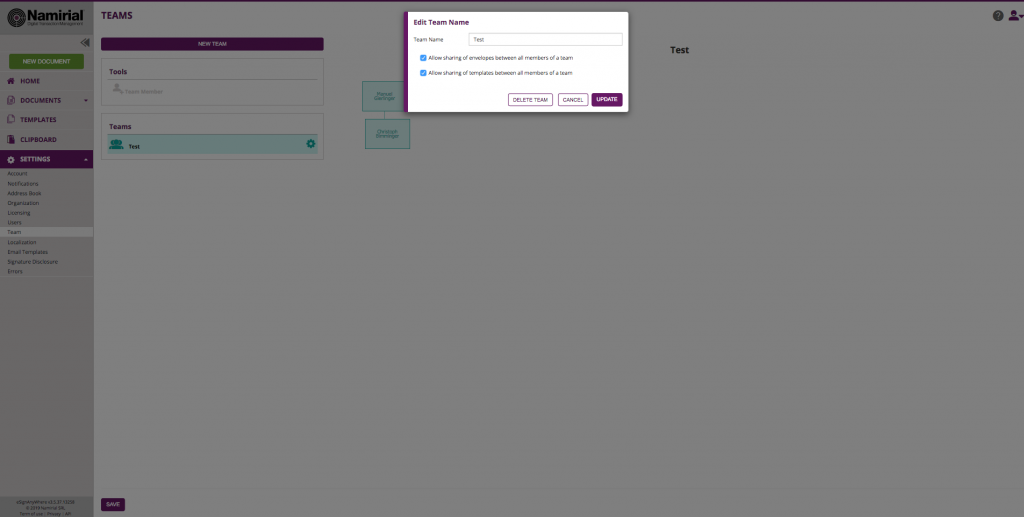
Team
In this section you are defining your teams. A team is a virtual organization, in which the team-manager (root) has access to all envelopes of the team. With the enabled sharing feature all team members can access the envelopes and/or templates of the team. People with the “isUserManager” setting can edit teams.
| Info |
|---|
If a person is in two teams (Team A & Team B) and sharing is enabled, the envelopes of Team A are not visible to Team B (and vice versa). [Note: changed behavior with eSAW 3.5, before it was able to be shared across both teams]. |
| Figure | Description |
|---|---|
|
|
Add new Team Dialog
By drag and drop move a new member to your selected team. You have to select which user should be added to the team.
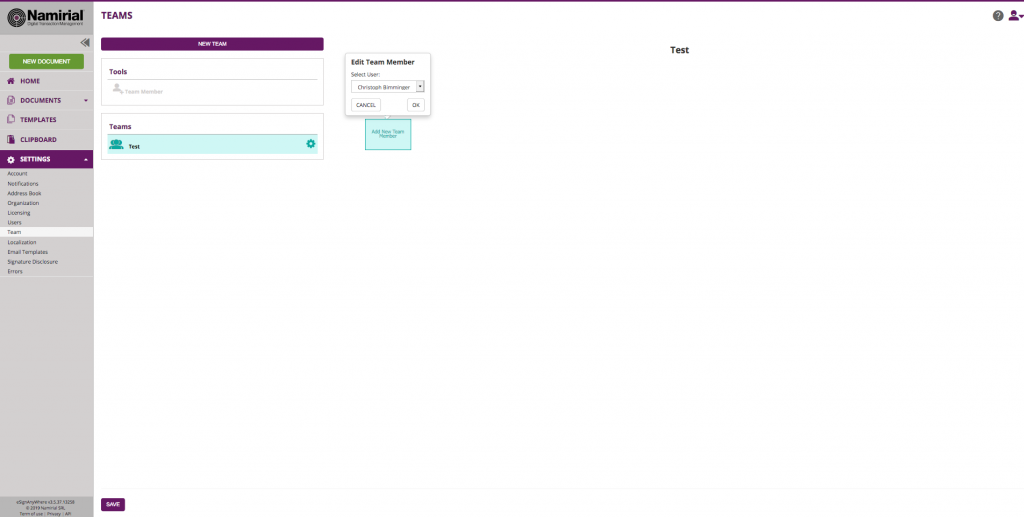
Removing a team member is simple. Just move over it and a delete icon appears.
In the team-settings you can define if envelopes and/or templates are shared.
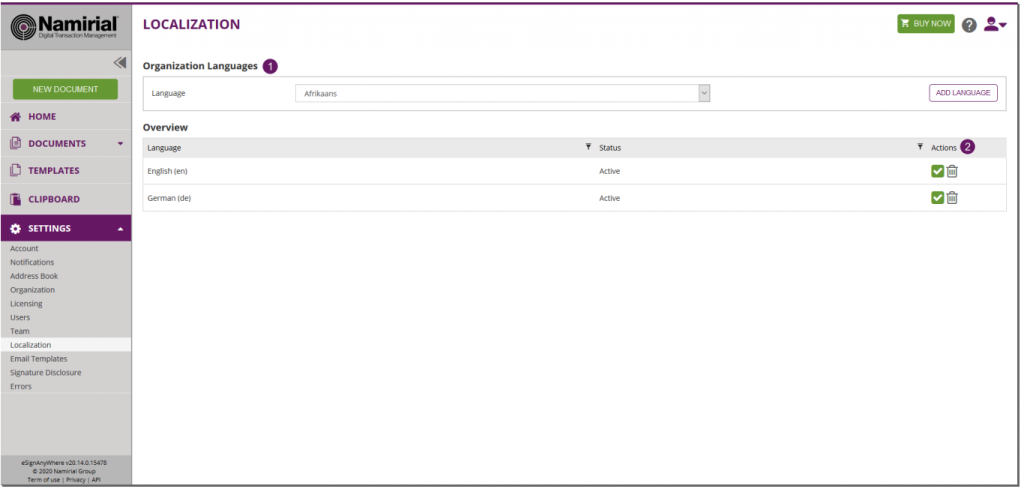
Localization
In this section you are managing languages for your organization. You can select active languages for the notifications. We do not offer all translations, so for non-supported languages you can define your individual texts in the “Email Templates” section of the settings.
| Figure | Description |
|---|---|
|
|
Email Template
In this section you can set your email templates. You can change the layout, texts, logo, etc. to adopt it to your needs. With the keywords you can add dynamically information (e.g. recipients name, message, etc.).
The Email Templating allows you to adopt the email, sent by eSignAnyWhere. A default template and default notifications are present for every organization and can always be restored to default. For each language set in “Localization”, a separate template and notification can be set. This allows you to set up languages, which are not directly supported by eSignAnyWhere and send the notifications in the, by you translated, language to the recipient.
Note: If a recipient has an eSignAnyWhere user account (on the same instance), the user will receive the mails in his/her prefered language. Sample: the recipient has a eSAW language set in German and you send her/him an envelope in Italian, he/she will receive the notification in German (his prefered language).
There are three types of templates:
- email master template “TEMPLATE”
- reminder template for reminder notifications “ReminderText”, which is used a prefix for the subject of the mail (e.g. “Reminder: “)
- email notifications, the text/wording/layout used for a certain type of notification and is placed within the master template
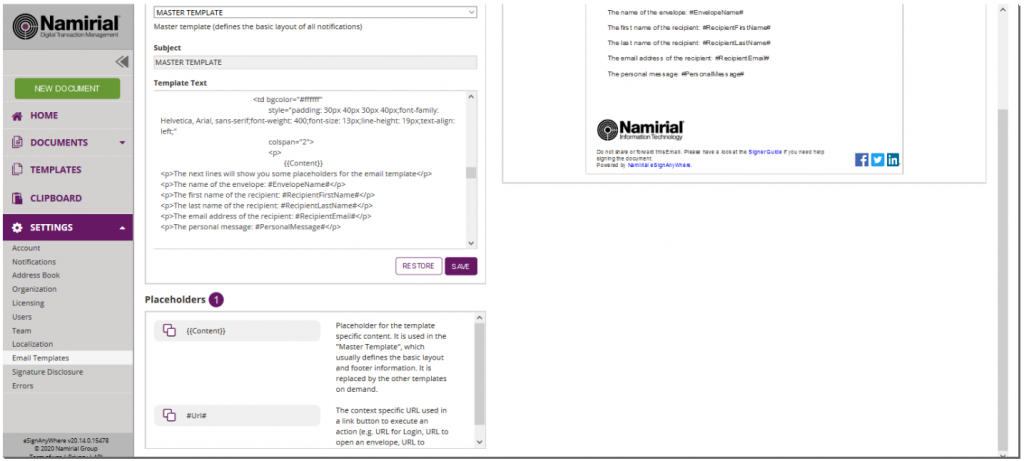
The email master template is called “TEMPLATE” and defines the basic layout of the notifications for the given language. You can define, for example a header, logo, footer, etc. The {{Content}} element is a placeholder to be replaced by the email notification template (e.g. “Sign”) to place the notification information and text.
You can select the following placeholders, but please note that not all placeholders are available in all notifications! The next section shows you all general available placeholders:
| Placeholder | |
#ContactUrl# | |
#Delegatee# | |
#DelegationMessage# | |
#Delegator# | |
#DelegatorName# | |
#EnvelopeList# | |
#EnvelopeMessage# | |
#EnvelopeName# | |
#ExpirationDate# | |
#InviterName# | |
#LicenseInfo# | |
#NumberOfRecipientsWhoSigned# | |
#OrganizationName# | |
#Password# | |
#PersonalMessage# | |
#RecipientEmail# | |
#RecipientFirstName# | |
#RecipientLastName# | |
#RecipientList# | |
#SenderFirstName# | |
#SenderLastName# | |
#SupportUrl# | |
#TotalNumberOfRecipients# | |
#Url# | |
#UrlAndroid# | |
#UrlDownload# | |
#UrlExpiration# | |
#UrlIos# | |
#UrlWindows# | |
#UserFirstName# | |
#UserLastName# | |
#UserList# | |
#{{Content}}# |
| Info |
|---|
Please note, that not all placeholders are available for all notification types! Moreover, you can find detailed information about the templates in the following section in the product: Settings->Email Templates |
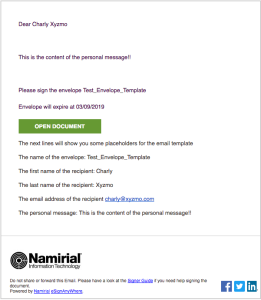
Simple example:
Messages exist of the placeholders (see above) and basic HTML tags. Therefore a HTML knowledge for modifying the messages is useful (<br/>, <p>...</p>, <strong>...</strong>, <h3>...</h3>).
<h4>The envelope "#EnvelopeName#" has been signed by the following recipients:</h4>
<p>#RecipientList#</p>
Figure | Description |
|---|---|
|
|
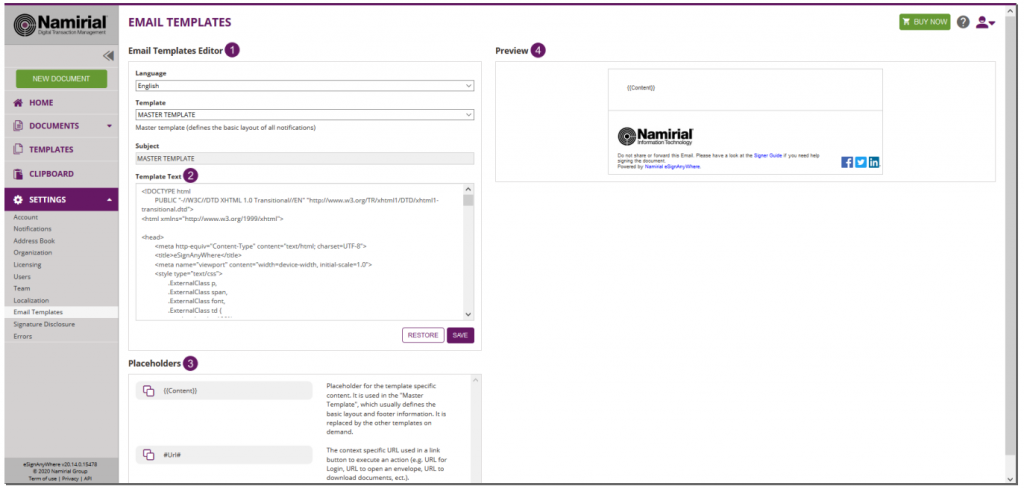
Figure | Description |
|---|---|
|
|
If you click on restore the current selected template will be restored to the system’s default.
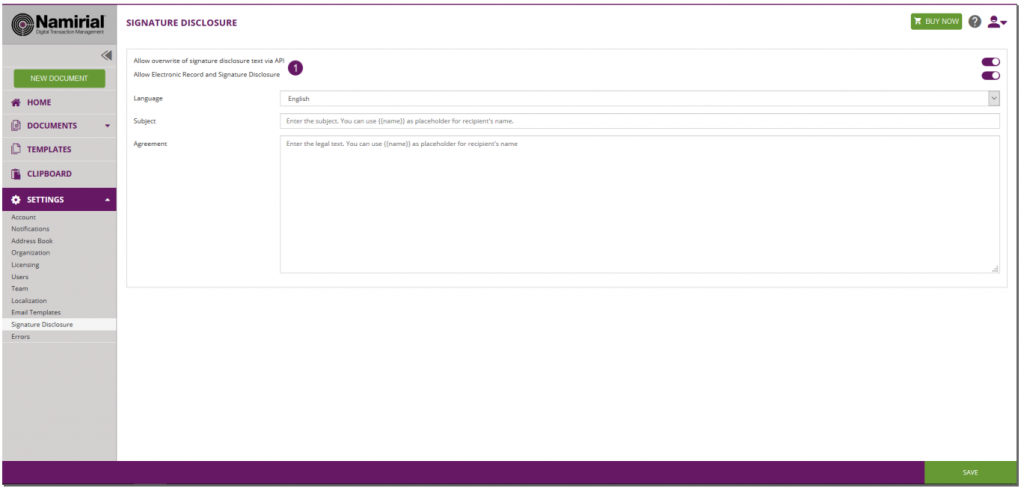
Agreements Configuration
If you want to use a common signature disclosure, you can enable it here. Just activate it by clicking on the checkbox and enter your individual signature disclosure. You can define different texts for each language and add the name of the recipient by using {{name}}. An optional setting allows you to overwrite the settings via API and set individual agreement texts per envelope or recipient.
| Figure | Description |
|---|---|
|
|
Errors
In case of errors they are listed in this section of the settings.
...