...
- Envelope: Name of the envelope and if you want to prevent the envelope from sharing in your team
- Documents: The documents in the envelope
- Recipients: define recipients and their order (sequential or parallel)
- Recipient Types:
- Needs to Sign: the recipient must sign the document to continue the workflow
- Receives a copy: the recipient gets a copy of the documents via email, the workflow continues automatically
- Needs to view: the recipient must open the document to continue the workflow
- Bulk: optional feature to split the document to send a unique document to recipients defined in the bulk
- Automatic Remote Signers: optional feature to sign with an automatic remote signature (For more information: Beginner Guide)
- Needs to Sign (PKCS#7): optional feature to sign a document with a PKCS#7 signature (For more information: Beginner Guide)
- Authentication: define if the recipient has to authenticate
- Access Code: The recipient has to enter the code to open the envelope (pre-shared code)
- SMS Code: The recipient receives a SMS with the one-time-password (OTP) to open the envelope
- Windows-Live Authentication
- OAuth / SAML / BankID as optional authentication methods (if available and configured)
- Personal Message for recipient and language
- Settings for Digital Remote Certificates, Disposable Certificates and SMS-OTP signature (optional)
- Recipient Types:
- Message: Define the message and subject for the envelope
- Document Visibility: optional feature, which allows to define the document visibility defined by recipient (only if you use more than one document in the envelope and more than one recipient)
Meta Data: if enabled, the sender can add metadata to the envelope (e.g. for hybrid use cases)
To create an envelope following steps are necessary: Name the envelope, upload a document, select one to many recipients, (additional) design a personal message. The next figures will show you exactly how to create an envelope.
...
- Recipient: which recipient has to sign the field
- Label: the label of the signature field
- Required: define if the recipient has to sign it or if the field is optional. If a signature field is required it is highlighted with a red border.
- Signature Type: you have to select at least one type. You can select more, if you want to give the recipient the option to choose a specific type. You can also define a preselect type (favorite, click on star-icon). Please note, that not all types are available for all customers.
- Click to Sign: the recipient has just to click on the signature field to sign it
- Draw to Sign: the recipient can draw his signature (e.g. with finger on touch screen)
- Type to Sign: the recipient can type his name for signing
- Biometric Signature: this stores the biometric data of his recorded signature (x,y coordinates; pressure [if available] and time). For that signature type the recipient has to use the SIGNificant SignOnPhone App on his Smartphone or Tablet for recording. The Signature is asymmetrically encrypted and highly secure.
- withinField: the recorded signature must within the signature field
- onPage: the recorded signature must be on the page (can be written outside of the signature field)
- intersectsWithField: the recorded signature must be partly within the signature field (default)
- Local Certificate: the recipient can use a locally on his device installed certificate for signing.
- Digital Remote Signature: the recipient uses a remote certificate for signing
- Disposable Certificate: The recipient will receive an email as usual and when the recipient wants to sign a disposable certificate signature field he/she will get a one-time-password via SMS. The counter on the disposable certificate starts by signing the first signature. (For more Information please have a look into the Beginner Guide)
- SMS-OTP Signature: The recipient receives a SMS with the one-time-password (OTP)
...
For more information about the api configuration please also see the beginner guide.
|
...
Here you can download a PDF which contains one recipient with a Click2Sign signature field by using the tags. For a complex example please see the Text Placeholders Use Case.
Document Tags
...
This section will show you how you can use documents with eSAW. eSAW will work with PDF documents. To generate PDF documents you can use Microsoft Office, Open Office or most of the typical document suites. If your document suite does not export PDF documents you can install a PDF printer on your computer. Instead of printing a document it will be exported as PDF file. There are many different printers available (open source to commercial).
...
Advanced tags support you with more flexible tags, such as form fields (radio buttons, check boxes, text fields, …), styling and workflow features. Even an input validation is available. If you want to use the advanced tags, please go to the Text Placeholders Use Case.
| Info |
|---|
In the following section you find a list of additional features, which are not be part of every eSignAnyWhere plan. |
...
eSignAnyWhere allows you to use automatic remote signatures to be applied to a document. Details are available in the Beginner Guide. Please contact your Namirial Sales if you are interested in this feature.
...
This is a feature to allow the signer to sign a document with a PKCS#7 signature. You find details in the Beginner Guide.
SwissCom On-Demand-Certificate 
...
Configure the user token:
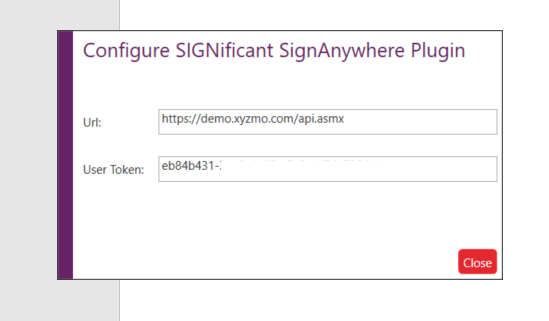
If you use eSignAnywhere on premise you also can configure the endpoint (URL).
...