Basic The user guide chapter is providing a basic documentation for envelope senders, registered users and administrators of an organization for the eSignAnyWhere product. After reading this guide you will know how to create and send signature requests and manage all organization related settings.
| Table of Contents | ||||
|---|---|---|---|---|
|
Create and Send Envelopes
In addition an electronic signature guide is available for further information (also linked at relevant chapters).
To create a new envelope (or documents you want to have signed), just click on “New Document” or directly click “Upload” on the Dashboard. In addition, if you upload a document via Microsoft Office Plugin (available in the user menu top-right), you can select it from the Clipboard.
To send an envelope you have to go through three steps:
- Create envelope and define its workflow
- Designer to place signature and form fields
- Send Envelope
You also can save the envelope as Draft or Template.
...
Further reading:
For users who want to go deeper into product capabilities, we recommend to consider also the following chapters:
- The eSignAnyWhere Integration Stories, which document both API-related and Web UI typical use cases examples from a usecase centric perspective
- The Application Reference, which documents the different product features from an UI centric perspective
Create and Send Envelopes
...
In addition an electronic signature guide is available for further information (also linked at relevant chapters).
To create a new envelope (or documents you want to have signed), just click on “New Document” or directly click “Upload” on the Dashboard. In addition, if you upload a document via Microsoft Office Plugin (available in the user menu top-right), you can select it from the Clipboard.
To send an envelope you have to go through three steps:
- Create envelope and define its workflow
- Designer to place signature and form fields
- Send Envelope
You also can save the envelope as Draft or Template.
(1) Create EnvelopeAnchor CreateEnvelope CreateEnvelope
| CreateEnvelope | |
| CreateEnvelope |
...
When you create a new envelope, you can set at least the following parameters:
- Envelope: Name of the envelope and if you want to prevent the envelope from sharing in your team
- Documents: The documents in the envelope
- Recipients: define recipients and their order (sequential or parallel)
- Recipient Types:
- Needs to Sign: the recipient must sign the document to continue the workflow
- Receives a copy: the recipient gets a copy of the documents via email, the workflow continues automatically
- Needs to view: the recipient must open the document to continue the workflow
- Recipient Types:
...
When you create a new envelope, you can set at least the following parameters:
- Envelope: Name of the envelope and if you want to prevent the envelope from sharing in your team
- Documents: The documents in the envelope
- Recipients: define recipients and their order (sequential or parallel)
- Recipient Types:
- Needs to Sign: the recipient must sign the document to continue the workflow
- Receives a copy: the recipient gets a copy of the documents via email, the workflow continues automatically
- Needs to acknowledge: the recipient must open the document to continue the workflow
- Bulk: optional feature to split the document to send a unique document to recipients defined in the bulk
- Automatic Remote Signers: optional feature to sign with an automatic remote signature (For more information: Beginner Guide)
- Needs to Sign (PKCS#7): optional feature to sign a document with a PKCS#7 signature (For more information: Beginner Guide)
- Authentication: define if the recipient has to authenticate
- Access Code: The recipient has to enter the code to open the envelope (pre-shared code)
- SMS Code: The recipient receives a SMS with the one-time-password (OTP) to open the envelope
- Windows-Live Authentication
- OAuth / SAML / BankID as optional authentication methods (if available and configured)
- Personal Message for recipient and language
- Settings for Digital Remote Certificates, Disposable Certificates and SMS-OTP signature (optional)
- Recipient Types:
- Message: Define the message and subject for the envelope
- Document Visibility: optional feature, which allows to define the document visibility defined by recipient (only if you use more than one document in the envelope and more than one recipient)
Meta Data: if enabled, the sender can add metadata to the envelope (e.g. for hybrid use cases)
To create an envelope following steps are necessary: Name the envelope, upload a document, select one to many recipients, (additional) design a personal message. The next figures will show you exactly how to create an envelope.
...
|
| Info |
|---|
The buttons “add bulk” and “bulk CSV template” are features, which are not part of every eSignAnyWhere plan. So you may not see these buttons in your eSignAnyWhere. |
...
- Defines order in workflow
- Address book
- Phone number
- Task
- Personal message
- Authentication
- Additional details
| Info |
|---|
Additional information to the phone number of the recipient: The phone number of the recipient is connected with the following three phone number settings:
If you enter a phone number for the recipient, these three fields are also filled out. You can then either accept the phone number (default) or change the phone number for, for example, SMS-Authentication (custom). For more information please also see the video below. |
...
- Authentication settings
| Multimedia | ||||||
|---|---|---|---|---|---|---|
|
(2) Designer
The Designer helps you to assign predefined signature fields of the document to the recipients and define additional signature fields and form fields.
- Recipients: Select a recipient for placing signature or form fields by drag and drop. Every recipient has its own color to be easily visible at the document preview.
- Form fields and predefined fields: signature field and form fields (e.g. text form, checkbox, radio button) and predefined field (e.g. initials of the recipient)
- Document: The document shows the pages of the envelopes documents and the placed elements (signatures and form fields) can be easily moved, edited (by clicking on it) and deleted (except predefined form fields of the uploaded PDF document).
| Info |
|---|
The next figures show you how to add for example signature fields and textfields in the eSignAnyWhere viewer. In the video you see how you can position the fields and how you can change the settings of the form fields. For example we changed the settings of the first signature field in the video from Click2Sign to Draw2Sign (if you select more than one type, the signer can choose his signing method). |
You can replace documents. The signature fields are kept, except they can not be applied (e.g. page in new document doesn’t exist any more). If a recipient is replaced his/her fields get unassigned, except there is only one recipient.
If you open a template or an envelope, where you have already set signature and form fields, but you need to replace the document without losing the configuration, just click after loading the template or envelope, on the replace icon of the document.
| Figure | Description |
|---|---|
|
| Info |
|---|
The buttons “add bulk” and “bulk CSV template” are features, which are not part of every eSignAnyWhere plan. So you may not see these buttons in your eSignAnyWhere. |
|
| Info |
|---|
Additional information to the phone number of the recipient: The phone number of the recipient is connected with the following three phone number settings:
If you enter a phone number for the recipient, these three fields are also filled out. You can then either accept the phone number (default) or change the phone number for, for example, SMS-Authentication (custom). For more information please also see the video below. |
(2) DesignerThe Designer helps you to assign predefined signature fields of the document to the recipients and define additional signature fields and form fields.
|
|
Define Signature of Recipient
...
Please also see the electronic signature guide.
By clicking on a signature field, you can define its setting and behavior. Following options are available:
- Recipient: which recipient has to sign the field
- Label: the label of the signature field
- Required: define if the recipient has to sign it or if the field is optional. If a signature field is required it is highlighted with a red border.
- Signature Type: you have to select at least one type. You can select more, if you want to give the recipient the option to choose a specific type. You can also define a preselect type (favorite, click on star-icon). Please note, that not all types are available for all customers.
- Click to Sign: the recipient has just to click on the signature field to sign it
- Draw to Sign: the recipient can draw his signature (e.g. with finger on touch screen)
- Type to Sign: the recipient can type his name for signing
- Biometric Signature: this stores the biometric data of his recorded signature (x,y coordinates; pressure [if available] and time). For that signature type the recipient has to use the SIGNificant SignOnPhone App on his Smartphone or Tablet for recording. The Signature is asymmetrically encrypted and highly secure.
- withinField: the recorded signature must within the signature field
- onPage: the recorded signature must be on the page (can be written outside of the signature field)
- intersectsWithField: the recorded signature must be partly within the signature field (default)
- Local Certificate: the recipient can use a locally on his device installed certificate for signing.
- Digital Remote Signature: the recipient uses a remote certificate for signing
- Disposable Certificate: The recipient will receive an email as usual and when the recipient wants to sign a disposable certificate signature field he/she will get a one-time-password via SMS. The counter on the disposable certificate starts by signing the first signature. (For more Information please have a look into the Beginner Guide)
- SMS-OTP Signature: The recipient receives a SMS with the one-time-password (OTP)
|
|
Batch-Signature
To increase the recipient’s user experience, you can use the batch signature. This allows the recipient to sign more than one signature field at once. Therefore, you have to select a first signature field and add the “Batch Signature” option. You can add more signature fields to the multi-signature field. So a signer is optionally able to sign all fields at once!
Properties and Limitations:
- The signer is asked, if he wants to sign all fields at once or one-per-one.
- Per envelope only one multi-signature-field can be defined via the Designer (with one to many fields and even within different files)
- You see the batch-signature-type with the icon
- If you select a batch-signature field, it adds its properties to the multi-signature-field (e.g. first field ist Click to Sign and second field will be added with Draw to Sign. So the multi-signature-field has two properties: Click to Sign and Draw to Sign). If you change the settings of a batch-signature field, it is applied to all fields of the batch-signature-set.
- You can use the batch-signature with limited signature types, because not all are able to be supported
- If you are using biometric signature as multi-signature, it is just able to use it on one physical document (e.g. contract.pdf in your envelope); because of legal aspects.
The following screenshot show you how to configure batch signing:
|
In the drop down for the batch signature (highlighted with the arrow) you have the following options:
- Simple Batch
- Signature List (unselected)

- Signature List (preselected)
- Signature List (selected, required mandatory)

- Signature List (unselected, required mandatory)
Form Fields
...
You can add form fields simply by drag and drop and place it on the document or via the advanced tags as predefined fields.
The following form fields are available:
- Textfield
- allows the signer to fill in some text (e.g. telefon number)
- Signature (see above)
- Radiobutton
- allows to create a group of field, where just one can be selected (e.g. Yes or No)
- Checkbox
- allows to check a box; if required is set, the checkbox must be selected before the workstep can be finished.
- Listbox
- enables to select 0-many fields of the list
- Combobox
- enables to select one field of the list
- Signer Attachment
- allows the signer to attach a file
Some of the fields enable an advanced setting, where you can define additional settings (e.g. font family).
A more detailled explaination of the different Form Elements and their properties is contained in the Designer Page chapter of the Application Reference.
Anchor SendEnvelope SendEnvelope
(3) Send Envelope
...
With the last step of creating and sending an envelope you get a summary, document list and notification setting of the envelope.
- Summary
- Envelope Name
- Recipients and Tasks: by clicking on a recipient you see the message which will be sent to the recipient
- Documents: List of documents in the envelope
- Notification Settings
- General Setting: To use a qualified timestamp server for all recipients

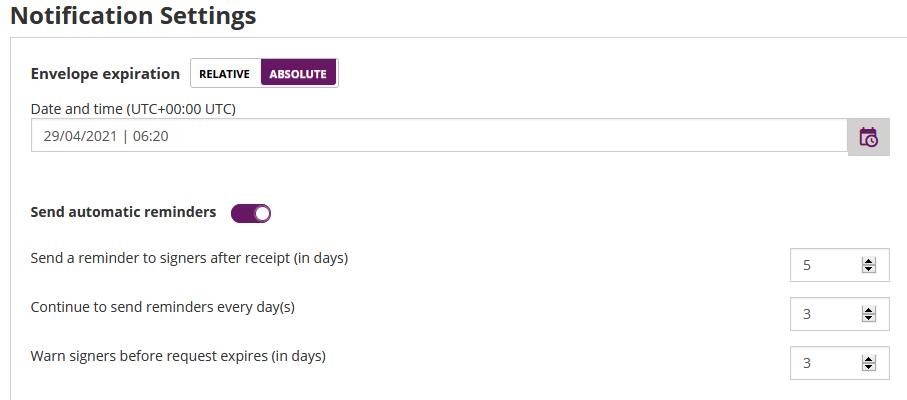
Regarding the expiration date of the envelope:
Before sending you have to choose between the following two options:
- Envelope expiry as relative time, provided in days:hours:minutes after sending the envelope
- Envelope expiry as absolute time, provided as timestamp and selected in the timezone in the account settings
On the last page (envelope summary) of creating and sending an envelope you can find the settings for the absolute, relative date and also the configuration for the reminders. Please see the next figure for detail information:
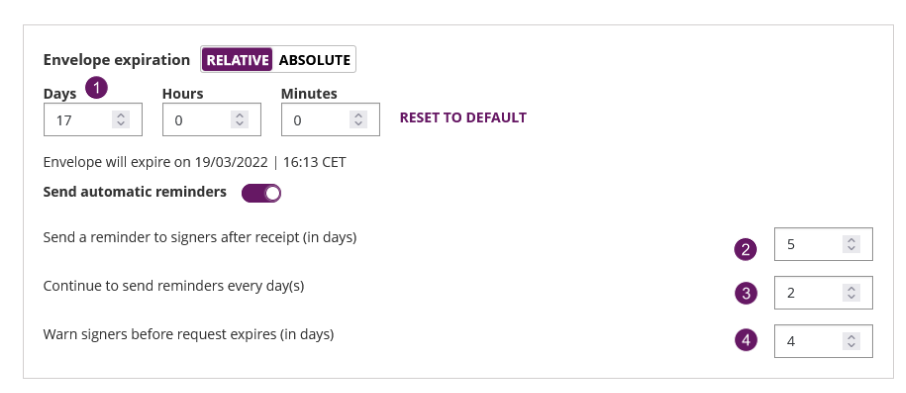
Please see the following figure which shows the configured reminders in a timeline. Note that the use case one shows the exact configuration which is configured above in the envelope expiration settings. The difference in the second use is that the "warn signers before request expires (in days)" is 5 days instead of 4 which is shown in the configuration above. Summing up the configuration: The point ![]() is the first reminder after the envelope was sent. After this first reminder the continuing reminders
is the first reminder after the envelope was sent. After this first reminder the continuing reminders ![]() start. Therefore, as it is configured in the settings above, every second day after the first reminder the recipient will get a reminder for signing the document. If also a reminder is configured before expiration
start. Therefore, as it is configured in the settings above, every second day after the first reminder the recipient will get a reminder for signing the document. If also a reminder is configured before expiration ![]() the continuing reminders will orient themselves on this reminder. This is shown in the second use case. If such a reminder is used, the continuous reminder can be postponed by one day (referring to the last continuous reminder). Overall, the recipient will receive a reminder again two days after the additional reminder
the continuing reminders will orient themselves on this reminder. This is shown in the second use case. If such a reminder is used, the continuous reminder can be postponed by one day (referring to the last continuous reminder). Overall, the recipient will receive a reminder again two days after the additional reminder ![]() .
.
| Multimedia | ||||||
|---|---|---|---|---|---|---|
|
...
- Recipients
- Tools
- Document
Define Signature of Recipient
Please also see the electronic signature guide.
By clicking on a signature field, you can define its setting and behavior. Following options are available:
- Recipient: which recipient has to sign the field
- Label: the label of the signature field
- Required: define if the recipient has to sign it or if the field is optional. If a signature field is required it is highlighted with a red border.
- Signature Type: you have to select at least one type. You can select more, if you want to give the recipient the option to choose a specific type. You can also define a preselect type (favorite, click on star-icon). Please note, that not all types are available for all customers.
- Click to Sign: the recipient has just to click on the signature field to sign it
- Draw to Sign: the recipient can draw his signature (e.g. with finger on touch screen)
- Type to Sign: the recipient can type his name for signing
- Biometric Signature: this stores the biometric data of his recorded signature (x,y coordinates; pressure [if available] and time). For that signature type the recipient has to use the SIGNificant SignOnPhone App on his Smartphone or Tablet for recording. The Signature is asymmetrically encrypted and highly secure.
- withinField: the recorded signature must within the signature field
- onPage: the recorded signature must be on the page (can be written outside of the signature field)
- intersectsWithField: the recorded signature must be partly within the signature field (default)
- Local Certificate: the recipient can use a locally on his device installed certificate for signing.
- Digital Remote Signature: the recipient uses a remote certificate for signing
- Disposable Certificate: The recipient will receive an email as usual and when the recipient wants to sign a disposable certificate signature field he/she will get a one-time-password via SMS. The counter on the disposable certificate starts by signing the first signature. (For more Information please have a look into the Beginner Guide)
- SMS-OTP Signature: The recipient receives a SMS with the one-time-password (OTP)
...
- No required field
- Required field (highlighted in red)
...
- Signature settings
Batch-Signature
To increase the recipient’s user experience, you can use the batch signature. This allows the recipient to sign more than one signature field at once. Therefore, you have to select a first signature field and add the “Batch Signature” option. You can add more signature fields to the multi-signature field. So a signer is optionally able to sign all fields at once!
Properties and Limitations:
- The signer is asked, if he wants to sign all fields at once or one-per-one.
- Per envelope only one multi-signature-field can be defined via the Designer (with one to many fields and even within different files)
- You see the batch-signature-type with the icon
- If you select a batch-signature field, it adds its properties to the multi-signature-field (e.g. first field ist Click to Sign and second field will be added with Draw to Sign. So the multi-signature-field has two properties: Click to Sign and Draw to Sign). If you change the settings of a batch-signature field, it is applied to all fields of the batch-signature-set.
- You can use the batch-signature with limited signature types, because not all are able to be supported
- If you are using biometric signature as multi-signature, it is just able to use it on one physical document (e.g. contract.pdf in your envelope); because of legal aspects.
The following screenshot show you how to configure batch signing:
...
- Simple Batch
In the drop down for the batch signature (highlighted with the arrow) you have the following options:
- Simple Batch
- Signature List (unselected)
- Signature List (preselected)
- Signature List (selected, required mandatory)
- Signature List (unselected, required mandatory)
Form Fields
You can add form fields simply by drag and drop and place it on the document or via the advanced tags as predefined fields.
The following form fields are available:
- Textfield
- allows the signer to fill in some text (e.g. telefon number)
- Signature (see above)
- Radiobutton
- allows to create a group of field, where just one can be selected (e.g. Yes or No)
- Checkbox
- allows to check a box; if required is set, the checkbox must be selected before the workstep can be finished.
- Listbox
- enables to select 0-many fields of the list
- Combobox
- enables to select one field of the list
- Signer Attachment
- allows the signer to attach a file
Some of the fields enable an advanced setting, where you can define additional settings (e.g. font family).
...
(3) Send Envelope
With the last step of creating and sending an envelope you get a summary, document list and notification setting of the envelope.
- Summary
- Envelope Name
- Recipients and Tasks: by clicking on a recipient you see the message which will be sent to the recipient
- Documents: List of documents in the envelope
- Notification Settings
- Expiration Date of the envelope
- Automatic Reminders: configure reminders for the recipient if he has not fulfilled his tasks
- General Setting: To use a qualified timestamp server for all recipients
Regarding the expiration date of the envelope:
Before sending you have to choose between the following two options:
- Envelope expiry as relative time, provided in days:hours:minutes after sending the envelope
- Envelope expiry as absolute time, provided as timestamp and selected in the timezone in the account settings
On the last page (envelope summary) of creating and sending an envelope you can find the settings for the absolute and relative date. Please see the next figure for detail information:
For more information about the api configuration please also see the beginner guide.
|
...
| Info |
|---|
When you first load the “Document” page no filters are applied. All your envelopes are listed in it. You can easily add multiple filters by selecting them from the menu (left) ) one after another and set text filters. |
- Status
- Drafts, Completed, Active (Action Required, Waiting for Others, Expiring Soon), Rejected, Canceled and Expired
- Sent | Signed
- By Me
- By a team member
- By team
- Sender Date
- Yesterday, Since last 7 Days, 30 Days, 90 Days, 6 Months, Year and Custom Date
- Bulk (if feature is available)
- Exclude bulk children
- Bulk parents only
- Text
- Filter by a text you have entered (at the top bar)
...
- ID of the envelope
- Name
- State
- Sender
- Sending Date
- Expiration Date
- Subject
- Document(s) as CSV
- Recipient(s) as CSV
Templates
Templates can be used for recurring documents or workflows. You can prepare them and directly use them from the template page. When you use or edit the template the procedure is similar to create envelope, except the prepared configuration is used.
Features:
- Use: directly use the envelope
- Details: show details about template
- Edit: modify template
- recipients
- settings
- documents: you can replace documents. The signature fields are kept, except they can not be applied (e.g. page in new document doesn’t exist any more). If a recipient is replaced his/her fields get unassigned, except there is only one recipient.
If you open a template, where you have already set signature and form fields, but you need to replace the document without losing the configuration, just click after loading the template, on the replace icon of the document.
...
- Sender
- Sending Date
- Expiration Date
- Subject
- Document(s) as CSV
- Recipient(s) as CSV
Templates
...
Templates can be used for recurring documents or workflows. You can prepare them and directly use them from the template page. When you use or edit the template the procedure is similar to create envelope, except the prepared configuration is used.
Features:
- Use: directly use the template as a new envelope (same function also available in creation of an envelope in the document section as "add a template"
- Details: show details about template
- Edit: modify template
- recipients
- settings
...
...
Document Tags and Placeholders
...
Here you can download a PDF which contains one recipient with a Click2Sign signature field by using the tags. For a complex example please see the Text Placeholders Use Case.
Document Tags
...
This section will show you how you can use documents with eSAW. eSAW will work with PDF documents. To generate PDF documents you can use Microsoft Office, Open Office or most of the typical document suites. If your document suite does not export PDF documents you can install a PDF printer on your computer. Instead of printing a document it will be exported as PDF file. There are many different printers available (open source to commercial).
...
Advanced tags support you with more flexible tags, such as form fields (radio buttons, check boxes, text fields, …), styling and workflow features. Even an input validation is available. If you want to use the advanced tags, please go to the Text Placeholders Use Case.
| Info |
|---|
In the following section you find a list of additional features, which are not be part of every eSignAnyWhere plan. |
Additional Envelope Features
...
Bulk Envelopes 
...
For further information please see the Bulk Sending Use Case.
...
After creating your CSV, you can upload it. Afterwards you can continue the standard process of creating an Envelope. For further information please see the Bulk Sending Use Case.
Automatic Remote SignaturesSignatures 
...
eSignAnyWhere allows you to use automatic remote signatures to be applied to a document. Details are available in the Beginner Guide. Please contact your Namirial Sales if you are interested in this feature.
PKCS#7 SignerSigner
...
This is a feature to allow the signer to sign a document with a PKCS#7 signature. You find details in the Beginner Guide.
SwissCom On-Demand-CertificateCertificate 
...
Please contact your Namirial Sales if you are interested in this feature.
BankId 
...
Please contact your Namirial Sales if you are interested in this feature.
...
Configure the user token:
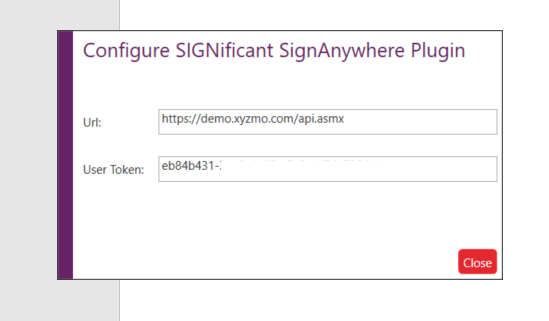
If you use eSignAnywhere on premise you also can configure the endpoint (URL).
...