...
Please see the following figure for more information.
| Figure | Description |
|---|---|
|
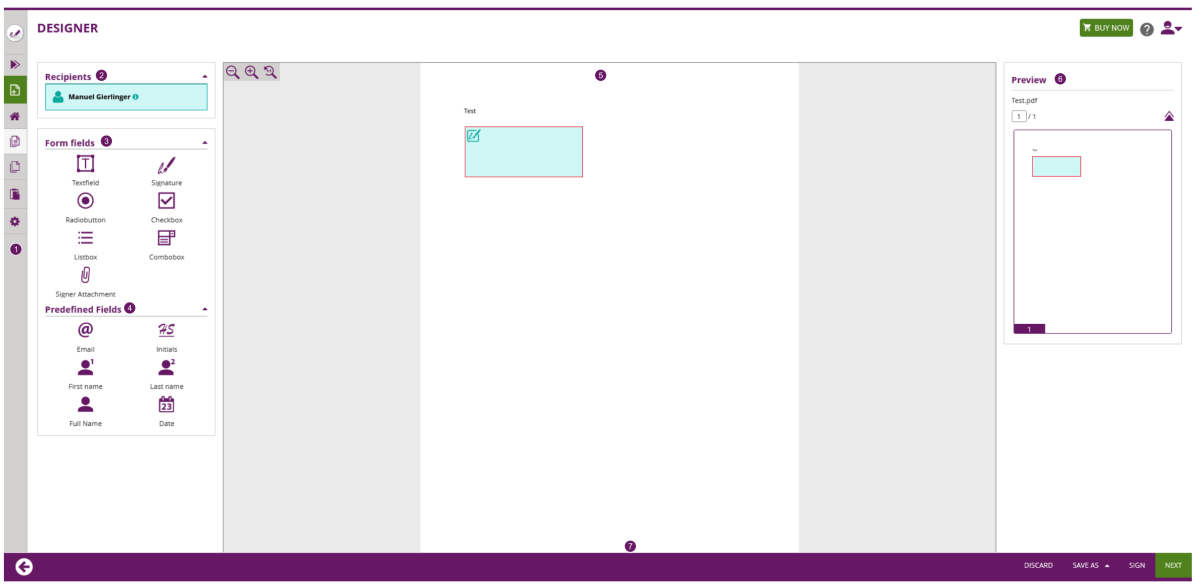
Properties Panel |
...
There is a couple of properties which can be defined on any interactive element that can be placed on a document:
The assignment of an element to a recipient defines which recipient is allowed to, or must, fill an element as part of fulfilling the (signing) activity. An element can be assigned to one (or no) recipient. Only recipients of type "signer" (with or without having signature fields) are eligible in the recipients selection (with an exception - "Automatic Signing Activities" can be selected on signature fields, see below). If a field is not assigned to any recipient, only the default value will be shown to all signers (and other recipients), but nobody will be able to interact with the element or change its value. When changing the recipient using the drop down list, both the color indicator of the properties panel and the color of the element in the main panel will automatically change to the color indicator of the recipient (also visible e.g. in the recipients panel).
...
- None
- Date
- Format
- Minimum value
- Maximum value
- Number
- Decimal Places
- Symbol
- Symbol location
- Group Separator
- Decimal Separator
- Minimum value
- Maximum value
- Phone
- Phone type
- international
- international leading zeros
- international leading plus
- Phone type
- Time
- Format
- Minimum value
- Maximum value
Please see the following sample for date validation:
| Input validation | Result |
|---|---|
Signature
For information about how to sign the different signature types please have a look at the Signer Guide.
...
- Signature fields can be assigned also to "Automatic Signing Activities", making the automatic signatures visible on the document
- Required
- Custom Signature Image (feature flag necessary: "ExternalSignatureImage"
- This allows signers to upload their picture (custom signature picture) and add it as additional graphics to the stamp imprint. Furthermore the signer can store the signature image which a gallery for later usage.
- By enabling the "Custom Signature Image" checkbox, the sender can allow (or enforce) that the signer is uploading an additional image to be shown in the signature field. Such custom signature images can be used to ask for placing a company stamp picture, or to insert Hanko stamps. See Story: Using external signature images for additional use case details. Note that the global setting here sets and overrules the signature-type specific settings, as this property can also be defined on a per-signature-type level in the Advanced tab.
- Batch Signature
With the "Batch Signature" checkbox enabled, it makes the signature field a member of a batch of several signature fields. Signatures being member of a batch can be signed all at once if the signer prefers, but allow the signer also to sign them one by one. When the batch signing option is enabled, the sender can distinguish between different batch signing behavior:
- Simple Batch
where the signer just knows how many signature fields are signed as part of the batch - Signature List (unselected)
where a list of all signature fields (document name and page number, or signature field label) are displayed in a list of checkboxes; the user needs to select those which should be signed as part of the batch (opt-in) - Signature List (preselected)
where a list of all signature fields (document name and page number, or signature field label) are displayed in a list of checkboxes; the user can deselect those which she/he doesn't want to sign as part of the batch (opt-out) - Signature List (selected, required mandatory)
Like "preselected", but without an option to uncheck the "mandatory signature fields) - Signature List (unselected, required mandatory)
Like "unselected", but mandators signature fields still preselected and without an option to uncheck the mandatory signature fields
- Simple Batch
The signature field, in the designer page's main editor, is represented by a different icon when the signature field is member of a batch:
Signature Field in standard representation Signature Field allowing batch signing
Following options available for all signature types
...
- DisposableCertificate
- SwissComOnDemand
- RemoteCertificate
- OneTimePassword
ClickToSign
...
| Info | |||||||||||||
|---|---|---|---|---|---|---|---|---|---|---|---|---|---|
Following feature flag is necessary: SwissComOnDemandCertificate Before starting the envelope please see the following configurations which are needed in order to send a SwissCom On Demand Certificate.
After setting the organization configuration you can start with the envelope. Please do not forget to add the following data which is necessary to use the SwissCom On Demand Certificate:
|
...
Another option allows the sender to define that only the validation response (which includes the validation score obtained from biometric server) should be stored in the signed PDF, instead of storing the entire biometric data. In this case, the document itself does not store the data required for a forensic examination of the handwritten signature, but legal considerations may result in preferring that option, in some countries.
| Info |
|---|
Following feature flag is necessary: BiometricSignature |
For the biometric signature you can additionally configure following setting:
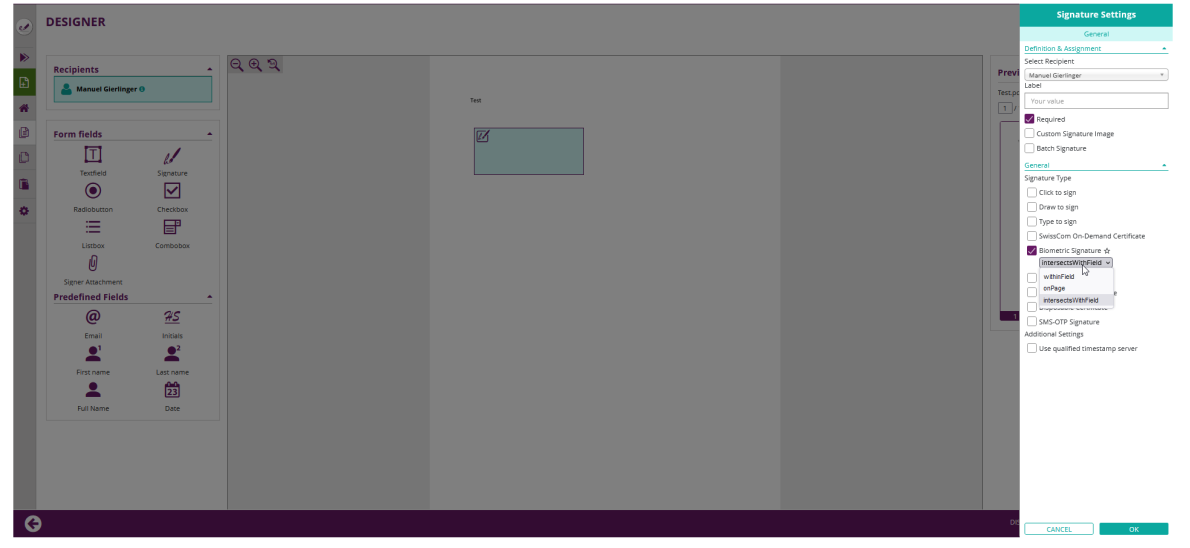
- positioning
- intersects with field
- withinField
- onPage
...
| Info | ||||
|---|---|---|---|---|
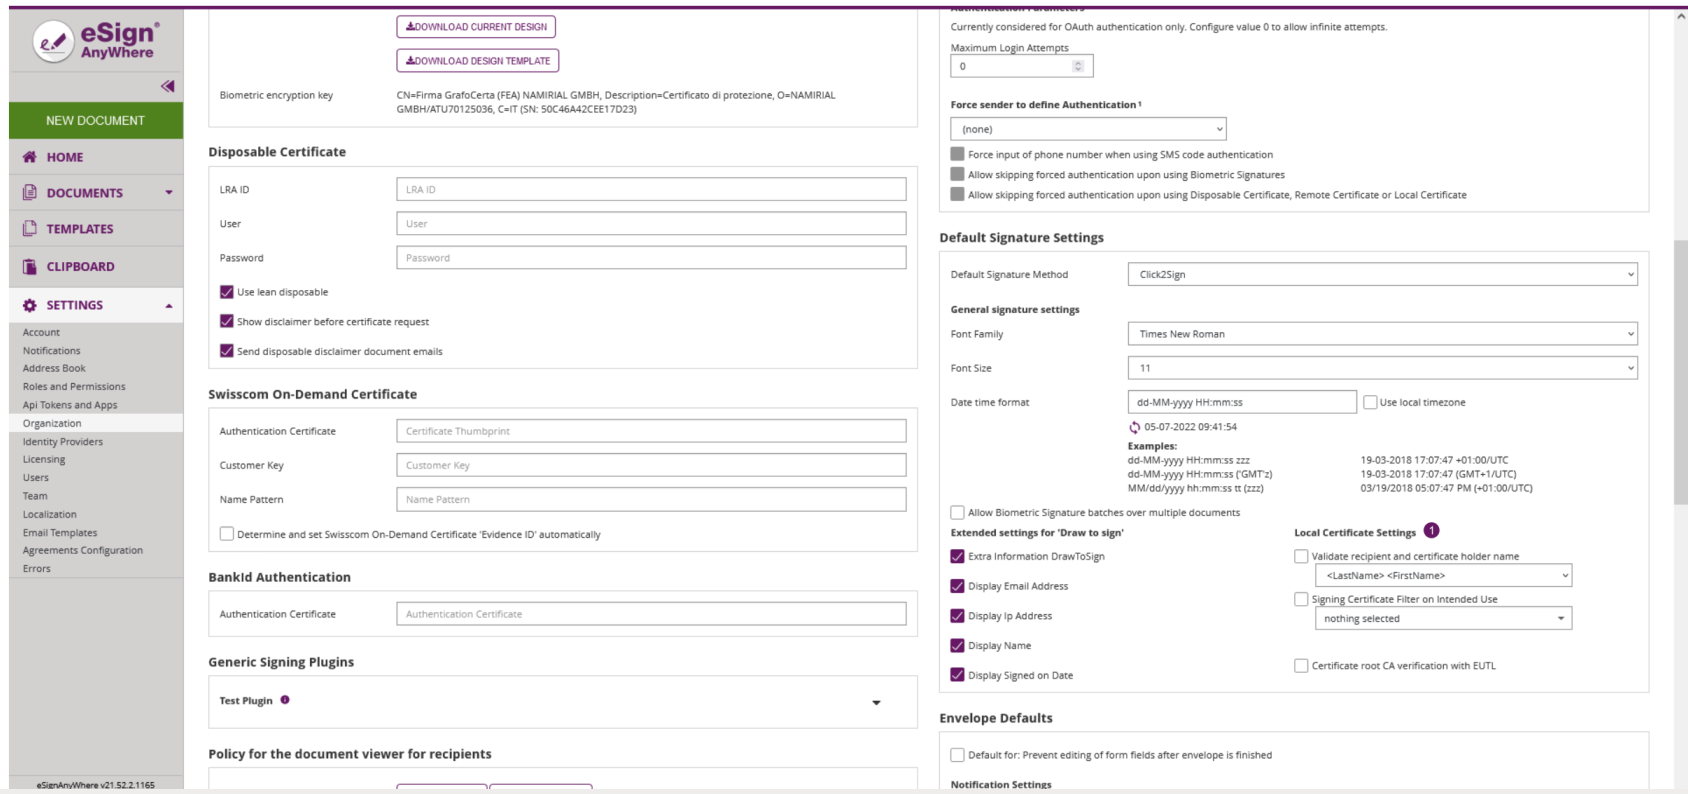
Please see the following configuration available for local certificate signature:
|
...
If the user has a long lived certificate you can use the Digital Remote Signature option. You can configure the User Id and the Device Id. If not configured the signer must provide those information:
Disposable Certificate
...
Please see the following configuration for the disposable certificate (those settings can be found in the organization settings)
| Figure | Configuration |
|---|---|
|
|

After the configuration in the organization settings you also have to fill in the disposable data for the recipient. Please see the next figure:
| Figure | Configuration |
|---|---|
|
...
Following configuration (optional) can be set before sending the envelope with a SMS-OTP signature: You can either set the phone number for the signer or not. To set the phone number just add in the following space on the create envelope page. If you do not set the phone number, the signer has to fill in his/her phone number:
Automatic Remote Signature
...
User must have enabled the option “Allow automatic eSealing” to use the automatic remote signatures / eSealing within a workflow.
|
...
In the eSAW UI you can add an automatic signer / eSealing via button in the recipient list “Add Automatic”. Then the profile must be selected for the automatic signature / eSealing. Attention: the power user must have the right “Allow automatic eSealing” enabled (see “Settings” > “Users”).
|
...
- Select in Unison
- When multiple radio buttons of a group have the same export value and one of this duplicate export value is selected, all radio buttons of the group with the same export value get selected
Checkbox
| General |
|---|
|
...
- Attachment icon
- Paperclip
- Graph
- Pushpin
- Tag
- Either enable or disable to set a custom file name and if enabled enter a file name
Read Confirmation 
...
Please also see the next figure for reading confirmation just for a specific area:
| Figure | Description |
|---|---|
|
If the field is selected as required the recipient must then confirm that he/she has read the selected area.
Link
Please note the following general settings which are available to configure a link:
...
With the link form field it is possible to add hyperlinks to the document. This allows the recipient to just click on the link to navigate to linked pages.
Predefined (static value) Fields
...
- EmailFields
- InitialsFields
- GivenNameFields
- SurnameFields
- FullNameFields
- DateFields
- Static Text
The value of a predefined field will be inserted automatically at the time when the recipient, to whom a predefined field was assigned, is opening the activity. On predefined fields, only the recipient can be selected. Different to other form elements, it is not possible to set a predefined field "mandatory" as the value anyhow is filled automatically. Following predefined fields can be used:
...
- TextBoxes
- CheckBoxes
- ComboBoxes
- RadioButtons
- ListBoxes
- Signatures
- Attachments
- AreaReadConfirmations
- PageReadConfirmations
Main Editor
What-you-see-is-what-you-get (WYSIWYG) editor to place form elements, re-arrange and resize them. Elements can be added on the document by dragging them from the Elements Toolbox and placing it directly at the target location. After adding the element to the document, when moving the mouse over the element on the document, an in-place action menu up shows up:
The in-place action menu provides following actions:
...
Re-arranging elements on the page can again be done by Drag&Drop. While re-arranging elements, rulers which are automatically appearing during the re-arranging help to align controls precisely:
Elements can be resized with a Drag&Drop interaction on the lower-right corner (where it is indicated using the resize-corner icon). Note that elements that had been embedded as AcroForm Elements on the PDF cannot be resized.
...
On devices without touch capabilities, the user can open the properties panel by selecting (clicking) an element in the Main Editor area. On tablet PCs (or in general on devices with touch input), the user must click on the cogwheel icon on an element's adhoc menu to open the properties panel. The color of the property panel is indicating to which recipient an element is assigned. The recipient colors used in the recipients list, and also used for the elements in the main editor, are reflected in the colors of the properties panel. When the properties panel is open, the user can change settings, but needs to confirm or cancel the properties panel using one of the two buttons at the bottom of the properties panel, before other UI changes (e.g. arranging of elements) can be done in the UI: