| Table of Contents |
|---|
Introduction
INTRODUCTIONAfter install installing and configure you configuring your virtual appliance SWS or SaaS instance, now you can use their method to sign or apply timestamp. SWS have two interfaces SOAP or and REST. SOAP and REST standard interface is used for files under 50MB 80MB and REST big interface is used for files over 50MB80MB.
SWS can manage some signature device devices like:
- automatic signature (her name start starts with AHI or AHIP followed by numbers)
- eSeal (her name start starts with SHI or SHIP followed by numbers)
- remote signature (her name start starts RHI or RHIP followed by numbers)
- disposable signature (her name start starts with RHI or RHID followed by numbers)
- long-lived signature (her name start starts with RHIL or RHILD followed by numbers)
Only during During the integration, you can only see:
- eSeal like a an automatic signature
- disposable, longlived long-lived like a remote signature
And the The remote signature is like an extension of the automatic signature , because it requires the OTP code beyond username and password require the OTP code.
Can support SWS supports three different types of signaturesignatures:
- Pades: valid only for PDF files
- Xades: valid only for XML files
- Cades: valid for every type of filesfile
Apply timestamp on files (according to standard RFC3161)
For every Each type of signature and timestamp , there is a dedicated has its web method, which will be is described in the the next sections.
In this user guide, the examples will be shown using "SoapUI". This is a free tool which can be installed on every OS. With this tool, It is possible to create SOAP request which invoke the differents requests with this tool that invokes different web methods.
During the integration, the application client of SWS should recreate the same XML soap request created on SoapUI with his program language.
SOAP INTERFACEFor test SOAP interface, you can request with SoapUI, following this steps:
Download and install SoapUI from this link:
https://www.soapui.org/tools/soapui/
Once complete the installation:
open SoapUI → File → New Soap ProjectAnd add appliance SWS method to SoapUI, like in this image:

In text box “Initial WSDL” use this URL:
http://<IP-APPLIANCE>:8080/SignEngineWeb/sign-services?wsdl
And you will obtain the list of method like this:

FOR AUTOMATIC AND REMOTE SIGNATURE
The principal method used to sign (valid for remote and automatic signature), they are:
signPAdESList → Used for sign only PDF files
signCAdESList → Used for sign every type of files
signXAdESList → Used for sign XML files
getSignatures → permit to obtain the number of signature made since certicate creation
getAvailableSignatures → permit to obtain the numbers of signatures (valid only for device NOT pay per use, else it will generate an exception)
Every method require the Credentials object, in the next section will see how populate this field.
ONLY FOR REMOTE SIGNATURE
If you are signing with remote signature, you can use this method:
getOTPList → permit to obtain the list of OTP associate to your remote signature (exactly the OTP is associated to the holder of certificate. For example if you have two or more remote signature associate to same holder, you can use this OTP for every remote signature).
sendOtpBySMS → it will send the SMS containig the OTP code.
openSession → permit to obtain the token (like a string) for sign instead to insert new OTP code on every signature). The token is valid for three minutes from generation.
getRemainingTimeForSession → it return the time until the session is valid
closeSession → if you want destroy the token before three minutes
TIMESTAMP
If you want apply only timestamp, you can use this method:
timestamp → it permits to obtain the file with timestamp is possible to choose between two types TSR or TSD. The option TSR mean the timestamp is another files, while the TSD mean the timestamp signature is in the same file.
After this introduction, below will be described every method with input required.
CREDENTIALS object
All the methods used for sign (signPAdES..., signCAdES..., signXAdES) they use the Credentials object, like you can see in this image:

How popolate this fields?
FOR AUTOMATIC AND REMOTE SIGNATURE
For every type of signature (automatic signature and remote signature) you must fill this two fields:
username: contain the device name it start with RHI..., AHI... or SHI...
password: contain the PIN associated to device
ONLY FOR REMOTE SIGNATURE
While only if you you are using the remote signature (username starts with RHI...) you should fill this fields:
idOtp: (optional) it specify the idOtp which you want use for sign. If you don't want set the idOtp, SWS will use automatically the default OTP. You can use the method getOTPList for obtain the idOtp.
Otp: it contains the OTP code recived by SMS or read on app Namirial
sessionKey: it contain the token (like a string) received from method openSession
securityCode: this parameter must not be set. It is used only in certain situation
How works method getOTPList?
With this method you can obtain the OTP list which can be use with specified username, and you will can populate the variable Credentials.idOtp.
This method it require only the username.
For example with username: RHIP20102336019765, in this request:
| Code Block | ||||||
|---|---|---|---|---|---|---|
| ||||||
<soapenv:Envelope xmlns:soapenv="http://schemas.xmlsoap.org/soap/envelope/" xmlns:ser="http://service.ws.nam/">
   <soapenv:Header/>
   <soapenv:Body>
      <ser:getOTPList>
         <credentials>
            <username>RHIP20102336019765</username>
         </credentials>
      </ser:getOTPList>
   </soapenv:Body>
</soapenv:Envelope> |
You will obtain response like this:
| Code Block | ||||||
|---|---|---|---|---|---|---|
| ||||||
<soap:Envelope xmlns:soap="http://schemas.xmlsoap.org/soap/envelope/">
   <soap:Body>
      <ns2:getOTPListResponse xmlns:ns2="http://service.ws.nam/">
         <return>
            <idOtp>501719</idOtp>
            <serialNumber>20210113-091031RJ2L1</serialNumber>
            <type>SMS</type>
         </return>
         <return>
            <idOtp>537430</idOtp>
            <serialNumber>20210305-163726L0PYF</serialNumber>
            <type>OTP GENERATOR</type>
         </return>
         <return>
            <idOtp>537433</idOtp>
            <serialNumber>20210305-163726F0I75</serialNumber>
            <type>OTP PUSH</type>
         </return>
      </ns2:getOTPListResponse>
   </soap:Body>
</soap:Envelope> |
During the sign process is possible to choose between this two idOtps: 501719 (associated to OTP SMS) and the idOTP: 537430 (associated to OTP GENERATOR).
Isn't possible to use OTP PUSH, they are used for other purpose, not for sign.
Now during the sign we can choose two types of idOTP: 501719 or 537430.
Sign with OTP SMS
If you decide to sign with OTP SMS, you should use the method: sendOTPBySMS
This method require in input only the username (in this example the username is: RHIP20102336019765).
The soap request will be like this:
| Code Block | ||||||
|---|---|---|---|---|---|---|
| ||||||
<soapenv:Envelope xmlns:soapenv="http://schemas.xmlsoap.org/soap/envelope/" xmlns:ser="http://service.ws.nam/">
   <soapenv:Header/>
   <soapenv:Body>
      <ser:sendOtpBySMS>
         <credentials>
            <username>RHIP20102336019765</username>
         </credentials>
      </ser:sendOtpBySMS>
   </soapenv:Body>
</soapenv:Envelope> |
And if everything is ok, in output will receive the response like this:
| Code Block | ||||||
|---|---|---|---|---|---|---|
| ||||||
<soap:Envelope xmlns:soap="http://schemas.xmlsoap.org/soap/envelope/">
   <soap:Body>
      <ns2:sendOtpBySMSResponse xmlns:ns2="http://service.ws.nam/"/>
   </soap:Body>
</soap:Envelope> |
And on mobile phone will receive the SMS containing the OTP code (composed from 6 number) for sign, for example now we have received the code: “214196”.
The OTP code just received will be the variable Crediantls.otp during the process of sign.
Sign with OTP GENERATOR
If you decide to sign with OTP GENERATOR, you should open the Namirial OTP App and insert the OTP code showed during the sign process.
→Show the guide "How to configure Namirial OTP App"
How Sign File
Finally we have all requisites to populate Credentials object during the sign. Like mentioned before, the methods to sign are:
- signPAdESList
- signCAdESList
- signXAdESList
With this three methods is possible to sign with every type of signature (automatic and remote).
Everyone of this three methods use the Credentials object filled in the same time.
The automatic signature, require only the variables username and password in the object Credentials.
For example in automatic signature with username: AHI7609757152622 and password 13572468
the object Credentials will be populate like in the image:
| Code Block | ||||||
|---|---|---|---|---|---|---|
| ||||||
<credentials>
	<username>RHIP20102336019765</username>
	<password>1357268</password>
</credentials>
|
While if you are using remote signature you should fill the other fields:
- idOtp (only if you have more idOTP received from method getOTPList)
- OTP or sessionKey (will see in the next section how populate this variable)
Suppose we want sign using with the OTP code received previously from method sendOtpBySMS.
The credentials object will be filled in this way:
| Code Block | ||||||
|---|---|---|---|---|---|---|
| ||||||
<credentials>
	<idOtp>501719</idOtp>
	<otp>150259</otp>
	<password>13572468</password>
	<username>RHIP20102336019765</username>
</credentials> |
idOtp was obtained from method getOTPList method and otp is the code received from method sendOTPBySMS.
Sign using session
With otp is possible to make only one signature, but if you have need to sign more files, with the “sessionKey” is possible. In the next section will be described how works the session.
This function is available on remote signature, it permits to sign at most 3 minutes using the same session. You can see the sessione like a token provided from method “openSession”.
How obtain the sessionKey?
The method “openSession” it permits to obtain the sessionKey.
In input it require:
- username
- password
- otp
- idOtp
Like in this example:
| Code Block | ||||
|---|---|---|---|---|
| ||||
<soapenv:Envelope xmlns:soapenv="http://schemas.xmlsoap.org/soap/envelope/"
	xmlns:ser="http://service.ws.nam/">
   <soapenv:Header/>
   <soapenv:Body>
      <ser:openSession>
         <credentials>
            <idOtp>501719</idOtp>
            <otp>150259</otp>
            <password>13572468</password>
            <username>RHIP20102336019765</username>
         </credentials>
      </ser:openSession>
   </soapenv:Body>
</soapenv:Envelope> |
In output will obtain the value of sessionKey which will be used for sign:
| Code Block | ||||||
|---|---|---|---|---|---|---|
| ||||||
<soap:Envelope xmlns:soap="http://schemas.xmlsoap.org/soap/envelope/">
   <soap:Body>
      <ns2:openSessionResponse xmlns:ns2="http://service.ws.nam/">
		<return>
			f4lf7bq/cCxW6mTgL3iGjFEST5cEAZjgLnXvV3hUFzFHcTvjlH3FOkJy+kv/0Zsv1
			uNK0S7L6jMqHYSspBz+CZl7h3r5IEP2FqrK7WJQTVyrNfyr/trZmDgxYOLuACyoZVUFIlnck5Lkjihui
			sv+gZeB68Spwm+cNDdQQdUS3ngzJavHXxo9ADCX6VDIKKMe/AY0v+R51XWE90JF5LfKEThlv1OCpQC5nhnW8WKOFOm
			P4vM90d79JhFYGVVSZWtnTQ9Dg8pOMvg9wwxNm3uGkKKaS7oTp1ewd+eCG/uSC9k3H2w9GB6vQLHQEbn6d
			VVMcsIqJ0RMmZ2IgraD+scb4Q==
		</return>
      </ns2:openSessionResponse>
   </soap:Body>
</soap:Envelope> |
The sessionKey just obtained is valid for three minutes, after will expire and will needed to generate another sessionKey using the method openSession and new OTP code (isn't possible to use the same OTP already used).
Is possible to know when the session will expire with method: “getRemainingTimeForSession”. Like in this image:
| Code Block | ||||
|---|---|---|---|---|
| ||||
<soap:Envelope xmlns:soap="http://schemas.xmlsoap.org/soap/envelope/">
   <soap:Body>
      <ns2:getRemainingTimeForSessionResponse xmlns:ns2="http://service.ws.nam/">
         <return>167</return>
      </ns2:getRemainingTimeForSessionResponse>
   </soap:Body>
</soap:Envelope> |
Where 167 are the seconds until the session is active. After 180s from creation will be destroyed automatically, but is good pratice close the session before will expire.
You can destroy the session manually before will expire with method: "closeSession"
Destroy manually the session
The method "closeSession" require in input:
- sessionKey
- username
| Code Block | ||||||
|---|---|---|---|---|---|---|
| ||||||
<soapenv:Envelope xmlns:soapenv="http://schemas.xmlsoap.org/soap/envelope/"
	xmlns:ser="http://service.ws.nam/">
   <soapenv:Header/>
   <soapenv:Body>
      <ser:closeSession>
         <credentials>
            <sessionKey>
				f4lf7bq/cCxW6mTgL3iGjFEST5cEAZjgLnXvV3hUFzFHcTvjlH3FOkJy+kv/0Zsv1
				uNK0S7L6jMqHYSspBz+CZl7h3r5IEP2FqrK7WJQTVyrNfyr/trZmDgxYOLuACyoZVUFIlnck5Lkjihui
				sv+gZeB68Spwm+cNDdQQdUS3ngzJavHXxo9ADCX6VDIKKMe/AY0v+R51XWE90JF5LfKEThlv1OCpQC5nhnW8WKOFOm
				P4vM90d79JhFYGVVSZWtnTQ9Dg8pOMvg9wwxNm3uGkKKaS7oTp1ewd+eCG/uSC9k3H2w9GB6vQLHQEbn6d
				VVMcsIqJ0RMmZ2IgraD+scb4Q==
			</sessionKey>
            <username>RHIP20102336019765</username>
         </credentials>
      </ser:closeSession>
   </soapenv:Body>
</soapenv:Envelope> |
For security reason, this method doesn't generate an exception if you insert wrong sessionKey and/or username.
In this seguence diagram, we can sumarize the methods to call for sign using sessionKey and OTP SMS:
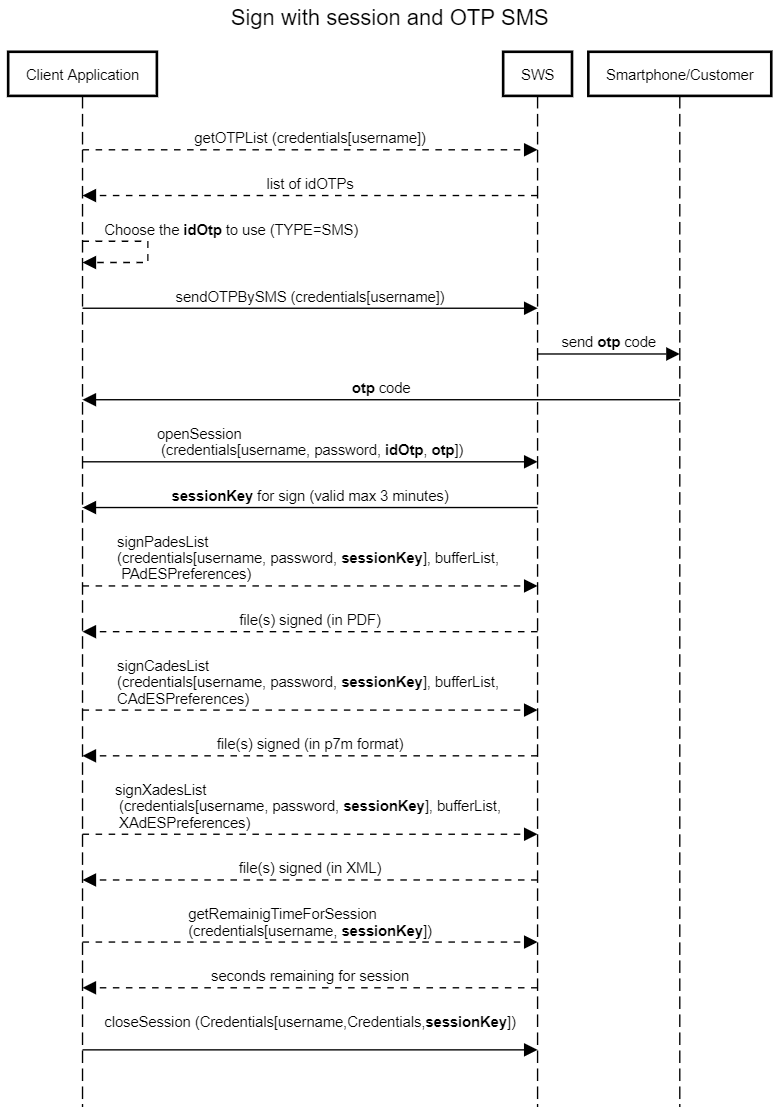
If you are using OTP on App you can skip the method "sendOTPBySMS".
DA VALUTARE: se mettere o meno il diagramma delle sequenze con Namirial App OTP
Summarize:
For automatic signature the credentials object is composed by:
- username
- password
While for remote signature the credentials object is composed by:
- username
- password
- otp
- idOtp (only if you have more OTP else you can set this to "-1")
- sessionKey (optional)
If you need to sign multiple files with remote signature you should use the sessionKey how already described.
Now, is complete how populate the Credentials object for methods: signPadesList, signCadesList and signXadesList, we can populate the object bufferList.
How populate the bufferList
The bufferList contain the list of files (in byte array) which you want sign.
For example in SoapUI the bufferList is composed by the base64 of file which you want sign, like in this example:
| Code Block | ||||||||
|---|---|---|---|---|---|---|---|---|
| ||||||||
<soapenv:Envelope xmlns:soapenv="http://schemas.xmlsoap.org/soap/envelope/" xmlns:ser="http://service.ws.nam/">
   <soapenv:Header/>
   <soapenv:Body>
      <ser:signPAdESList>
			<credentials>
            	<idOtp>501719</idOtp>
	            <otp>548316</otp>
    	        <password>13572468</password>
        	    <username>RHIP20102336019765</username>
	         </credentials>
    	     <bufferList>BASE64-FILE-TO-SIGN</bufferList>
			 <PAdESPreferences>
				<level>B</level>
				<signerImage></signerImage>
			</PAdESPreferences>
      </ser:signPAdESList>
   </soapenv:Body>
</soapenv:Envelope> |
You can dowload the full exampe at this link: signPadesListxml
In output will obtain the base64 associated to file just signed like this: RESPONSE-base64-signPadesList.b64 and decoded will be this PDF: RESPONSE-signPadesList.pdf.
The difference between signPadesList, signCadesList and signXadesList are based on the preferences:
signPadesList → use PadESPreferences
signCadesList → use CadESPreferences
signXadesList → use XadESPreferences
How populate this preferences will be describe in the next sections.
How populate PadESPreferences
This type of preference is used in method signPadesList. Their principal options are:
Methods for sign
SWS offer different method according to type of device signature. For example with automatic signature isn't possible to use the method "sendOtpBySMS" because don't require the second factor for sign. Below will be described all methods offered by SWS.
Sign interface#MethodgetAvailableSignatures
Methods for automatic and remote signature
The main methods used to sign (valid for remote and automatic signatures) are:
signPAdES → Used for sign only PDF files
signPAdESMultiFieldName → Used for sign only PDF files, the field signature must exist
signCAdES → Used for sign every type of files
signXAdES → Used for sign XML files
signPkcs1 → Used for raw signature (require the client of SWS make the cryptographic envelope)
getSignatures → allows obtaining the number of signatures, since the certificate was issued
getCertificate → allows obtaining the certificate associated to signature device
getAvailableSignatures → allows obtaining the numbers of signatures (valid only for device NOT pay per use, otherwise an exception is generated)
changePassword → allows changing the password (PIN) of the device
Each method requires the Credentials object. In the next section, you will see how to populate this field.
Method signPades
In this table are defined the parameters required (IN) and the output (OUT) of this method:
| signPades | |||
| Name | Type | Description | IN/OUT |
|---|---|---|---|
| credentials | Credentials | See the Credentials section to see how to populate this object | IN |
| buffer | byte[] | Byte array which you want to sign | IN |
| PAdESPreferences | PAdESPreferences | Specify the details of PadesSignature. See the PadesPreferences section to populate the object | IN |
| byte[] | Byte array containing the files just signed | OUT | |
Method signPadesMultiFieldName
In this table are defined the parameters required (IN) and the output (OUT) of this method:
| signPadesMultiFieldName AVAILABLE FROM VERSION 2.5.57 | |||
| Name | Type | Description | IN/OUT |
|---|---|---|---|
| credentials | Credentials | See the Credentials section to see how to populate this object | IN |
| buffer | byte[] | Byte array which you want to sign | IN |
| PAdESPreferences | PAdESPreferences | Specify the details of PadesSignature. See the PadesPreferences section to populate the object | IN |
| PadesWithMultiFieldName | Complex object with details about signatures and error (if present) | OUT | |
PadesWithMultiFieldName
Here you can find a description of the complex object PadesMultiFieldName
PadesMultiFieldName | |||
Name | Type | Description | Included from SWS version |
|---|---|---|---|
signedContent | byte[] | File signed fully or partially | 2.5.57 |
remainingFieldNames | List<String> | List of unsigned fields (if the file signed is partially) | 2.5.57 |
| serviceError | ServiceError | Complex object with details about error. This field is populated if the "signedContent" is partially signed | 2.5.57 |
ServiceError
Here you can find a description of the complex object ServiceError
ServiceError | |||
Name | Type | Description | Included from SWS version |
|---|---|---|---|
code | int | error code generated during the signature | 2.5.57 |
message | String | error message generated during the signature | 2.5.57 |
NOTE: for example if you want sign a PDF wih 10 fields signatures ("field-1", "field-2", ... "field-10") using the sessionKey after 6 signatures the session key has expired in output will receive this response:
| Code Block | ||
|---|---|---|
| ||
signedContent = PDF with 6 signatures (the fields signed are: "field-1", "field-2",...,"field-6"
remainingFieldNames = ["field-7","field-8","field-9","field-10"]


IMPORTANT!!!,
The serviceError will be:

serviceError.code = 69
serviceError.message = "SessionKeyScaduta" |
Example of usage
In this sequence diagram, you can see usage standard (when the session key no expire):
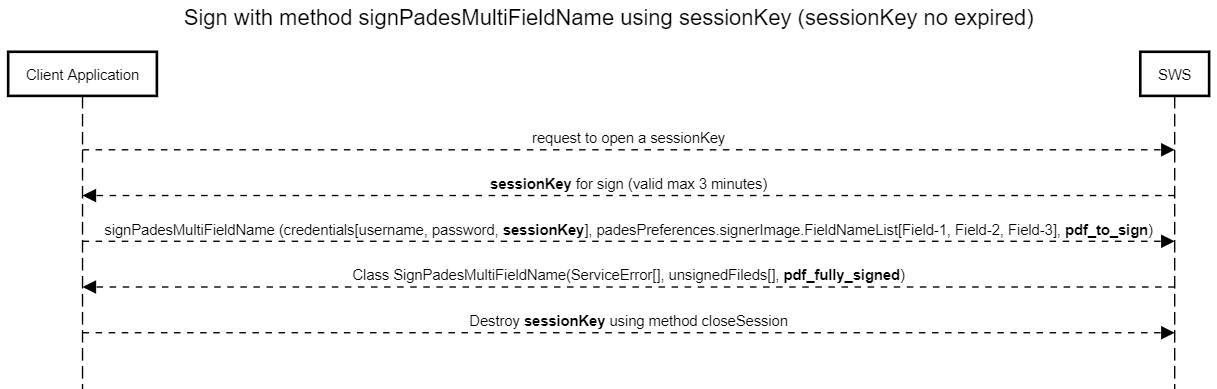
In this use case we are signing the signatures fields ("Field-1", "Field-2" and "Field-3") of "pdf_to_sign" and SWS make all three signatures required without problem returning the "pdf_fully_signed"
Below you can find a sequence diagram that explains the method "signPadesMultiFieldName" when the session key expire:
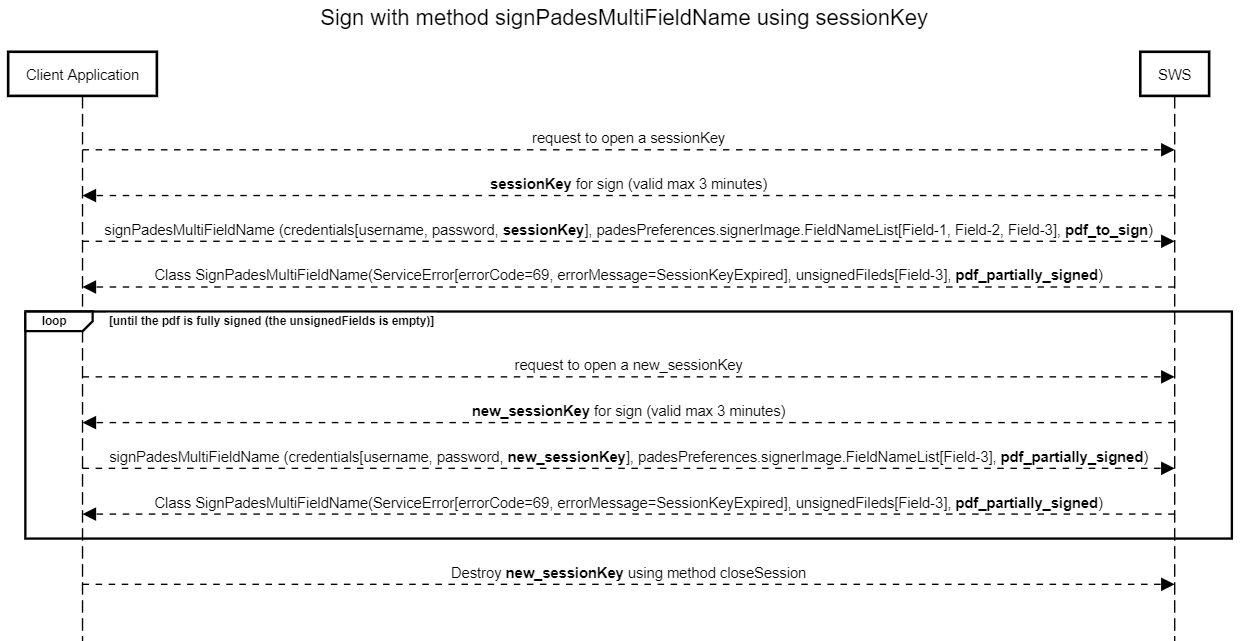
In this use case our target is: sign 3 fields ("Field-1", "Field-2" and "Field-3") of "pdf_to_sign" using a session key.
Make the request using "signPadesMultiFieldName" and after two signature the session key has expire.
Therefore the response will be
- the pdf_partially_signed (contains two signatures)
- ServiceError contain the details about error (in this example session key expired)
- List of unsigned fields: Field-3
To complete all three signatures we must:
- generate "new_sessionKey"
- make a new request of signPadesMultiFieldName using pdf_partially_signed and set "Field-3" ad list fields to sign
Finally, in response we obtain the pdf_fully_signed!!!
Method signCades
In this table are defined the parameters required (IN) and the output (OUT) of this method:
| signCades | |||
| Name | Type | Description | IN/OUT |
|---|---|---|---|
| credentials | Credentials | See the Credentials section to see how to populate this object | IN |
| buffer | byte[] | Byte array that you want to sign | IN |
| CAdESPreferences | CAdESPreferences | Specify the details of PadesSignature. See the CadesPreferences section to populate this object | IN |
| byte[] | List of byte array containing the file just signed | OUT | |
Method signXades
In this table are defined the parameters required (IN) and the output (OUT) of this method:
| signXades | |||
| Name | Type | Description | IN/OUT |
|---|---|---|---|
| credentials | Credentials | See the Credentials section to see how to populate this object | IN |
| buffer | byte[] | Byte array that you want sign | IN |
| XAdESPreferences | XAdESPreferences | Specify the details of XadesSignature. See the XadesPreferences section to populate this object | IN |
| byte[] | Byte array containing the file just signed | OUT | |
Method signPkcs1
In this table are defined the parameters required (IN) and the output (OUT) of this method:
| signPkcs1 | |||
| Name | Type | Description | IN/OUT |
|---|---|---|---|
| credentials | Credentials | See the Credentials section to see how to populate this object | IN |
| buffer | byte[] | hash associated the file you want sign | IN |
| SignPreferences | SignPreferences | Specify the hash algorithm used to sign the hash | IN |
| byte[] | Byte array containing the hash associated to the file just sgned | OUT | |
NOTE: SignPreferences is a complex object, the method require only the field: SignPreferences.hashAlgorithm
And the value can be:
- SHA-256 (default value if not specified)
- SHA-1
- SHA-384
- SHA-512
Method changePassword
In this table are defined the parameters required (IN) and the output (OUT) of this method:
| signXadesList | |||
| Name | Type | Description | IN/OUT |
|---|---|---|---|
| credentials | Credentials | See the Credentials section to see how to populate this object | IN |
| newPassword | String | String that contains the new password | IN |
VERY IMPORTANT: if the customer forgets the new password, it IS NOT POSSIBLE to recover/reset the password.
Methods only for remote signature
If you are signing with a remote signature, you can also use these methods:
getOTPList → allows obtaining the list of OTPs associated with your remote signature (OTP is assigned to the owner of the certificate. For example, if you have two or more remote signatures associated with the same owner, you can use this OTP for each remote signature).
sendOtpBySMS → it will send an SMS containing the OTP code.
openSession → allows obtaining the token (like a string) for the signature instead of inserting new OTP code for each signature). The token is available for three minutes from generation.
getRemainingTimeForSession → returns time until the session is valid
closeSession → if you want to destroy the token before three minutes (however will expire after three minutes)
Method getOtpList
| getOtpList | |||
| Name | Type | Description | IN/OUT |
|---|---|---|---|
| credentials | Credentials | See the Credentials section to see how populate this object | IN |
| List<OTP> | List of OTP assigned to the Credentials | OUT | |
Method sendOtpBySMS
| sendOtpBySMS | |||
| Name | Type | Description | IN/OUT |
|---|---|---|---|
| credentials | Credentials | See the Credentials section to see how populate this object | IN |
After this method is done the customer receives an SMS with an OTP code to use.
Method openSession
| openSession | |||
| Name | Type | Description | IN/OUT |
|---|---|---|---|
| credentials | Credentials | See the section Credentials for see how populate this object | IN |
| String | Sessionkey to use for sign | OUT | |
At the end of this method the customer will receive string with sessionKey for sign (credentials.sessionKey)
Method getRemainingTimeForSession
| getRemainingTimeForSession | |||
| Name | Type | Description | IN/OUT |
|---|---|---|---|
| credentials | Credentials | See the section Credentials for see how populate this object | IN |
| int | Seconds left until the session is valid | OUT | |
Method closeSession
| closeSession | |||
| Name | Type | Description | IN/OUT |
|---|---|---|---|
| credentials | Credentials | See the section Credentials for see how populate this object | IN |
After this method is done the session is destroyed.
Methods for timestamp
SWS offers methods for applying timestamp and enquiry (only for Namirial accounts).
timestamp → allows to get the file with timestamp; there are two types TSR or TSD. The TSR option means that the timestamp is in another file, while TSD means that the timestamp signature is in the same file.
getAvailableTimestamps → allows getting the timestamp; available ONLY for Namirial account.
Each method is described below with the required inputs.
Method timestamp
| timestamp | |||
| Name | Type | Description | IN/OUT |
|---|---|---|---|
| content | byte[] | Byte array to which the timestamp is applied. | IN |
| preferences | TimeStampPreferences | Preferences about timestamp url, username, password, etc. | IN |
| byte[] | Timestamp in binary format. | OUT | |
This method can be used with all timestamp account (not only Namirial) they must use standard RFC3161.
NOTE: Since SWS v2.5.44 this method supports Adobe Timestamp. In the timestampPreferences you should set "outputAsPDF=true".
TimeStampPreferences
Below will described how populate the preferences about timestamp
| timeStampPreferences | |||||
| Name | Type | Mandatory | Default value | Description | Included from SWS version |
|---|---|---|---|---|---|
| timestampUrl | String | yes | Url for timestamp service | ||
| timestampUsername | String | yes | Username for timestamp service | ||
| timestampPassword | String | yes | Password for timestamp service | ||
| outputAsTSD | boolean | true |
| ||
| outputBase64Encoded | boolean | false | return the output in base64 encode | ||
| outputAsPDF | boolean | false | Allow to obtain the timestamp according to Adobe standard | 2.5.44 | |
| timestampHashAlgo | String | SHA256 | Hash algorithm used for generate the timestamp | ||
Method getAvailableTimestamps (since SWS v2.5.44)
| getAvailableTimestamps | |||
| Name | Type | Description | IN/OUT |
|---|---|---|---|
| preferences | TimeStampPreferences | timestamp url, username, password | IN |
| Long | Number of timestamps available. An exception will be generated for the payperuse . | OUT | |
NOTE: TimestampUrl can be set to:
| TIMESTAMP URL | Environment |
|---|---|
| https://timestamp.namirialtsp.com/enquiry | PROD |
| https://timestamp.test.namirialtsp.com/enquiry | TEST |
How Sign the file
To sign the file with SWS each method requires parameters:
- Credentials: contain the value about signature device;
- Preferences: contain the details of the signature such as page, appearance etc., Level of signature (B, T, LT, etc.). There are different types of preferences PadesPreferences, CadesPreferences, XadesPreferences;
- buffer: file you want to sign.
In the next sections you will learn how to set these parameters.
Credentials Object
All methods for signing (signPAdES..., signCAdES..., signXAdES) use the Credentials object, as you can see in this table:
| Credentials | ||
| Name | Type | Description |
|---|---|---|
| username | String | Device name starts with: RHI (remote/disposable), SHI (eSeal) or AHI (automatic) |
| password | String | PIN associated to device name (can be set by the customer or read into blind envelope) |
| idOtp | int | otp identifier associated to device (used only in remote signature) can be SMS, App, Token . Every remote device can have one or more idOtp (for example a remote signature can have associated SMS and App OTP) |
| otp | Strinng | otp code for sign/change password (this is used only in remote device) |
sessionKey | String | string code (like a token) valid 3 minutes for sign (instead to insert every times new otp code) |
| securityCode | String | This is the second factor (used in automatic and eSeal) for change the password. This code is linked to the portal account. |
How to fill in these fields?
For automatic and remote signature
For each type of signature (automatic signature and remote signature) you must fill in these two fields:
username: contains the device name starting with RHI..., AHI... or SHI...
password: contains the PIN associated to the device (read from the blind envelope or set by the customer)
Only for automatic signature
Only if youusethe automatic signature (username starts with AHI... or SHI...) you should fill in these fields:
securityCode: this parameter must not be set. It is used only in certain situations (for example during the change password)
Only for remote signature
Only if youusethe remote signature (username starts with RHI...) you should fill in these fields:
idOtp: (optional) specify the idOtp you want to use for the signature. If you do not want to set the idOtp, set idOtp to "-1" and SWS will automatically use the default OTP. You can use getOTPListmethod to get the idOtp;
Otp: contains the OTP code received via SMS or read in the Namirial app;
sessionKey: contains the token (like a string) received from openSession method;
How works method getOTPList?
With this method, you can get the OTP list which can be used with the specified username, and you can fill in the Credentials.idOtpvariable.
This method requires only the username.
| getOTPList | |||
| Name | Type | Description | IN/OUT |
|---|---|---|---|
| credentials | Credentials | You must specify only credentials.username with the device name (RHI...) | IN |
| List<OTP> | list of OTPs associated to device name | OUT | |
The "OTP" object is compose by:
| OTP | ||
| Name | Type | Description |
|---|---|---|
| idOtp | int | identifier otp used for sign/change password |
| serialNumber | String | this field isn't used by SWS, this is serial number printed on OTP token |
| type | String | The possible values are:
|
NOTE: with SWS is not possible to use the OTP with type "OTP PUSH".
Sign with OTP SMS
If you decide to sign with OTP SMS, you should use the method sendOTPBySMS.
| sendOTPBySMS | |||
| Name | Type | Description | IN/OUT |
|---|---|---|---|
| credentials | Credentials | You must specify only credentials.username with the device name (RHI...) | IN |
| void | will receive on your mobile phone the SMS with OTP code | OUT | |
Sign with OTP GENERATOR (App)
If you decide to sign with OTP GENERATOR, you should open the Namirial OTP App and insert the OTP code shown during the signing process.
→Show the guide "How to configure Namirial OTP App" (To Do/Add)
Sign with sessionKey
With otp it is possible to create only one signature, but if you need to sign more files, it is possible with “sessionKey”. The next section describes how the session works.
This function is available only for remote signatures. It allows signing for a maximum of 3 minutes with the same sessionKey. You can see the session like a token provided from the method “openSession”.
How obtain the sessionKey?
The “openSession” method allows obtaining the sessionKey.
Input requires:
- username
- password
- otp
- idOtp
| openSession | |||
| Name | Type | Description | IN/OUT |
|---|---|---|---|
| credentials | Credentials | You must specify:
| IN |
| String | will receive the session which will be used for sign will be the value of credentials.sessionKey | OUT | |
The sessionKey is valid for three minutes from has been generated. With this is possible unlimited files.
How to check if the sessionKey has expired or is valid
- username
- sessionKey (obtained from method "openSession")
| getRemainingTimeForSession | |||
| Name | Type | Description | IN/OUT |
|---|---|---|---|
| credentials | Credentials | You must specify:
| IN |
| int | seconds until the sessionKey is valid | OUT | |
Destroy the session manually
The method closeSession requires in input:
sessionKey
username
| closeSession | |||
| Name | Type | Description | IN/OUT |
|---|---|---|---|
| credentials | Credentials | You must specify:
| IN |
| the sessionKey will be destroyed | OUT | ||
NOTE: for security reasons, this method doesn't generate an exception if you insert the wrong sessionKey and/or username.
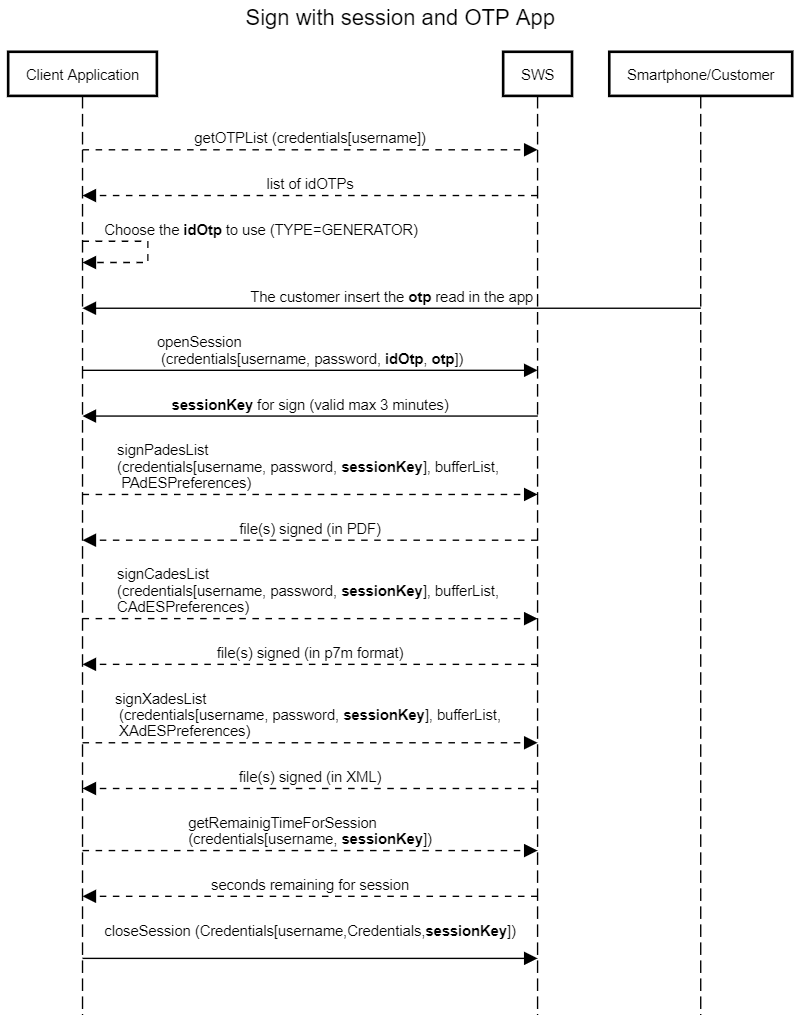
Sequence diagram for signature with session with OTP App
In this sequence diagram, we can summarise the methods that are for the signature with sessionKey and OTP SMS:
Sequence diagram for signature with session and OTP SMS
In this sequence diagram, we can summarise the methods that are called for the signature with sessionKey and OTP SMS:
Summarize
Finally, we have all the requirements to populate the Credentials object during the signing. As already mentioned, the methods for signing are:
- signPAdES
- signCAdES
- signXAdES
There are the same methods with the suffix "List", they accept in input a list of files to be signed. Therefore with only SOAP requests is possible to sign more files (using automatic signature or sessionKey).
With these three methods it is possible to sign with any type of signature (automatic and remote).
Each of these three methods uses the Credentials object filled in at the same time.
For the automatic signature, it requires only the username and password variables in the object Credentials.
If you use a remote signature, you should also fill in the other fields:
- idOtp (only if you received multiple idOTP from the method getOTPList)
- OTP or sessionKey (will see in the next section how to populate this variable)
Therefore for the automatic signature, the credentials object is composed by:
- username
- password
While for the remote signature, the credentials object is composed by:
- username
- password
- otp
- idOtp (only if you have more OTP, otherwise you can set this to "-1")
- sessionKey (optional)
If you need to sign multiple files with remote signature you should use the sessionKey as described earlier.
Now, that we know how to fill the Credentials object for the methods: signPades, signCades and signXades, we can fill the object buffer.
Now we should populate the value of:
- buffer
- preferences of signature (there are different types for each type of signature)
Populate the "buffer"
The buffer contains the file (in byte array) you want to sign.
In SoapUI, for example, the buffer is composed of the base64 of the file you want to sign, as in this example:
| Code Block | ||||||||
|---|---|---|---|---|---|---|---|---|
| ||||||||
<soapenv:Envelope xmlns:soapenv="http://schemas.xmlsoap.org/soap/envelope/" xmlns:ser="http://service.ws.nam/">
   <soapenv:Header/>
   <soapenv:Body>
      <ser:signPAdES>
			<credentials>
            	<idOtp>501719</idOtp>
	            <otp>548316</otp>
    	        <password>13572468</password>
        	    <username>RHIP20102336019765</username>
	         </credentials>
    	     <buffer>BASE64-FILE-TO-SIGN</buffer>
			 <PAdESPreferences>
				<level>B</level>
				<signerImage></signerImage>
			</PAdESPreferences>
      </ser:signPAdES>
   </soapenv:Body>
</soapenv:Envelope> |
You can download the complete example at this link: signPadesList.xml
The output is the base64 associated with the file you just signed as follows: RESPONSE-base64-signPadesList.b64 and decoded will be this PDF: RESPONSE-signPadesList.pdf.
Signature Preferences
The difference between signPades, signCades and signXades is based on the preferences:
signPades → use PadESPreferences
signCades → use CadESPreferences
signXades → use XadESPreferences
How to populate these preferences is described in the next sections.
PadES Preferences
This type of preference is used in method signPades. Their main options are:
| PAdESPreferences | |||||
| Name | Type | Mandatory | Default value | Description | Included from SWS version |
|---|---|---|---|---|---|
| hashAlgorithm | String | SHA256 | Algorithm you want to use for signature. Possible values are: SHA1, SHA256, SHA384, SHA512. | ||
| level | Level | B | See the description of Level type. | ||
| signType | int | ||||
| encryptInAnyCase | boolean | false | |||
| filenameInTSD | String | Not used. | |||
| outputAsTSD | boolean | Not used. | |||
| withTimestamp | boolean | false | Specify wheater you want to add the timestamp to the signedfile or not, | ||
| outputBase64Encoded | boolean | false | Set true if you want the file signed in Base64 encoding. | ||
| timestampHashAlgo | String | SHA-256 | Algorithm you want to use during the process of applying timestamp. | ||
| timestampUrl | String | URL of timestamp provider with standard RFC3161. Namirial URL: PROD: https://timestamp.namirialtsp.com / http://timestamp.namirialtsp.com TEST: https://timestamp.test.namirialtsp.com / http://timestamp.test.namirialtsp.com | |||
| timestampUsername | String | Username of timestamp credentials. | |||
| timestampPassword | String | Password of timestamp credentials. | |||
| needAppearanceDisabled | boolean | false | Deprecated. | ||
| page | 1 | Indicate the page number on which you want to apply the signature appearance. If you want to add the appearance on the last page of the PDF file, you should set it to "-1". | |||
| withTimestamp | boolean | false | Set true if you want to apply the timestamp after the signature. | ||
| encryptionPassword | String | Specify the password PDF, if present. | |||
| lockFields | List<String> | ||||
| signerImage | SignerImage | See the description of SignerImage. | |||
| signerImageReference | String | Used to specify the template to be used. (used in old version) | |||
| withSignatureField | boolean | false | Set true if you want to apply the signature on signature field in the PDF file. | ||
SignerImage
The SignerImage object is composed of the following:
| SignerImage | |||||
| Name | Type | Mandatory | Default value | Description | Included from SWS version |
|---|---|---|---|---|---|
| image | byte[] | Contains the image you want to apply to the appearance. | |||
| signerName | String | Contains the text you want to type to the appearance. | |||
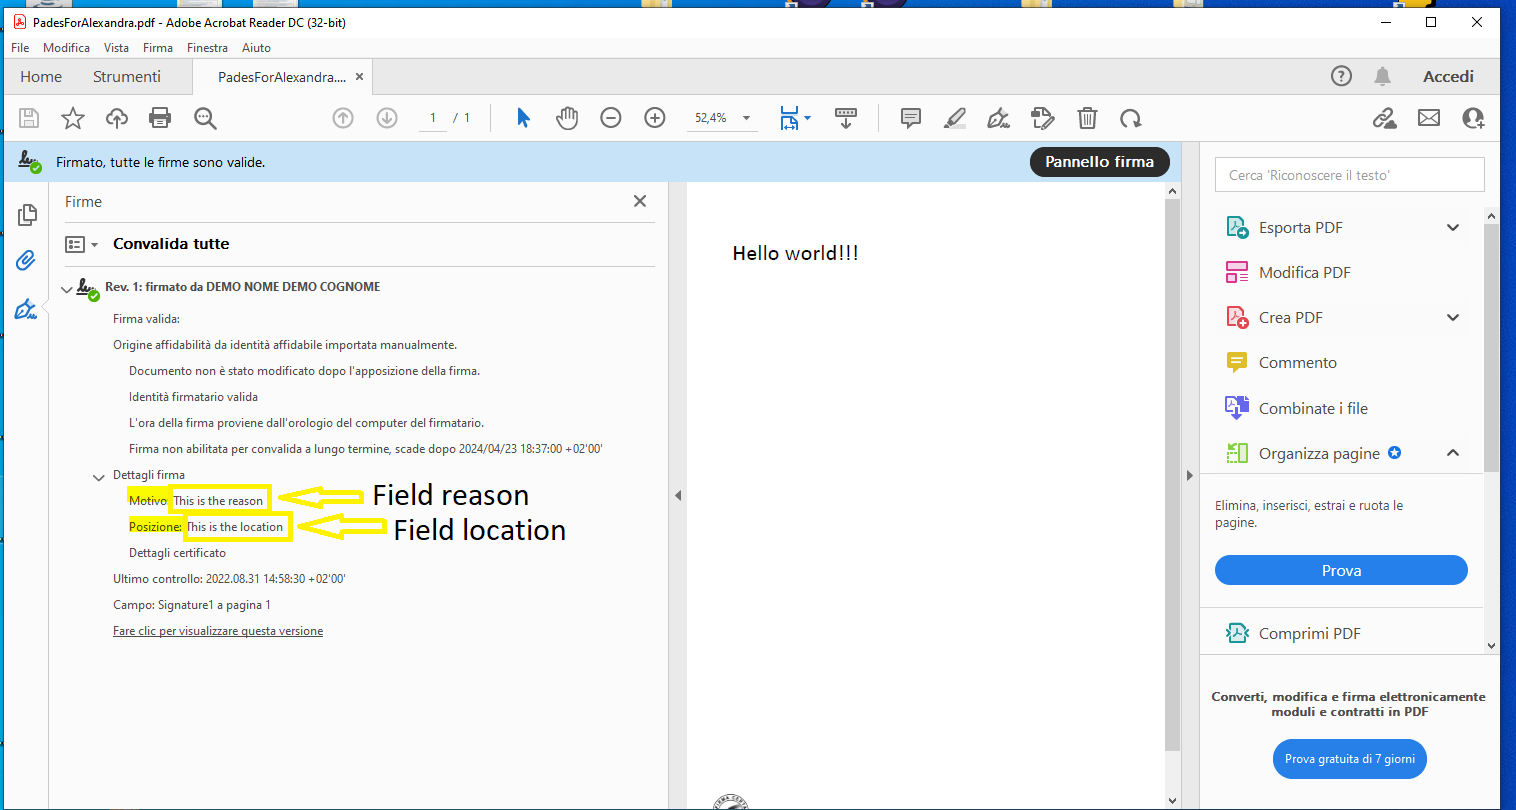
| reason | String | Indicate the reason for the signature. | |||
| textVisible | boolean | true | Allows the text to be shown on appearance or not. | ||
| textPosition | String | Position of the "signerName" on appearance. It is possible to choose between:
| |||
| x | int | X coordinate of the appearance (0 is on left of the page). | |||
| y | int | Y coordinate of the appearance (0 is on bottom of the page). | |||
| width | int | Specify the width of the appearance. | |||
| height | int | Specify the height of the appearance. | |||
| fieldName | Specify the fieldname to which the signature is to be applied. This fieldName must already exist in the PDF file before the signature is applied. | ||||
| fontName | String | Times-Roman | Specify the font to be used for the text on the appearance. The possible values are:
OR Specify the ttf absolute path which contain custom font (see this section below to use specific ttf) | 2.5.39 | |
| imageURL | String | URL to get the logo for appearance. | |||
| imageVisible | boolean | false | Allows the logo to be displayed or not when it appears. | ||
| fontSize | int | 10 | Allows the fontsize to set set. | ||
| imageFilename | String | Path of the logo on appearance. | |||
| scaled | boolean | false | Set true if you want to resize the logo on appearance. | ||
| scaledText | boolean | false | Reduce the font size until fit on the appereance | ||
| location | String | Place of the signature. | 2.5.53 | ||
| fieldsNameList | List<String> | List of fields signatures you want sign | 2.5.57 | ||
| signAllFields | boolean | false | Allow to sign all fields signatures available in a PDF | 2.5.57 | |
NOTE: if you are using the method "signPadesMultiFieldName", the property "signAllFields" have a priority on property "fieldsNameList"
Below an example of output in Adobe if you use the option "location" and "reason":
Use specific ttf (TrueTypeFont)
With SWS is possible to use a specific font specifying a path of ttf files. The fonts available are:
- DejaVu
- helvetica-neue
To use Dejavu, you must set value of "fontName" (signerImage.fontName) with this value:
| Code Block |
|---|
/usr/share/fonts/dejavu/@FONTNAME@ |
The possible values of "@FONTNAME@" are:
- DejaVuSans-BoldOblique.ttf
- DejaVuSansCondensed-Oblique.ttf
- DejaVuSansMono-Bold.ttf
DejaVuSans.ttf - DejaVuSans-Bold.ttf
- DejaVuSansCondensed.ttf
- DejaVuSansMono-Oblique.ttf
- DejaVuSansCondensed-BoldOblique.ttf
DejaVuSans-ExtraLight.ttf - DejaVuSansMono.ttf
- DejaVuSansCondensed-Bold.ttf
- DejaVuSansMono-BoldOblique.ttf
- DejaVuSans-Oblique.ttf
To use Helvetica-Neue, you must set value of "fontName" (signerImage.fontName) with this value:
| Code Block |
|---|
/usr/share/fonts/helvetica-neue/@FONTNAME@ |
The possible values of "@FONTNAME@" are:
- HelveticaBlkIt.ttf
- HelveticaNeueBold.ttf
- HelveticaNeueCondensedBlack.ttf
- HelveticaNeueCondensedBold.ttf
- HelveticaNeueMedium.ttf
- HelveticaNeueUltraLightItal.ttf
Cades Preferences
With cades signature, it is possible to sign each type of file. The signCades method requires:
- Credentials assigned to device signature;
- Buffer, the file that you want to sign;
- CAdESPreferences, the preferences about CAdES signature.
In the following table, you can see how to set the CAdESPreferences correctly:
| CAdESPreferences | |||||
| Name | Type | Mandatory | Default value | Description | Included from SWS version |
|---|---|---|---|---|---|
| filenameInTSD | |||||
| outputAsTSD | |||||
| outputBase64Encoded | boolean | false | Encodes the just signed file in base64. | ||
| timestampHashAlgo | String | SHA-256 | Algorithm you want to use during the process of applying timestamp. | ||
| timestampPassword | String | ||||
| timestampUrl | String | URL of the timestamp provider with the RFC3161 standard. Namirial URL: PROD: https://timestamp.namirialtsp.com / http://timestamp.namirialtsp.com TEST: https://timestamp.test.namirialtsp.com / http://timestamp.test.namirialtsp.com | |||
| timestampUsername | String | Username of the timestamp credentials. | |||
| hashAlgorithm | String | yes | SHA256 | Algorithm which you want to use for signing. Possible values: SHA1, SHA256, SHA384, SHA512. | |
| level | Level | B | See the description of Level type. | ||
| withTimestamp | boolean | false | Set true if you want to apply the timestamp after the signature. | ||
| counterSignature | |||||
| counterSignatureIndex | |||||
| detached | boolean | false | Set true if you want the signature and the files in two different files. The output will be the signature. | ||
Xades Preferences
With Xades Signature it is possible to sign only XML files, the signXadesmethod requires:
- Credentials assigned to device signature
- Buffer, file that you want to sign
- XAdESPreferences, the preferences about XAdES signature
In the following table you can learn how to set the XAdESPreferences correctly:
| XAdESPreferences | |||||
| Name | Type | Mandatory | Default value | Description | Included from SWS version |
|---|---|---|---|---|---|
| filenameInTSD | |||||
| outputAsTSD | |||||
| outputBase64Encoded | boolean | false | Encodes the just signed file in base64. | ||
| timestampHashAlgo | String | SHA-256 | Algorithm you want to use during the process of applying timestamp. | ||
| timestampPassword | |||||
| timestampUrl | String | URL of the timestamp provider with the RFC3161 standard. Namirial URL: PROD: https://timestamp.namirialtsp.com / http://timestamp.namirialtsp.com TEST: https://timestamp.test.namirialtsp.com / http://timestamp.test.namirialtsp.com | |||
| timestampUsername | String | Username of the timestamp credentials. | |||
| hashAlgorithm | String | yes | SHA256 | Algorithm you want to use for signing. Possibile values: SHA1, SHA256, SHA384, SHA512 | |
| level | Level | B | See the description of Level type. | ||
| withTimestamp | boolean | false | Set true if you want to apply the timestamp after the signature. | ||
| detached | boolean | false | Set true if you want the signature and the files in two different files. The output will be the signature. | ||
| detachedReferenceURI | String | ||||
| signElement | String | Allows to specify the "Id" on XML which you want to sign. | |||
| signatureId | String | Allows to specify the "Id" of the signature. | |||
| withoutSignatureExclusion | boolean | false | Allows to sign the file with/without previous signature. | ||
| XPathQuery | String | Allows to sign a specified path of XML | |||
Level
You can see how to set the correct Level signature:
| Level | |||
| Value | Description | Apply on signature | Included from SWS version |
| B | In the signed file the electronic signature and the signing certificate are added. | Pades, Cades, Xades | |
| T | Like B-Level, but adds a time-stamp, respectively a time-mark that proves the signature existed at a certain date and time. | Pades, Cades, Xades | |
| LT | Like T-Level, but adds VRI (Verification Related Information) data to the DSS (Long Term). | Pades, Cades, Xades | |
| LTA | Like LT-level, but adds a timestamp document and VRI data for the TSA (Time Stamping Authority). An LTA may help to validate the signature beyond any event that may limit its validity (Long Term with Archive Time-Stamps). | Pades, Cades, Xades | |
| LTV | (Long Term Validation) contains the OCSP/CRL response after the signature. It is used for validation after the signing certificate has expired. | Pades | |
How apply the timestamp
It is possible to apply timestamp with the method timestamp, in input require:
- content: byte array of the file to which the timestamp is applied;
- preferences: object containing details about timestamp.
Below the object timestamp:
| Name | Type | Mandatory | Default value | Description | Included from SWS version |
|---|---|---|---|---|---|
| filenameInTSD | |||||
| outputAsTSD | |||||
| outputBase64Encoded | boolean | false | Encoded the file just signed in base64. | ||
| timestampHashAlgo | String | SHA-256 | Algorithm you want to use during the process of applying timestamp. | ||
| timestampPassword | |||||
| timestampUrl | String | URL of the timestamp provider with RFC3161 standard. Namirial URL: PROD: https://timestamp.namirialtsp.com / http://timestamp.namirialtsp.com TEST: https://timestamp.test.namirialtsp.com / http://timestamp.test.namirialtsp.com |
Manage signer device
As already mentioned, SWS offers a method for managing the signing device.
Method changePassword
This method requires a different signature according to device type: automatic/eseal or remote.
The output of this method will change the password.
NOTE: if the holder device forgets the new password, it IS NOT POSSIBLE TO RESET the password.
changePassword on automatic/eseal signature
Input requires:
- credentials.username
- credentials.password
- credentials.securityCode
- newPassword
In output (if input is correct) will have the password associated to credentials.usernam set to "newPassword".
changePassword on remote signature
Input requires:
- credentials.username
- credentials.password
- credentials.idOtp
- credentials.otp
- newPassword
In output (if input is correct) will have the password associated to credentials.usernam set to "newPassword".
Method getCertificate
This method allow to obtain the certificate associated to signer device.
This method require same input for automatic and remote signature. Below the details:
| Name | Type | Description | IN/OUT |
|---|---|---|---|
| credentials | Credentials | You must specify:
| IN |
| byte[] | byte array of certificate associated to signer device | OUT |
Method getAvailableSignatures
This method allow to obtain the number of signaures available
This method require same input for automatic and remote signature. Below the details:
| Name | Type | Description | IN/OUT |
|---|---|---|---|
| credentials | Credentials | You must specify:
| IN |
| int | number of signatures availables | OUT |
NOTE: this method can't be used for signer device "pay-per-use" (device with unlimited signatures), will generate error with code: "56"
Method getSignatures
This method allow to obtain the number of signaures apposed since the device has been created
This method require same input for automatic and remote signature. Below the details:
| Name | Type | Description | IN/OUT |
|---|---|---|---|
| credentials | Credentials | You must specify:
| IN |
| int | number of signatures apposed | OUT |
Manage error in SWS
Each method can generate an exception, for example PIN not correct, sessioneKey expired or OTP not correct.
For example if we try to execute the signPAdESListmethod with the same OTP, we get the SOAP response with error 44, as in this response:
| Code Block |
|---|
<soap:Envelope xmlns:soap="http://schemas.xmlsoap.org/soap/envelope/">
   <soap:Body>
      <soap:Fault>
         <faultcode>soap:Server</faultcode>
         <faultstring>Codice OTP errato, riprovare con il prossimo codice</faultstring>
         <detail>
            <ns2:WSException xmlns:ns2="http://service.ws.nam/">
               <error>44</error>
               <message>Codice OTP errato, riprovare con il prossimo codice</message>
            </ns2:WSException>
         </detail>
      </soap:Fault>
   </soap:Body>
</soap:Envelope> |
By default, the error message is in the Italian language.
Below is the table description of all error messages SWS can generate during your execution method:
| Error details | ||
|---|---|---|
| Error number | Description | |
| English | Italian | |
| 0 | No errors found | Nessun errore riscontrato |
| 1 | Generic error | Errore Generico |
| 2 | Virtual device not found | Dispositivo virtuale inesistente |
| 3 | Virtual device locked | Dispositivo virtuale bloccato |
| 4 | Wrong credentials | Credenziali errate |
| 5 | Wrong emergency code | Codice di emergenza errato |
| 6 | Virtual device status changes denied | Modifiche allo stato del dispositivo virtuale negate |
| 7 | Signature error | Errore nella firma |
| 8 | Error creating slot | Errore nella creazione dello slot |
| 9 | Error deleting slot | Errore nella eliminazione dello slot |
| 10 | PIN change error | Errore nel cambio PIN |
| 11 | Key generation error | Errore nella generazione chiave |
| 12 | Error in key management configuration | Errore nella configurazione del sistema di gestione delle chiavi |
| 13 | Wrong company code | Codice azienda errato |
| 14 | No available slots | Nessuno slot disponibile |
| 15 | Virtual device already exists | Dispositivo virtuale gia' esistente |
| 16 | Operation performed using a wrong certificate | Operazione eseguita usando il certificato errato |
| 17 | Wrong virtual device code | Codice dispositivo virtuale errato |
| 18 | Slot already used | Slot gia' utilizzato |
| 22 | Incompatible file format for the signature type required | Richiesta una firma di file di formato non compatibile con il tipo di firma richiesto |
| 23 | Unsupported hash algorithm | Algoritmo di hash non supportato |
| 24 | Error decrypting CMS data | Errore nella decifratura del CMS EnvelopedData |
| 25 | Error importing key and certificates | Errore nell'importazione di chiave e certificati |
| 26 | The public key in the certificate does not match the private key | Chiave pubblica nel certificato non corrisponde a quella privata |
| 27 | Web method denied for the credentials or ssl certificate used | Eseguita una chiamata a web method mediante credenziali o certificato ssl non abilitato per questa funzione |
| 28 | CA doesn't exist | La CA inserita non esiste |
| 29 | The user didn't enter all required fields for the profile | L'utente non ha inserito tutti i campi richiesti per il profilo |
| 30 | EJBCA error | Errore di EJBCA |
| 31 | Authorization denied | Autorizzazione negata |
| 32 | Error due to waiting for data approval | Errore dovuto all'attesa per l'approvazione dei dati |
| 33 | Error approving the entered data | Errore nell'approvazione dei dati inseriti |
| 34 | Illegal query | Errore per query illegale |
| 35 | Certificate already revoked | Certificato gia' revocato in precedenza |
| 36 | I / O error, caused by writing / reading / converting a file / byte array / string | Errore di I/O, causato dalla scrittura/lettura/conversione di un file/array di byte/stringa |
| 37 | Payment verification failed | Verifica di pagamento non andata a buon fine |
| 38 | No available signatures | Eseguite tutte le firme a disposizione |
| 42 | A denied feature is invoked in the current mode | E' stata richiamata una funzionalita' non permessa nella modalita' corrente |
| 43 | A denied feature is invoked in the implementation used | E' stata richiamata una funzionalita' non permessa nell'implementazione usata |
| 44 | Wrong OTP code, try again with the next code | Codice OTP errato, riprovare con il prossimo codice |
| 45 | The key isn't associated to a certificate | La chiave non ha associato un certificato |
| 46 | Unknown certificate format | E' stato passato un certificato di formato sconosciuto |
| 47 | It isn't possible to open the slot | Non e' stato possibile aprire lo slot |
| 49 | Key login error | Errore di login sulla chiave |
| 50 | Error generating the CSR | Errore nella generazione del CSR |
| 51 | The maximum number of attempts to access the virtual device is reached | Raggiunto il numero massimo di tentativi di accesso al dispositivo virtuale |
| 52 | Error decrypting | Errore nella decifra |
| 53 | The certificate has expired | Il certificato associato alla chiave e' scaduto |
| 54 | There are no tokens for automatic signature with Cosign HSM | Non sono disponibili token per la firma automatica con hsm Cosign |
| 55 | Error updating certificate in db | Errore durante l'aggiornamento del certificato nel db |
| 56 | Wrong method use | Errato utilizzo del metodo |
| 57 | Method not implemented yet | Metodo non ancora implementato |
| 58 | Error assigning the OTP | Errore durante l'assegnazione dell'OTP |
| 59 | Error assigning the static token | Errore durante l'assegnazione del token statico |
| 60 | Error deleting the account | Errore durante la cancellazione dell'account |
| 61 | Error activating the account | Errore durante l'attivazione dell'account |
| 62 | Error loading the account | Errore durante il caricamento dell'account |
| 63 | Error unlocking the account | Errore durante lo sblocco dell'account |
| 64 | Unavailable hsm licenses | Licenze per hsm esaurite |
| 65 | PIN too short | PIN troppo corto |
| 66 | Session key incorrect | Session key errata |
| 67 | Session key not specified | Session key non specificata |
| 68 | Session key undefined | Session key non definita |
| 69 | Session key expired | Session key scaduta |
| 70 | Session key not usable | Session key non utilizzabile |
| 71 | Error generating session key | Errore durante la generazione della session key |
| 72 | Error incrementing the session counter | Errore durante l'incremento del session counter |
| 73 | Error sending OTP code | Errore durante l'invio del codice OTP |
| 74 | Error deleting session key | Errore durante la cancellazione della session key |
| 76 | Error appositioning timestamp | Errore durante l'apposizione della marca temporale |
| 77 | Error closing session | Errore durante la chiusura della sessione |
| 78 | The number of documents to be signed differs from the number of signature preferences | Il numero di documenti da firmare differisce dal numero di preferenze di firma |
| 79 | Error detecting Security World | Errore durante il rilevamento del Security World |
| 80 | Error detecting the Module | Errore durante il rilevamento del Modulo |
| 81 | Error reading the SoftCard | Errore durante la lettura della SoftCard |
| 82 | Error writing the SoftCard | Errore durante la scrittura della SoftCard |
| 83 | Error deleting the SoftCard | Errore durante la cancellazione della SoftCard |
| 84 | Error loading SoftCard | Errore durante il caricamento della SoftCard |
| 85 | SoftCard not loaded | SoftCard non caricata |
| 86 | SoftCard already exists in the system | SoftCard gia' esistente a sistema |
| 87 | SoftCard does not exist | SoftCard inesistente |
| 88 | Error reading the key | Errore durante la lettura della chiave |
| 89 | Error writing the key | Errore durante la scrittura della chiave |
| 90 | Error deleting the key | Errore durante la cancellazione della chiave |
| 91 | Error decrypting the RSA data | Errore durante la decifratura RSA |
| 92 | Error decrypting the CMS envelope | Errore durante la decifratura CMS |
| 93 | Error creating the SoftCard | Errore durante la creazione della SoftCard |
| 94 | The size of the hash does not coincide with the expected one by the algorithm | La dimensione dell'hash non coincide con quella prevista dall'algoritmo |
| 95 | Error loading Cosign Tokens | Errore durante il caricamento dei Token Cosign |
| 96 | The system takes too much time, HSM overload. Try again | Il sistema impiega troppo tempo, HSM sovraccarico. Riprovare |
| 97 | Timeout passed | Timeout superato |
| 98 | No signature device associated to the user | Nessun dispositivo di firma remota risulta associato all'utente in questione |
| 1001 | The OTP device does not exist | Dispositivo OTP non esistente a sistema |
| 1007 | The OTP device was not activated | Il dispositivo OTP non risulta essere stato attivato |
| 1009 | Unavailable attempts for the OTP device | Superato il numero massimo di tentativi per il dispositivo OTP |
| 1016 | The OTP device was not associated to the holder | Il dispositivo OTP non risulta essere stato associato al titolare |
Method getErrors
This method return a list of errors which can be generated from SWS in in
| Name | Type | Optional | Description | IN/OUT |
|---|---|---|---|---|
| lang | String | String county code in 2 digit, accept only EN, IT. | IN | |
| errorCode | Integer | true | Specify the error code you want to receive in the error description. If not specified will return return all errors in a specified language. | IN |
| List<ErrorDetails> | Return a list with the error(s) description. | OUT |
The type "ErrorDetails" is a composed by:
- int errorCode
- String errorLanguage (language code in 2 digit for example EN)
- String errorLanguage2 (language code in 3 digit for example ENG)
- String errorText (contain the error description in a specified language)
In this method, it is possible to return the list of all errors without setting the value of errorCode.
Verify the signatures/timestamp in SWS
SWS permits to verify the signature. For SWS the signature is VALID only if the signature has been apposed with qualified certificate.
For example the the certificate which has apposed the signature is qualified if:
- Root CA enroll the certificate is in the truested list
- private key is in secure device like smartcard, token or HSM
For example if the signature has been apposed with private key on file, the verify with SWS will fail because the private isn't in a secure device (like HSM).
Method for verification of digital signatures: verifyWithPreferences
This method allow to verify different types of signatures (detached or no): Pades, Xades, Cades:
| Name | Type | Mandatory | Description | IN/OUT |
|---|---|---|---|---|
| signedContent | byte[] | ✔️ | file to be verified | IN |
| preferences | VerifyPreferences | Contain the preferences to be used during the verify process | IN | |
| SignedDocumentReportBean | Composite class which contain the report of a signature | OUT |
Below will be described the complex object "VerifiyPreferences"
| VerifyPreferences | |||||
| Name | Type | Mandatory | Default value | Description | Included from SWS version |
|---|---|---|---|---|---|
| checkByteRange | boolean | ||||
| detachedContent | byte[] | Contain the original file if you are verifying a detached signature | |||
| includeFea | false | If set to true permits to verify the FEA (Firma Elettronica Avanzata) signature | |||
| language | String | IT | Contain the country code two digit and specify the language of verification report. | ||
| mandatoryRevocationCheck | boolean | false | |||
| pdfEncryptionPassword | String | Contains the password of PDF files (if you are verifying PDF files with password) | |||
| recursive | boolean | false | Check if there are signatures in the file which has been signed | ||
| verifyOnDate | Date | Date of verification at specified date | |||
| namirial | boolean | false | Permits to use custom tsl specified on properties. Used only for test purpose. | ||
| withoutPlainDocument | boolean | false | Permits to omit the plain document | 2.5.54 | |
In output will obtain the verification report described by complex object: SignedDocumentReportBean
| SignedDocumentReportBean | |||
| Name | Type | Description | Included from SWS version |
|---|---|---|---|
| overallVerified | boolean | Very IMPORTANT: outcome of verification, if true the signature is VALID | |
| checkDate | Date | Date of execute of verification | |
| verificationDate | Date | Date of verification. For example if the verification date is: "2021-09-03 15:30:00" specificy i want verify in that date. | |
| plainDocument | byte[] | Original file (present only in Cades signatures) | |
| noteReportList | NoteReportBean | List of notes to support the signature evaluation | |
| signatureReportList | SignatureReportBean | List of specific report on a single signature | |
| nrOfSignatures | int | Number of signature in the file are you verifiyng | |
| signatureFormat | String | Specify the type of signature. Can be: Pades, Cades or Xades | |
| timestampReportList | TimestampReportBean | Reports list in possible timestamps apposed to the signature | |
Below will be described the complex object NoteReportBean, SignatureReportBean:
| NoteReportBean | |||
| Name | Type | Description | Included from SWS version |
|---|---|---|---|
| policy | int | Note validity area (0=ALL, 1=IT, 2=EU) | |
| about | int | Object of the note (O=other, 1=Signature, 2=holder, 3=issuer, 4=timestamp) | |
| type | int | Type of the note (1=INFO, 2=WARNING, 3=ERROR) | |
| synopsis | String | Brief description of the note (for example: "Key on secure device") | |
| description | String | Detailed description of the note: "The private key associated with the test azienda certificate is stored in a secure device compliant with European Regulation 2014/910/EU" | |
| SignatureReportBean | |||
| Name | Type | Description | Included from SWS version |
|---|---|---|---|
| integrity | boolean | It defines the integrity of signature | |
| signatureAlgorithmName | String | Alghoritm used to sign | |
| serialNumber | BigInteger | Serial of the signing certificate | |
| subjectDN | String | Subject DN of the signing certificate | |
| subjectCN | String | Common Name (CN) in the subject DN associated to the signing certificate | |
| issuerDN | String | Subject DN associated to the issuer of signing certificate | |
| issuerDN | String | Common name (CN) of subject DN associated to the issuer of signing certificate | |
| issuerCertificateStatus | enum | Issuer's certificate status. It can have the following values: VALID, REVOKE, UNKNOWN | |
| issuerInTrustedList | boolean | It defines if the issuer of the signing certificate is a trusted entity defined by the European TSL | |
| keySize | int | size of key associated to the signer certificate | |
| qcComplianceStatus | enum | It defines if the signatures is in line with the Qualified Signature requirements. It can have the following values: VALID, INVALID, UNDETERMINATED, VALID_WITH_WARNINGS, INFORMATION | |
| qcSSCDStatus | enum | If defines if the signature was created by a secure device (like smartcard, token, hsm) NOT file (p12, jks) | |
| signatureDate | Date | Date of signature | |
| trustedSignatureDate | boolean | Set to true if the signature include timestamp (to guarantee the date of signature) | |
| derEncodedSignerCert | byte[] | Signer certificate in X509 format | |
| signerCertifcateNotBefore | Date | Start date of the validity of the signing certificate | |
| signerCertificateNotAfter | Date | End date of the validity of the signing certificate | |
| signerCertificateStatus | enum | Status of certificate. The value can be:
| |
| id | int | number of signature | |
Method for verification of timestamps
The timestamp can be of two different types:
- TSR (TimeStamp Response) + original file in the same file is called TSD (TimeStamp Data)
- TSR and original file in two different files
There are two method for verify the TSD and TSR:
- verifyTimeStampData
- verifyTimeStampResponse
Method verifyTimeStampResponse and verifyTimestampData
Below the description of method "verifyTimeStampResponse" permits to verify only TSR:
| Name | Type | Mandatory | Description | IN/OUT |
|---|---|---|---|---|
| tsr | byte[] | ✔️ | tsr to verify | IN |
| content | byte[] | ✔️ | original file | IN |
| TimestampReportBean | Report with detail of verification | OUT |
And the method "verifyTimestampData" permits to verify only TSD:
| Name | Type | Mandatory | Description | IN/OUT |
|---|---|---|---|---|
| tsd | byte[] | ✔️ | tsd to verify | IN |
| List<TimestampReportBean> | Report with detail of verification | OUT |
While the method "verifyTimeStampWithPreferences" permits to verify TSR and TSD, below the details:
| Name | Type | Mandatory | Description | IN/OUT | Included from SWS version |
|---|---|---|---|---|---|
| timestampedConted | byte[] | ✔️ | tsr or tsd to verify | IN | 2.5.55 |
| preferences | VerifyTimestampPreferences | Contain the preferences about verify like language, original files (if you are verifying a TSR file) | IN | " | |
TimestampReportBeanSummary | Report with detail of verification | OUT | " |
Below will be described the complex object VerifyTimestampPreferences:
VerifyTimestampPreferences | ||||
Name | Type | Default value | Mandatory | Description |
|---|---|---|---|---|
detachedContent | byte[] | Contain the original file where has been applied the timestamp, use this field only if you are verifying the TSR | ||
responseWithoutContent | boolean | false | Permits to remove the original files from the response (use this flag for reduce the bandwith usage) | |
language | String | IT | Specify the language report associated to verify | |
Below will be described the complex object TimestampReportBeanSummary:
TimestampReportBeanSummary | ||
Name | Type | Description |
|---|---|---|
timestampReportList | List<TimestampReportBean> | Detailed report of every timestamp in TSD file |
noteReportList | List<NoteReportBean> | Other details about timestamp |
overallVerified | boolean | Very IMPORTANT: outcome of verification, if true the all timestamps are VALID |
Below will be described the complex object TimestampReportBean:
TimestampReportBean | |||
Name | Type | Description | Included from SWS version |
|---|---|---|---|
index | Integer | Return the number of timestamp verified | |
date | Date | When the timestamp has been apposed | |
signatureVerificationStatus | enum | The status of the integrity of the timestamp (indicates if the token's signature is intact), the value can be:
| |
trustedListVerificationStatus | enum | The status of the root certificates associated, the value can be:
| |
timestampCertificateStatus | enum | The status of certifcate which has apposed the timestamp, the value can be:
| |
issuer | String | Subject DN associated to the issuer certificate | |
subject | String | Subject DN associated to timestamp certificate | |
issuerCN | String | CN (Common Name) of Subject DN associated to the issuer certificate | |
subjectCN | String | CN (Common Name) of Subject DN associated to the timestamp certificate | |
serialNumber | BigInteger | Serial number associated to timestamp certificate | |
signatureAlgorithm | String | Algorithm used for apply the timestamp | |
hashAlgorithm | String | Algorithm used for the hash generation for document hash | |
comment | String | Message explain the details of the error if present | |
timestampCertData | byte[] | Certificate associated to timestamp | |
content | byte[] | File oringinal which has been applied the timestamp | |
contentFilename | String | Return the filename if present else will return "originalFile.bin" | |
contentMimeType | String | Return the content type associated to the file if present. Else will return "application/octect-stream" | |
timeStampToken | byte[] | Contain the timestamp associated | |
NOTE: the timestamp file is verified only if for every element of TimestampReportBean list all this conditions (in AND) are verified:
- signatureVerificationStatus = VALID
- trustedListVerificationStatus = VALID
- timestampCertificateStatus = VALID
Method for verifyCertificate
Below the description of method "verifyCertificate":
| Name | Type | Mandatory | Description | IN/OUT |
|---|---|---|---|---|
| certificate | byte[] | ✔️ | certificate to verify | IN |
| CertificateReportBean | Report with detail of verification | OUT |
Below will be described the complex object CertificateReportBean:
CertificateReportBean | |||
Name | Type | Description | Included from SWS version |
|---|---|---|---|
trusted | boolean | Set to TRUE mean the root certificate of the chain is in trusted list. The root of the chain is the self-signed certificate (where issuerDN = subjectDN) | |
subjectValid | boolean | TRUE: if the certificate isn't expired FALSE: the certificate is expired | |
| subjectRevoked | boolean | TRUE: if the certificate is hold or revoked FALSE: the certificate is active | |
| subjectRevocationDate | Date | date of revoke/hold | |
| issuerValid | boolean | TRUE: if the issuer of the certificate isn't expired FALSE: the certificate is expired | |
| issuerRevoked | boolean | TRUE: if the issuer certificate is hold or revoked FALSE: the issuer certificate is active | |
| issuerRevocationDate | Date | date of revoke/hold | |
LEGEND:
Below the details about certificate:
active → the certificate isn't revoked or hold
valid → isn't expired
Utilities for sign
Below will described described the method for extract the info about the files, for example extract extract the info about the fieldName in a PDF
getAvailableSignatureFieldNames
This method allow to retrieve for a given PDF file all signature fields present that there are NOT already used.
Below you can find a description of IN/OUT fields.
| Name | Type | Mandatory | Description | IN/OUT |
|---|---|---|---|---|
| buffer | byte[] | ✔️ | The file to search for signature fields | IN |
| encryptionPassword | String | ❌ | The encryption password of the PDF in the file is encrypted | IN |
| List<String> | List of all signature field names available | OUT |
Example response
An example response can be found below:
| Code Block | ||
|---|---|---|
| ||
[
    "SignatureField-1",
    "SignatureField-2"
] |
allSignatureFieldNamesWithPreferences
This method allow to retrieve all signature field present inside a file. Using preferences the user is able to retrieve more details about the signature applied to a given signature field.
Below you can find a description of IN/OUT fields.
| Name | Type | Mandatory | Description | IN/OUT |
|---|---|---|---|---|
| buffer | byte[] | ✔️ | The file to search for signature fields | IN |
| preferences | SignatureFieldPreferences | ❌ | Preferences to be applied to the search operation | IN |
| List<SignatureFieldName> | List of all signature field names | OUT |
SignatureFieldPreferences
Here you can find a description of the complex object SignatureFieldPreferences
SignatureFieldPreferences | |||
Name | Type | Description | Included from SWS version |
|---|---|---|---|
withDetails | boolean | Show details about the signature field signed, for example the appearence ( height, widht, x, y), signer name, sign date, the reason, location and the page DEFAULT=false | 2.5.56 |
withCertificate | boolean | Retrieve the signer certificate in base64 encoding and certificate subjectDN DEFAULT=false | 2.5.56 |
| encryptionPassword | String | The encryption password used to protect the PDF given in input if present | 2.5.56 |
SignatureFieldName
Here you can find a description of the complex object SignatureFieldName
SignatureFieldName | |||
Name | Type | Description | Included from SWS version |
|---|---|---|---|
identifier | String | Signature field name identifier | 2.5.56 |
signed | boolean | TRUE: the signature field is already signed FALSE: the signature field is not signed | 2.5.56 |
| signatureDetails | SignatureDetails | Complex object containing details about the signature applied to a given field if signed | 2.5.56 |
SignatureDetails
Here you can find a description of the complex object SignatureDetails
SignatureDetails | |||
Name | Type | Description | Included from SWS version |
|---|---|---|---|
name | String | Signer name applied to a given signature field | 2.5.56 |
signDate | Timestamp | Unix timestamp representing the date of when the signature has been applied | 2.5.56 |
| location | String | The location of where the signature has been applied | 2.5.56 |
| reason | String | Reason applied to a given signature | 2.5.56 |
| page | Integer | Page where the signature field is present ( -1 if the page is not found ) | 2.5.56 |
| appearance | PdfRectangle | Complex object containing info about the signature field box | 2.5.56 |
| certificate | String | Base64-encoding of the signer certificate | 2.5.56 |
| subjectDN | String | SubjectDN of the signer certificate | 2.5.56 |
PdfRectangle
Here you can find a description of the complex object PdfRectangle
PdfRectangle | |||
Name | Type | Description | Included from SWS version |
|---|---|---|---|
witdth | Float | Width of the signature field | 2.5.56 |
height | Float | Heigth of the signature field | 2.5.56 |
| x | Float | Lower left X-Axis position of the signature field | 2.5.56 |
| y | Float | Lower left Y-Axis position of the signature field | 2.5.56 |
Example response
Here you can find an example response:
| Code Block | ||
|---|---|---|
| ||
[
    {
        "identifier": "SignatureField-1",
        "signed": false
    },
    {
        "identifier": "SignatureField-2",
        "signatureDetails": {
            "name": "My Name and Surname",
            "signDate": 1687869549000,
            "location": "Milan",
            "reason": "Signed for general purpose",
            "page": -1,
            "appearance": {
                "width": 40.50,
                "height": 10.20,
                "x": 1.0,
                "y": 2.3
            },
            "certificate": "<base64-encoded certificate>",
            "subjectDN": "CN=My Name and Surname, SERIALNUMBER=1234567890, GIVENNAME=MyName, SURNAME=My Surname, C=IT"
        },
        "signed": true
    }
] |
URL of timestamp provider with standard RFC3161.
Namirial URL:
PROD: https://timestamp.namirialtsp.com / http://timestamp.namirialtsp.com
TEST: https://timestamp.test.namirialtsp.com / http://timestamp.test.namirialtsp.com
Username of timestamp credentials
You can see how set the correct Level signature:
LevelWhile the other variables are:
hashAlgoritm: hash algorithm used to sign (for example SHA-256)
level: type of signature with or without timestamp, ocsp response ecc.., is possible to choose between B, T, LT, LTV, LTA
withTimestamp: maybe true or false if you want use or not timestamp during the process of digital signature. If you set “true” this variable, you should set the variable starts with “timestamp”
page: indicate the number page of appereance (if you don't use the appereance, you should set this to “1”)
signerImage: this object is used for specify the details on appereance like logo image or string.
withSignature: set to “true” if you want apply the appereance con PDF signature fiels, else set to “false”
How populate the object signerImage
Read this section only if you want apply the appereance on PDF.
The object credentials is composed by:
The object “signerImage” is used to describe how populate the appereance. Set the image and string on appereance.
fieldName: use this variable with name of field signature if your PDF have a field signature else you should not set this variable.
fontName: name of the font used for the string on appereance
fontSizie: size of the font used for the string on appereance
height: specify the height (in pixel) of appereance
image: in SOAP request will be the image in base64 associated to the logo
imageFilename: used only in certain situation
imageURL: url which contain the image associated to the logo
imageVisible: set true if you want show the image in the appereance
location: this property is associated to the position of the String in appereance. The possible options are: BOTTOM, TOP, LEFT, RIGHT
reason: is a string ….insert the adobe image example
ADVANCED USE
VERIFY TIMESTAMP
While for verify only timestamp, you can use this methods:
timestampTSDVerify → It permits to validate TSD files (file and timestamp in the same file)
timestampTSRVerify → It permits to validate TSR files (file and timestamp in two different files)