...
| Section |
|---|
CollectionIn this tutorial you will do the first API Call as well as sending envelopes, upload documents and download signed papers. Let us start with creating a Collection so that we can save all request there. Therefore, you must go to the register “new” and select Collection. Then Figure 1 should appear where we define a name for our Collection. |
| Section |
|---|
Create a requestAfter creating a new Collection, we will save our first request into it. Therefore, you select again the register “new” and pick request. Afterwards the Figure 2 should appear where you choose a name for the request and make sure to save it in the Collection we just created. |
| Section |
|---|
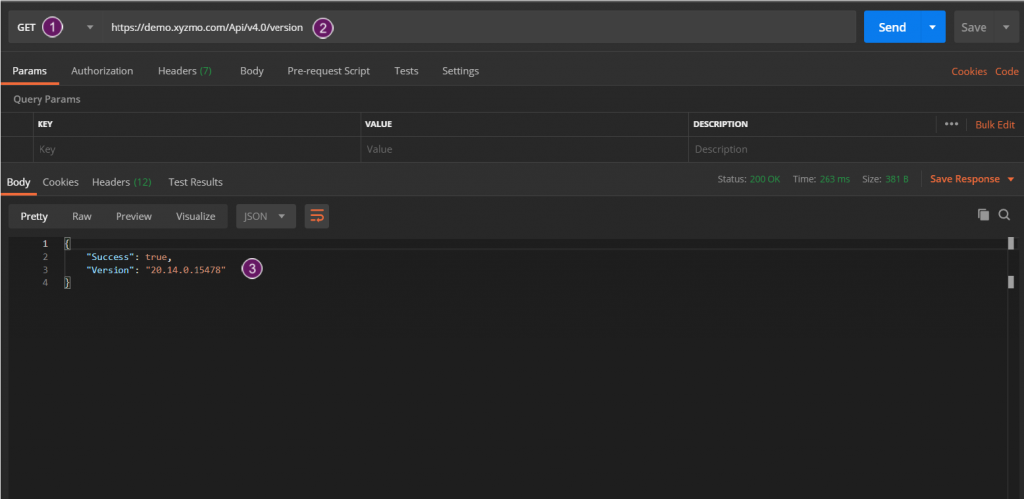
First API Call (get the version)Let us start now with the first API call. As the name of our request tells we will first make an easy call to examine the current version. You can see all requests here: https://demo.esignanywhere.net/Api Therefore, you must select the request type to a “Get” request and you must fill in the URL. For a detailed overview see the next Figure. |
| Section | |||||||||||
|---|---|---|---|---|---|---|---|---|---|---|---|
As you may see from the Figure 3 you just have to fill in the URL, select the correct type (in this case it is a “Get” type) and then you just have to click the send button and you will get such a result as shown in the Figure 3. If an error appears, make sure you have chosen the correct request type and the right URL. Version Request JSON not required Version Response JSON
|
...
| Section |
|---|
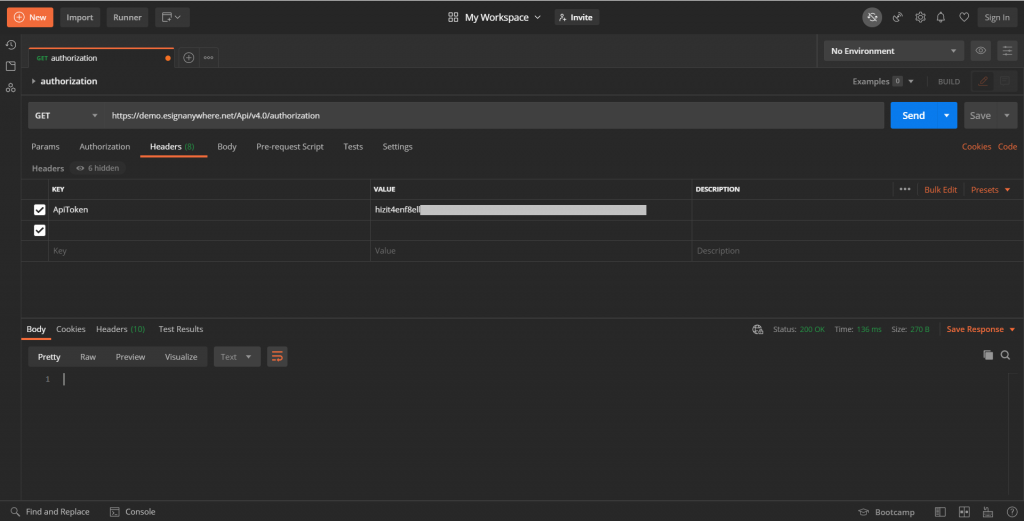
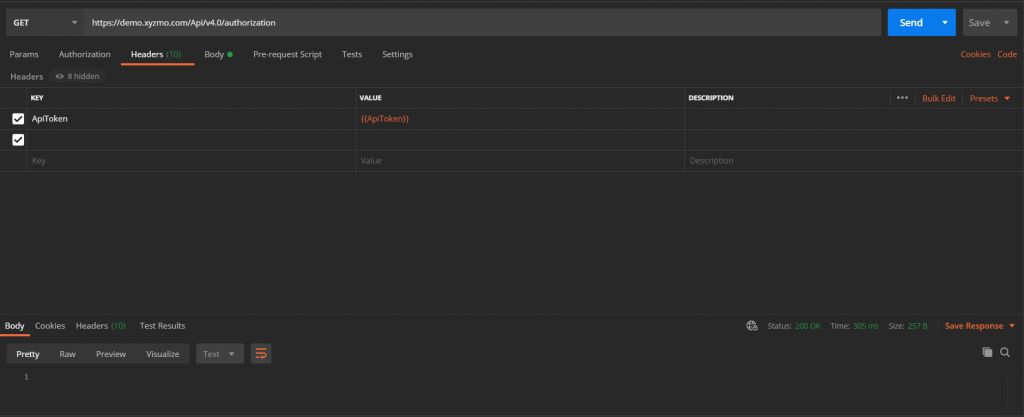
AuthorizationThe next request will show you an authorization. This is an important part of the requests for sure but not only because of security but also because we will need the authorization for all other requests. Let us create another request to make our second API Call to try the authorization. The only extension to the previous call is to define the headers. If you click on “Headers” you will see three columns. The first and second one, so the keys and the values are necessary for the authorization. Two ways of authorizationFor authentication, you’ll need an api token. You can find this information in Settings / Api Tokens and Apps. Note that all API methods require authentication. The API token is a user specific secret which should not be shared with other users. We recommend to create different API keys for different application integrations, to avoid configuring the same key in various integration systems. This allows, e.g. in case of sharing a key by mistake, to disable one key while keeping other integrations working with their existing configuration. |

| Section |
|---|
|
| Section |
|---|
You can also authorize with the organizationKey and the userLoginName. |

Authorization Request JSON
...
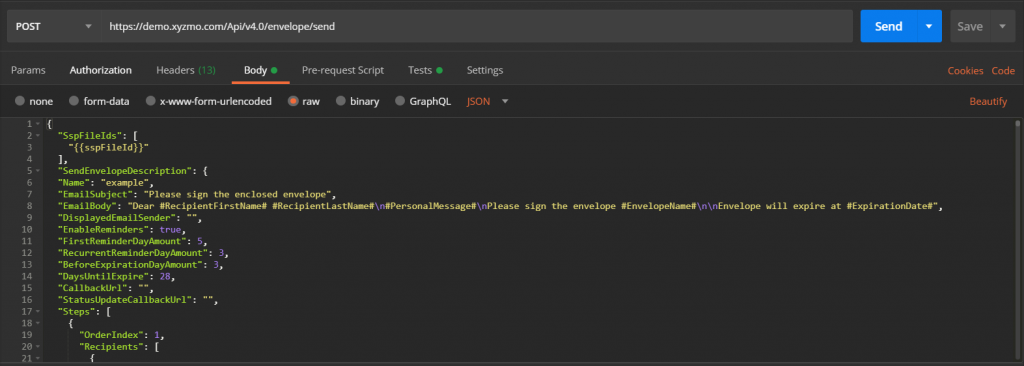
Before we can send an envelope, we must make sure that we have already uploaded a file. Therefore, the next request will be about uploading a file.
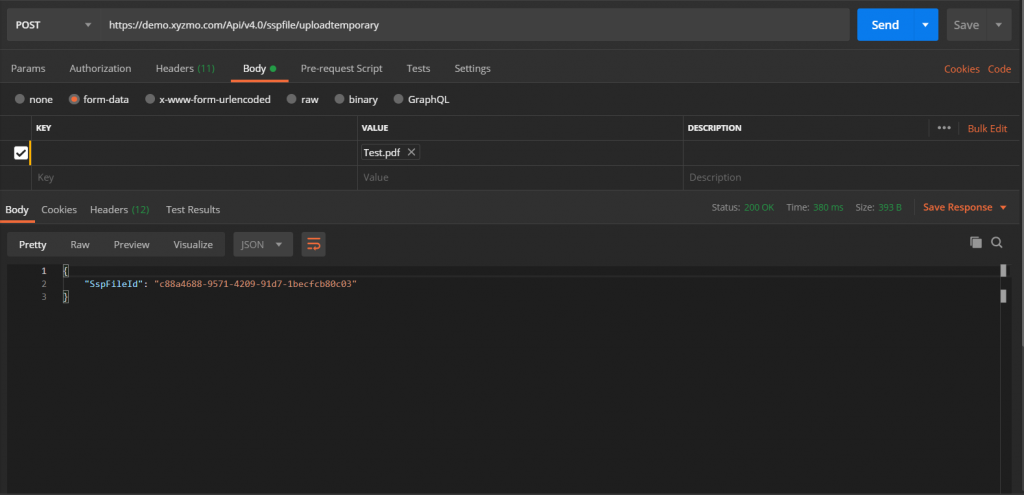
As you can see in Figure 5 you must also edit the body. So, the header will be the same as we have already seen in the authorization. In the body you must select that you will upload a file and you must choose a file which you wanted to be uploaded. (In this case “Tutorial.pdf”)
...
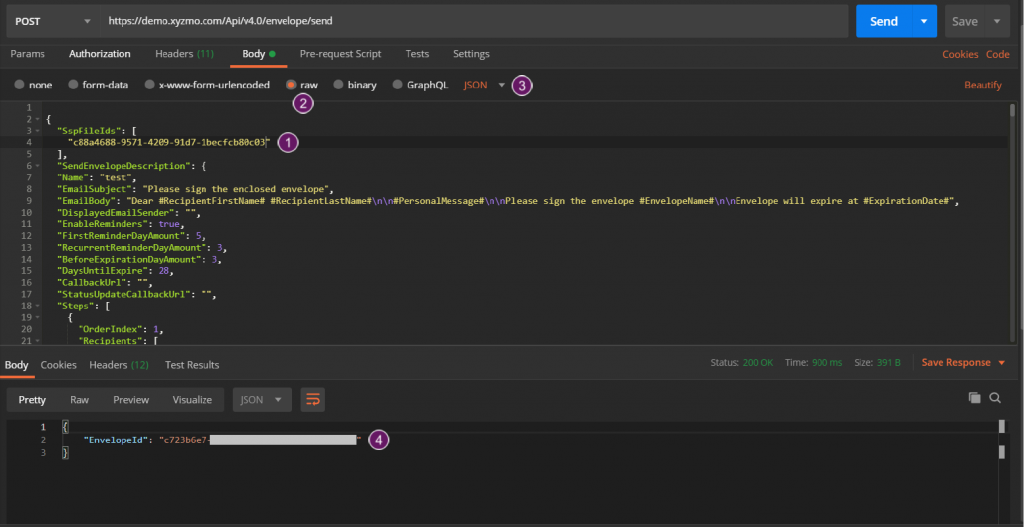
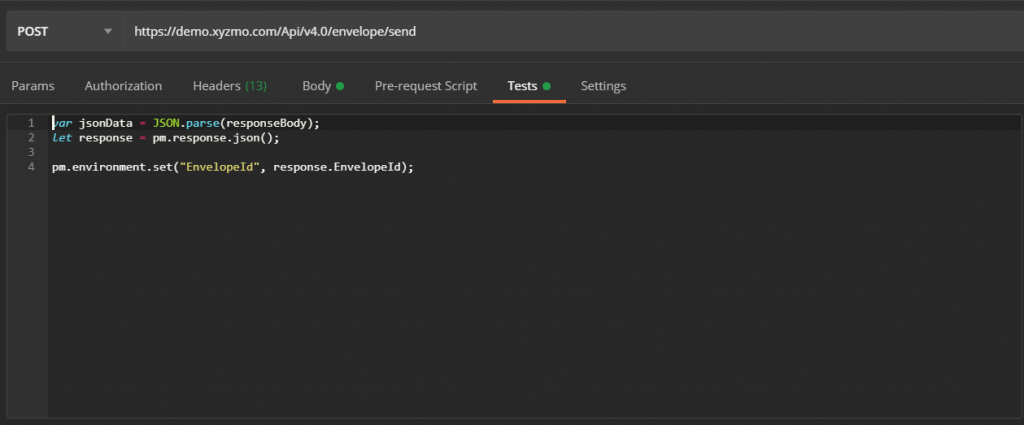
The next Figure should give you an overview of all changes you have to do to get a positive result. (in this case the result is the envelope ID)
| Section | ||||
|---|---|---|---|---|
Sending Request JSON |
...
| Section |
|---|
Get the envelope descriptionThe last request of this tutorial will be the download of the document which has been signed. But before we will check if the envelope with the ID which we got from the sending is correct. Furthermore, we need the request “get the envelope” because of the document ID`s which we only get because of this request. The following Figure will help you with the request and give you an overview how it should be done.  Description Request JSON Not required Description Response JSON |
...
If we do the same request after the recipient has signed the envelope, we will get the result which is shown in Figure 8.
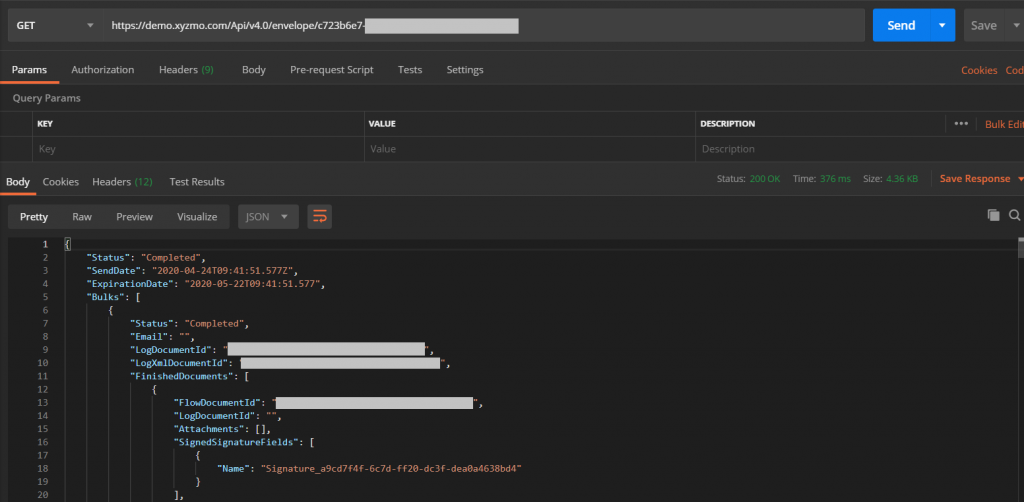
In this case the status says completed so we have now the document ID`s which we need to download the signed document.
...
The next Figure will give you an overview.
| Section | ||||||||||||||||||||||||||||
|---|---|---|---|---|---|---|---|---|---|---|---|---|---|---|---|---|---|---|---|---|---|---|---|---|---|---|---|---|
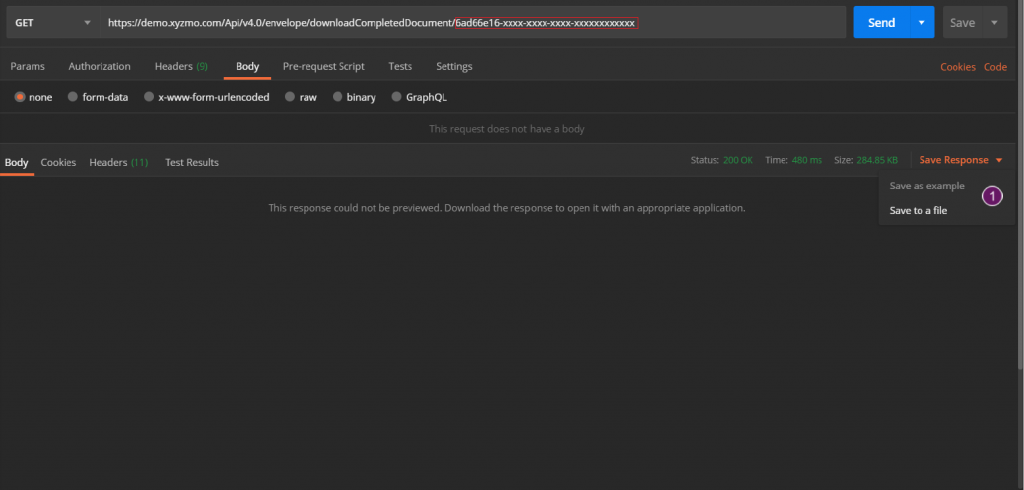
Download Request JSON not required Download Response JSON Should response 200 OK Attention: You can choose between three document ID`s which you got from the “get the envelope” request. For the “LogDocumentId” you get an Audit, for the “LogXmlDocumentId” you get an XML and for the “FlowDocumentId” you get the original document with the sign of the recipient. Please also see the following video which shows the process of downloading all different documents:
After the tutorial you should have the same requests which are shown in the next Figure.  Please also see the following video which shows the process from the version call until the get envelope api call:
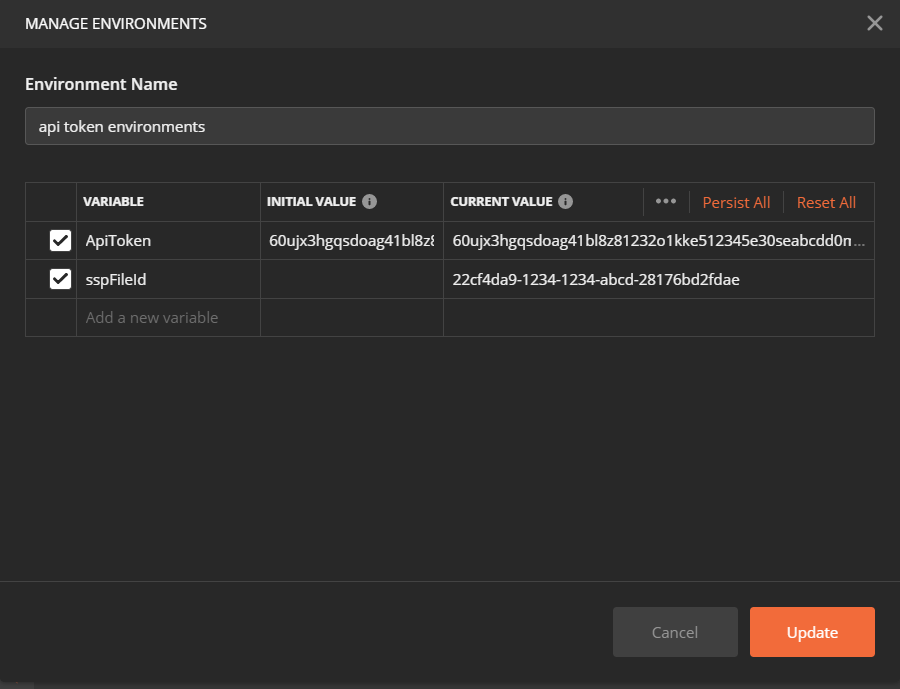
How to use variables in PostmanLet us start with the authorization but this time we will use variables, so we do not have to remember the api token for all other requests. Manage environmentsAfter selecting the configuration button which is shown in Figure 11 another window should appear which is shown in Figure 12. There you must give the environment a name and we have to create the two variables which are necessary for the authorization. Further details in the next Figure: First give your variable a name (it does not matter how you name them). Then fill in “initial value” and “current value” your api token. After filling up the environments for the variable, we now can use it in the header of the next request. AuthorizationFigure 13 shows you the same request we have already done in the tutorial above but this time we will use the variables we have just created.
In the first column we have our api token. In the second column we now do not have to fill in our api token, but we must write {{##name_of_the_variable##}}. From now on you can always use the variable instead of continual writing your api token because all the dates are saved in the environments. If you run this request, you should get the status “200 OK”. Upload a fileNow we will upload a file and save the file ID which we will get from the request in another variable in the environments. 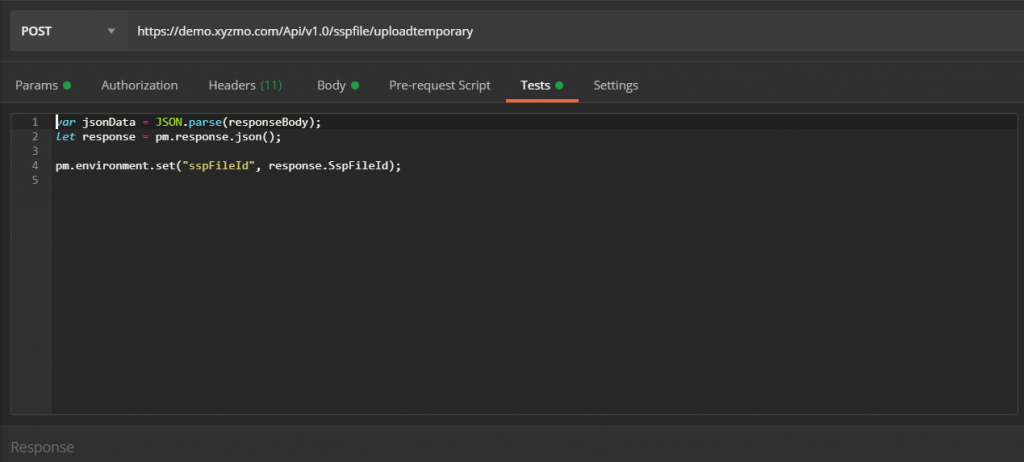 Just these three lines of code are necessary to save the file ID in another variable. First we will parse the response, then we set the file ID with the command (“pm.environment.set(“name_of_the_variable”, response.” name_of_the_response”). After running this request, the new variable “sspFileId” should be in the environments. See next Figure: |
| Figure | Description |
|---|---|
|
|

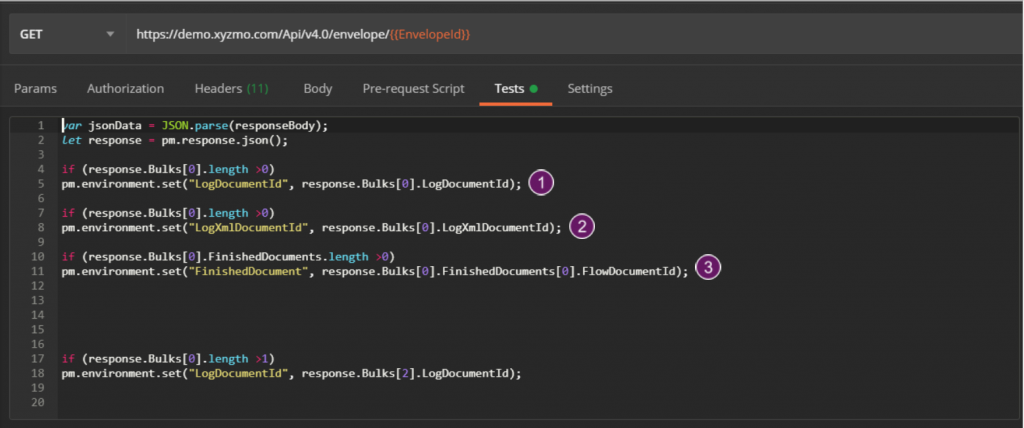
We now want to save the different document ID`s (LogDocumentId, LogXmlDocumentId, FlowMDocumentId).
Therefore, we must check if the array has a length higher than 0. After that, we must do the same “set” command as in the previous once but now we have to “go” into the array. So we write again response.”name_of_the_array[on which place].”name_of_the_variable”.
Figure | Description |
|---|---|
|
|
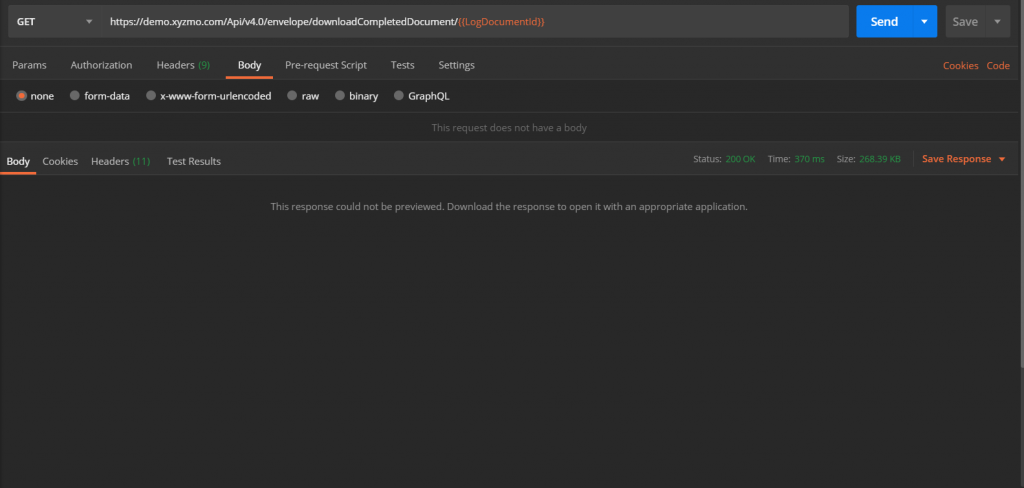
After we have saved all documentId we can use them for the download request. You can find the configuration for saving the documentId here: Configuration
Download the file
Therefore, we just have to attach the variable to the URL which is shown in the next Figure.
Overview of all variables

Advantages of using variables in Postman
First, we do not have to remember all dates which we get through all the requests. Furthermore, we can simply change the organization key and the username and wen can play all requests without other changes because the variables auto fill in the new dates in the requests. Moreover we have a better overview of all ID`s so that we can easily match them with the requirements of the requests.
...