Introduction
In this guide will be described how configure SWS appliance or SWS SaaS with SoapUI. SWS SaaS require JKS while SWS SaaS no.
Steps for configure and test SoapUi
- Download and install the latest SoapUI version.
Launch the software.
Add SSL Global certificate: File > Preferences > SSL Settings > KeyStore choose the jks → You can skip this step if you are using SWS Appliance
Select “File” > “New SOAP project”.
Insert:
Project Name: insert the name you want to assign the project
Initial WSDL:
If you are using SWS SaaS you can use this link
| Code Block |
|---|
https://sws-companynamesaas-test.namirialtsp.com/SignEngineWeb/sign-services?wsdl --> SWS-URL |
Else if yuo are using SWS appliance, you can use this link
| Code Block |
|---|
http://<IP-APPLIANCE>:8080/SignEngineWeb/sign-services?wsdl --> SWS-URL |
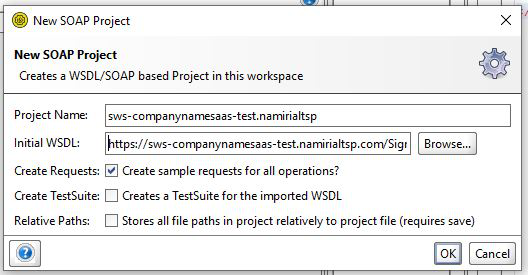
Click “OK”.
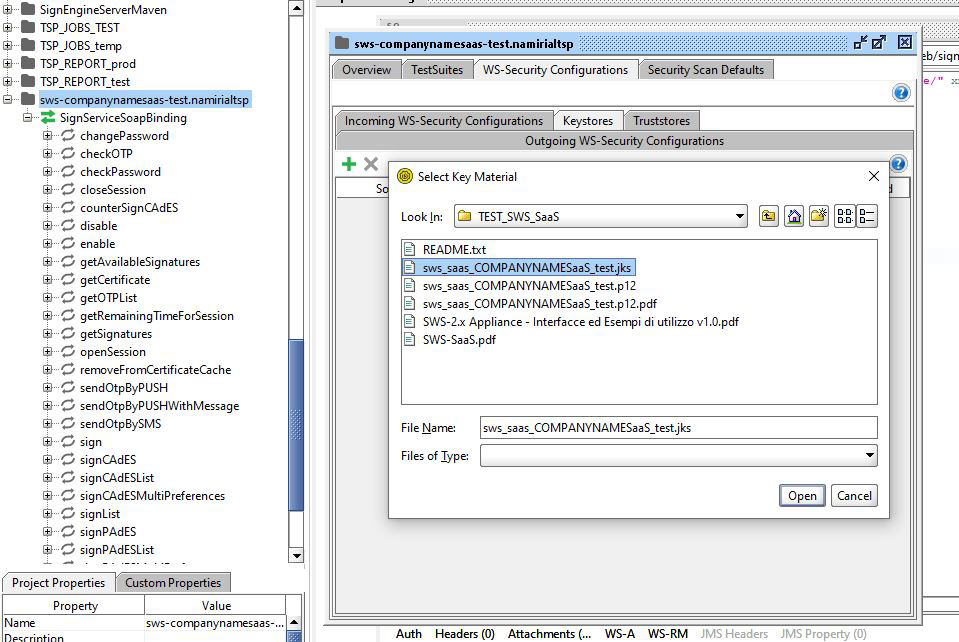
6. Double click on “sws-companynamesass-test.namirialtsp.com”. And the go to: WS-Security Configurations > Keystore > press on “+” and select the JKS to use for the SOAP request. → You can skip this step if you are using SWS Appliance
7. Double click on SignServiceSoapBinding > Service Endpoints > set the address correct:
SWS-URL (specified in the previous step)

8. Now, double click on the method “Get certificate” (left column) and set the parameter like in this example: → You can skip this step if you are using SWS Appliance
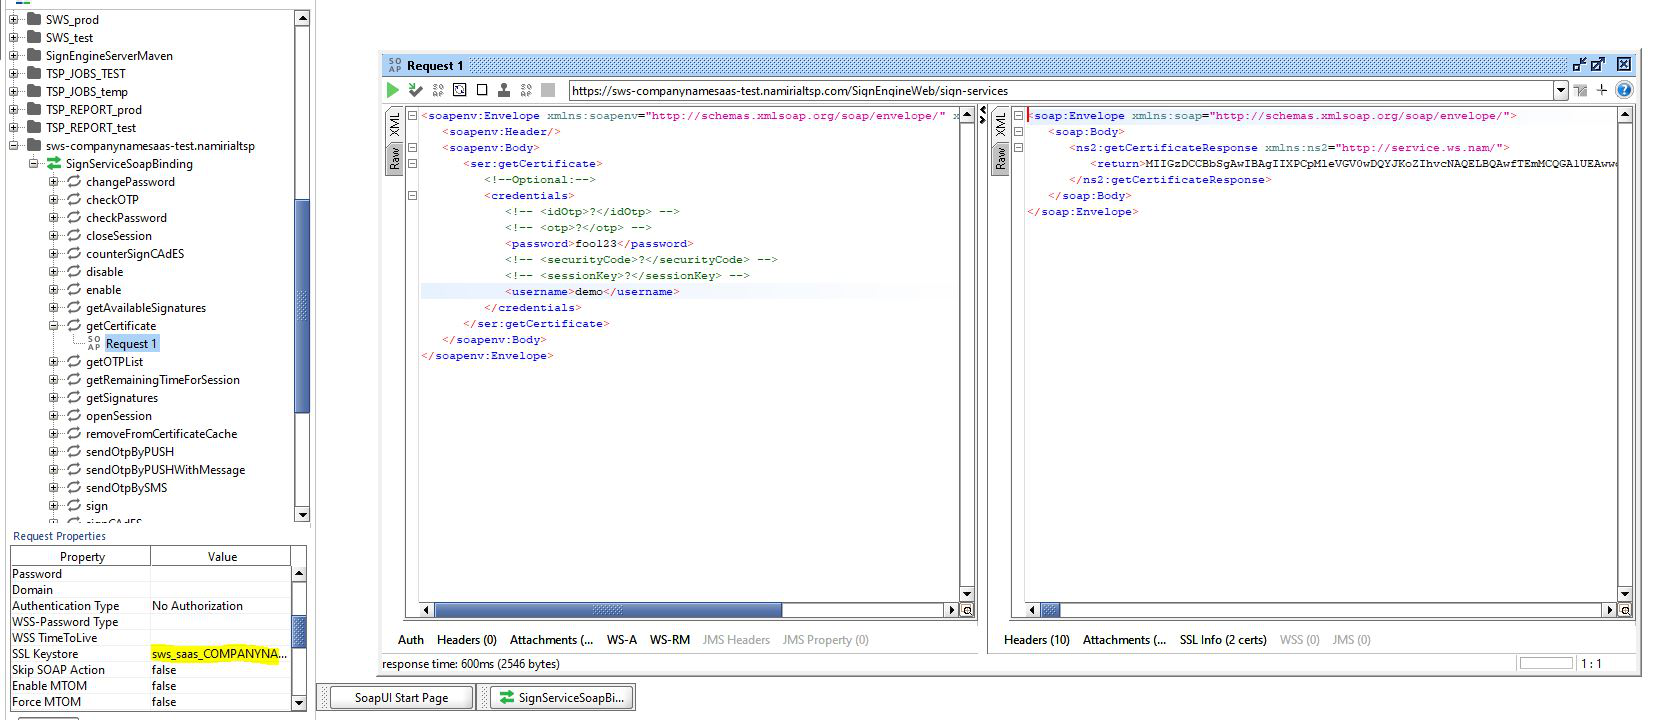
Click the button to execute the request.
And set JKS to use like in the yellow line
9. The response will be presented as follows:
“Return” will contain the certificate in Base64 format.
Copy the whole string, paste it into a new txt file and change the extension to “.crt”.
Example
Device number: demo
Base64 certificate:
MIIGzDCCBbSgAwIBAgIIXPCpMleVGV0wDQYJKoZIhvcNAQELBQAwfTEmMCQGA1UEAwwdTmFtaXJpYWwgQ0EgRmlybWEgUXVhbGlmaWNhdGExIDAeBgNVBAsMF0NlcnRpZmljYXRpb24gQXV0aG9yaXR5MSQwIgYDVQQKDBtOYW1pcmlhbCBTLnAuQS4vMDIwNDY1NzA0MjYxCzAJBgNVBAYTAklUMB4XDTE4MDEyMzE2MzcwMFoXDTI0MDQyMzE2MzcwMFowgacxCzAJBgNVBAYTAklUMRUwEwYDVQQKDAxOT04gUFJFU0VOVEUxFTATBgNVBAQMDERFTU8gQ09HTk9NRTESMBAGA1UEKgwJREVNTyBOT01FMRwwGgYDVQQFExNJVDpETUNETk0xNVQxMEEyNzFPMR8wHQYDVQQDDBZERU1PIE5PTUUgREVNTyBDT0dOT01FMRcwFQYDVQQuEw5ERU1PMTIzNDU2Nzg5MDCCASIwDQYJKoZIhvcNAQEBBQADggEPADCCAQoCggEBAPiLqTYMjlxdSMoOI9/HqoWXmQPP7AKlZEWedZwvXfu+LgqG6kalwESS+vb3zFmnzaMXCuhDYjg1SQC4YHHsrddlnA72Zv6pnY98h43M+MdO3/RQ4wZ7bA/SgRljVxB2uJemDi0Fu/l09Yys5Ou384Dj9C4C2HlR6SbQ7s4L4Kx5x/KGSW6mN8AGaNvgKxQhgXWprifhJqSUTxG2tvP0+NnElsr3TaxONpCeYr3li/lwQPpO0A2JW0wqz94uCgQU3y/HrYqHdX50ccb7jNd+ah3fO/U6RUvQoBcgUFKG973eiFyv8SGymRHf9iwdanrLkTAKSFsYk8z9JfAOGN1WoBsCAwEAAaOCAyMwggMfMIGiBggrBgEFBQcBAQSBlTCBkjBUBggrBgEFBQcwAoZIaHR0cHM6Ly9kb2NzLnRlc3QuZmlybWFjZXJ0YS5pdC9kb2N1bWVudHMvTmFtaXJpYWxDQUZpcm1hUXVhbGlmaWNhdGEuY3J0MDoGCCsGAQUFBzABhi5odHRwOi8vb2NzcC50ZXN0LmZpcm1hY2VydGEuaXQvb2NzcC9jZXJ0c3RhdHVzMB0GA1UdDgQWBBS+qAt2HpxfpSyLftgy962gNRD4BzAfBgNVHSMEGDAWgBTbOAhQt7Yvlu477D60ZlTCSpap3jAvBggrBgEFBQcBAwQjMCEwCAYGBACORgEBMAsGBgQAjkYBAwIBFDAIBgYEAI5GAQQwggGqBgNVHSAEggGhMIIBnTCCAZkGCysGAQQBgpprAQEDMIIBiDAwBggrBgEFBQcCARYkaHR0cDovL3d3dy5maXJtYWNlcnRhLml0L21hbnVhbGktTU8vMIIBUgYIKwYBBQUHAgIwggFEHoIBQABJAGwAIABwAHIAZQBzAGUAbgB0AGUAIABjAGUAcgB0AGkAZgBpAGMAYQB0AG8AIADoACAAdgBhAGwAaQBkAG8AIABzAG8AbABvACAAcABlAHIAIABmAGkAcgBtAGUAIABhAHAAcABvAHMAdABlACAAYwBvAG4AIABwAHIAbwBjAGUAZAB1AHIAYQAgAGEAdQB0AG8AbQBhAHQAaQBjAGEALgAgAFQAaABpAHMAIABjAGUAcgB0AGkAZgBpAGMAYQB0AGUAIABtAGEAeQAgAG8AbgBsAHkAIABiAGUAIAB1AHMAZQBkACAAZgBvAHIAIAB1AG4AYQB0AHQAZQBuAGQAZQBkAC8AYQB1AHQAbwBtAGEAdABlAGQAIABkAGkAZwBpAHQAYQBsACAAcwBpAGcAbgBhAHQAdQByAGUAcwAuMEkGA1UdHwRCMEAwPqA8oDqGOGh0dHA6Ly9jcmwudGVzdC5maXJtYWNlcnRhLml0L0Zpcm1hQ2VydGFRdWFsaWZpY2F0YTEuY3JsMA4GA1UdDwEB/wQEAwIGQDANBgkqhkiG9w0BAQsFAAOCAQEAec6anyYgKJqGF/nwcRwKPNaSOikbJoARGxYVJxEF2DWTg5/ck6qLdArjsXzdqLjWNE0L4oEpg/+ZRLASiTd0RFbutUffEpejsaYINSbseTU7sHw34hOVIqeIySy9KmTHcYTB52vVUPQKCqP8xBrzAw/7GheKgGt0gixNKGT+qLl5ytt0Vc2Gh4DfM7+86ftYU8ULrFH4spac4Qdb8W1w5rBxZXyFU2EbvsIP7DI6enKlvUcpQ5VLAWoNW9fskXy7bzT36bTJKqhnrbUhN5NA0LD2SbbpswrLsPhV583c0hBtqTxvR+1bPFayeCS+IfkwU9KrklYjQhk6M6E+Iee2Sw==
Copy this base64 to new file and save file with name: “demoCert.crt”